Table of Contents
- 1. Copyright
- 2. Introduction
- 3. Overview of opsi
- 4. opsi configuration and tools
- 5. Web service / API methods
- 6. Activation of non free modules
- 7. opsi-client-agent
- 8. Localboot products: automatic software distribution with opsi
- 9. Netboot products
- 10. Inventory
- 11. opsi-server
- 12. Security
- 13. opsi-backup
- 14. opsi Extension opsi-clonezilla
- 15. opsi License Management
- 15.1. Conditions for using the opsi License Management extension
- 15.2. Overview
- 15.3. license pools
- 15.4. Setting up licenses
- 15.5. Editing licenses
- 15.6. Assignment and release of licenses
- 15.7. Reconciliation with the software inventory
- 15.8. Licenses usage overview
- 15.9. Service methods for license management
- 15.10. Example products and templates
- 16. opsi WAN/VPN extension
- 17. opsi-server with multiple depots
- 18. Dynamic Depot Assignment
- 19. opsi Software On Demand (Kiosk-Mode)
- 20. opsi extension User Profile Management
- 21. opsi-Nagios-Connector
- 22. opsi Installation on Shutdown
- 23. opsi Linux Support
- 24. opsi with UEFI / GPT
- 24.1. Preconditions for working with UEFI / GPT
- 24.2. Furher remarks regarding the pxe-installation with the opsi-Moduls UEFI / GPT
- 24.3. Introduction
- 24.4. What is UEFI and what is different about it?
- 24.5. What is different about GPT
- 24.6. UEFI Boot
- 24.7. UEFI Netboot
- 24.8. opsi support for UEFI netboot
- 24.9. Installation
- 24.10. Configuration of the DHCP server
- 24.11. Criteria for a good BIOS
- 24.12. Technical details
- 25. opsi extension opsi local image
- 26. opsi Feature SilentInstall
- 27. opsi Setup Detector
- 28. opsi subscriptions
- 29. opsi data storage (backends)
- 30. Important files on the depot servers
- 31. /etc/opsi/opsi.conf
- 32. Registry Entries
- 33. Upgrade of a opsi-server
- 34. opsi localization
The Copyright of this manual is held by uib gmbh in Mainz, Germany.
This manual is published under the creative commons license
Attribution - ShareAlike (by-sa).

A German description can be found here:
http://creativecommons.org/licenses/by-sa/3.0/de/
The legally binding German license can be found here:
http://creativecommons.org/licenses/by-sa/3.0/de/legalcode
The English description can be found here: http://creativecommons.org/licenses/by-sa/3.0/
The English license can be found here: http://creativecommons.org/licenses/by-sa/3.0/legalcode
Most parts of the opsi software are open source.
The parts of opsi that are not open source are still under cofunded development. Information about these parts can be found here:
http://uib.de/en/opsi_cofunding/index.html
All the open source code is published under the GPLv3 and is moved to AGPLv3 while releasing opsi 4.0.3:

The legally binding GPLv3 license can be found here: http://www.gnu.org/licenses/gpl.html

The legally binding AGPLv3 license can be found here: http://www.gnu.org/licenses/agpl-3.0-standalone.html
Some information around the AGPL: http://www.gnu.org/licenses/agpl-3.0.en.html
For licenses to use opsi in the context of closed software please contact the uib gmbh.
The names opsi, opsi.org, open pc server integration and the opsi logo are registered trade marks of uib gmbh.
This manual is written for all who want to gain a deeper insight into the mechanisms and the tools of the client management system opsi ("open pc server integration").
It presents a complete HOWTO for the use of opsi while emphasizing the understanding of the technical background. The decision maker who decides on using opsi as well as the system administrator who works with it will get a solid foundation for their tasks.
Angle brackets < > mark abstract names. In a concrete context any marked <abstract name> must be replaced by some real name. Example: The file share, where opsi places the software packets, may abstractly be noted as <opsi-depot-share>. If the real fileshare is /var/lib/opsi/depot, then you have to replace the abstract name by exactly this string. The location of the packet <opsi-depot-share>/ooffice becomes
/var/lib/opsi/depot/ooffice.
Example snippets from program code or configuration files use a Courier font, with a background color:
depoturl=smb://smbhost/sharename/path
Tools for automated software distribution and operating system installation are important and necessary tools for standardization, maintainability and cost saving of larger PC networks. Normally the application of such tools comes along with substantial royalties, whereas opsi as an open source tool affords explicit economics. Expenses thereby arise only from performed services like consulting, training and maintenance, and perhaps from low Co-funding rates if you like to use some of the non free modules.
Although the software itself and the handbooks are free of charge, the process of introducing any software distribution tool is still an investment. To get the benefit without throwbacks and without a long learning curve consulting and education of the system administrators by a professional partner is recommended. uib offers all these services around opsi.
The opsi system as developed by uib depends on Linux-servers. They are used for remote installation and maintenance of the client OS and the client software packets ("PC-Server-Integration"). It is based as far as possible on free available tools (GNUtools, SAMBA etc.). The complete system all together is named opsi (Open PC-Server-Integration) and with its configurability is a very interesting solution for the administration challenges of a large computer park.
opsi is derived from a system, which is in use since the middle of the 90’s with more than 2000 Client-PCs in different locations of a state authority. Since that time it has continuously been adapted to the changing Microsoft operating system world. As a product opsi is now accessible for a broad range of interested users.
You can find an geographical overview of the registered opsi-installations at: http://www.opsi.org/en/opsi-map
The core features of opsi are:
- automatic software distribution
- automatic operating system installation
- hard- and software inventory
- comfortable control via the opsi management interface
- support of multiple depot-servers
- Management of licenses
- MySQL-Backend
- Nagios Connector
- Installation ab Shutdown
- Local Image Backup (Rapid client restore of student computers. For public authorities (e.g. schools) only)
- Linux Agent
- User Profile Management (manipulation Profiles even with Roamin Profiles)
- WAN Extension (Support for clients behind slow connections)
- OTRS::ITSM Connection - via KIX4OTRS by cape IT gmbh
The configuration of opsi requires some data management. All non-server components are using a web service for data exchange with the opsi server. They exchange data via the opsiconfd, and the opsiconfd forwards the data to the backend manager which passes the data into the selected backend.
opsi supports different backends: Backends:
- File based
- MySQL based
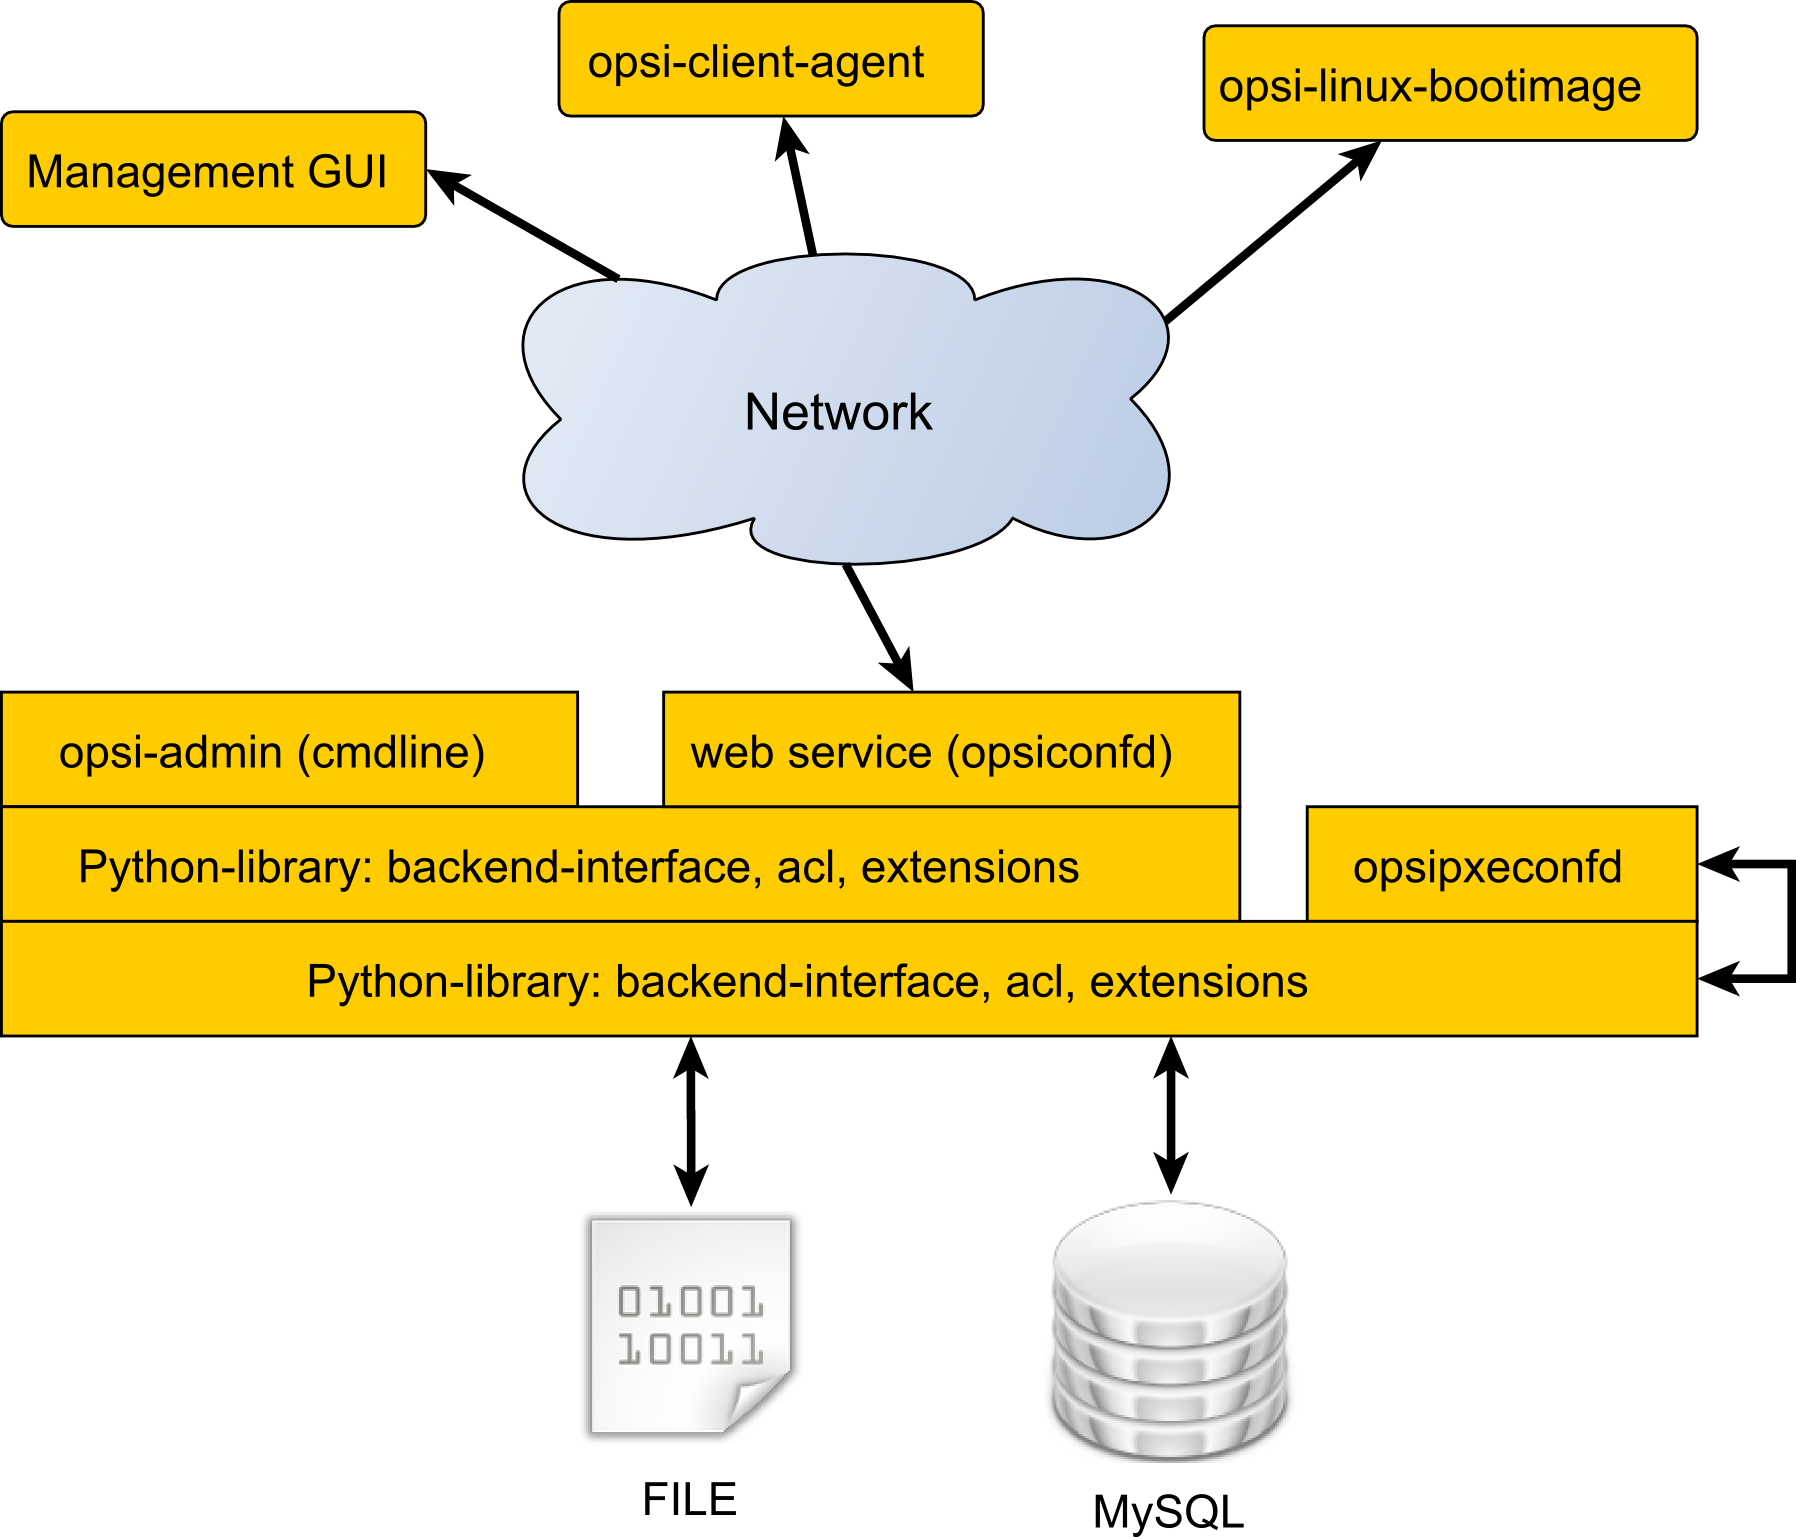
More details you will find at Section 29, “opsi data storage (backends)”.
The in opsi 3 used directory /etc/opsi/backendManager.d isn’t used in opsi 4 anymore.
The configuration files in /etc/opsi/backends define the backends.
Which backend is used for which data, is configured in the file
/etc/opsi/backendManager/dispatch.conf.
The file /etc/opsi/backendManager/acl.conf defines who has access to which
methods.
Below the directory /etc/opsi/backendManager/extend.d there could be files
which defines extended opsi methods. So you will find here for example the files which define the old opsi 3 legacy methods by mapping them to the new opsi 4 methods (/etc/opsi/backendManager/extend.d/20_legacy.conf).
A more detailed reference of these configuration files you will find at
This program is something like the swiss army knife of the opsi configuration. It is used by the opsi installation scripts and can be also called separately for maintanace and repair purpose.
The tasks of opsi-setup are:
- register a opsi-server as depot server
- correct file access rights
- initialize data storage backends
- upgrade backend (from 3.4 to 4.0)
- setup of the MySQL-backend
- edit the default configurations
- cleanup the current backend(s)
- configure the essential samba shares
- configure the essential dhcp entries
The command opsi-setup --help shows the program options:
opsi-setup --help

Usage: opsi-setup [options]

Options:
   -h, --help  show this help
   -l          log-level 0..9

   --log-file <path>          path to log file
   --ip-address <ip>          force to this ip address (do not lookup by name)
   --register-depot           register depot at config server
   --set-rights [path]        set default rights on opsi files (in [path] only)
   --init-current-config      init current backend configuration
   --update-mysql             update mysql backend
   --update-ldap              update ldap backend
   --update-file              update file backend
   --configure-mysql          configure mysql backend
   --edit-config-defaults     edit global config defaults
   --cleanup-backend          cleanup backend
   --auto-configure-samba     patch smb.conf
   --auto-configure-dhcpd     patch dhcpd.conf
The functions and options in detail:
-
--ip-address <ip>
Sets the ip-address for opsi-server and do not resolve by name. -
--register-depot
This option is used to register a opsi-server as depot server to a other opsi-server (opsi-config-server). For details see
--set-rights [path]
Sets the file access rights in all opsi directories:-
/tftpboot/linux -
/home/opsiproducts -
/var/log/opsi -
/var/lib/opsi -
/var/lib/opsi/depot /etc/opsiYou may give a directory name as argument to set only the access rights below this directory.
e.g.
opsi-setup --set-rights /var/lib/opsi/depot/winxppro/drivers
-
-
--init-current-config
initialize the configured backend. Should be always called after changing the file
/etc/opsi/backendManager/dispatch.conf -
The commands:
--update-mysql
--update-file
are used to upgrade the backends from one opsi release to the next one.
For details see the releasenotes-upgrade-manual. -
--configure-mysql
does the first time database setup.
-
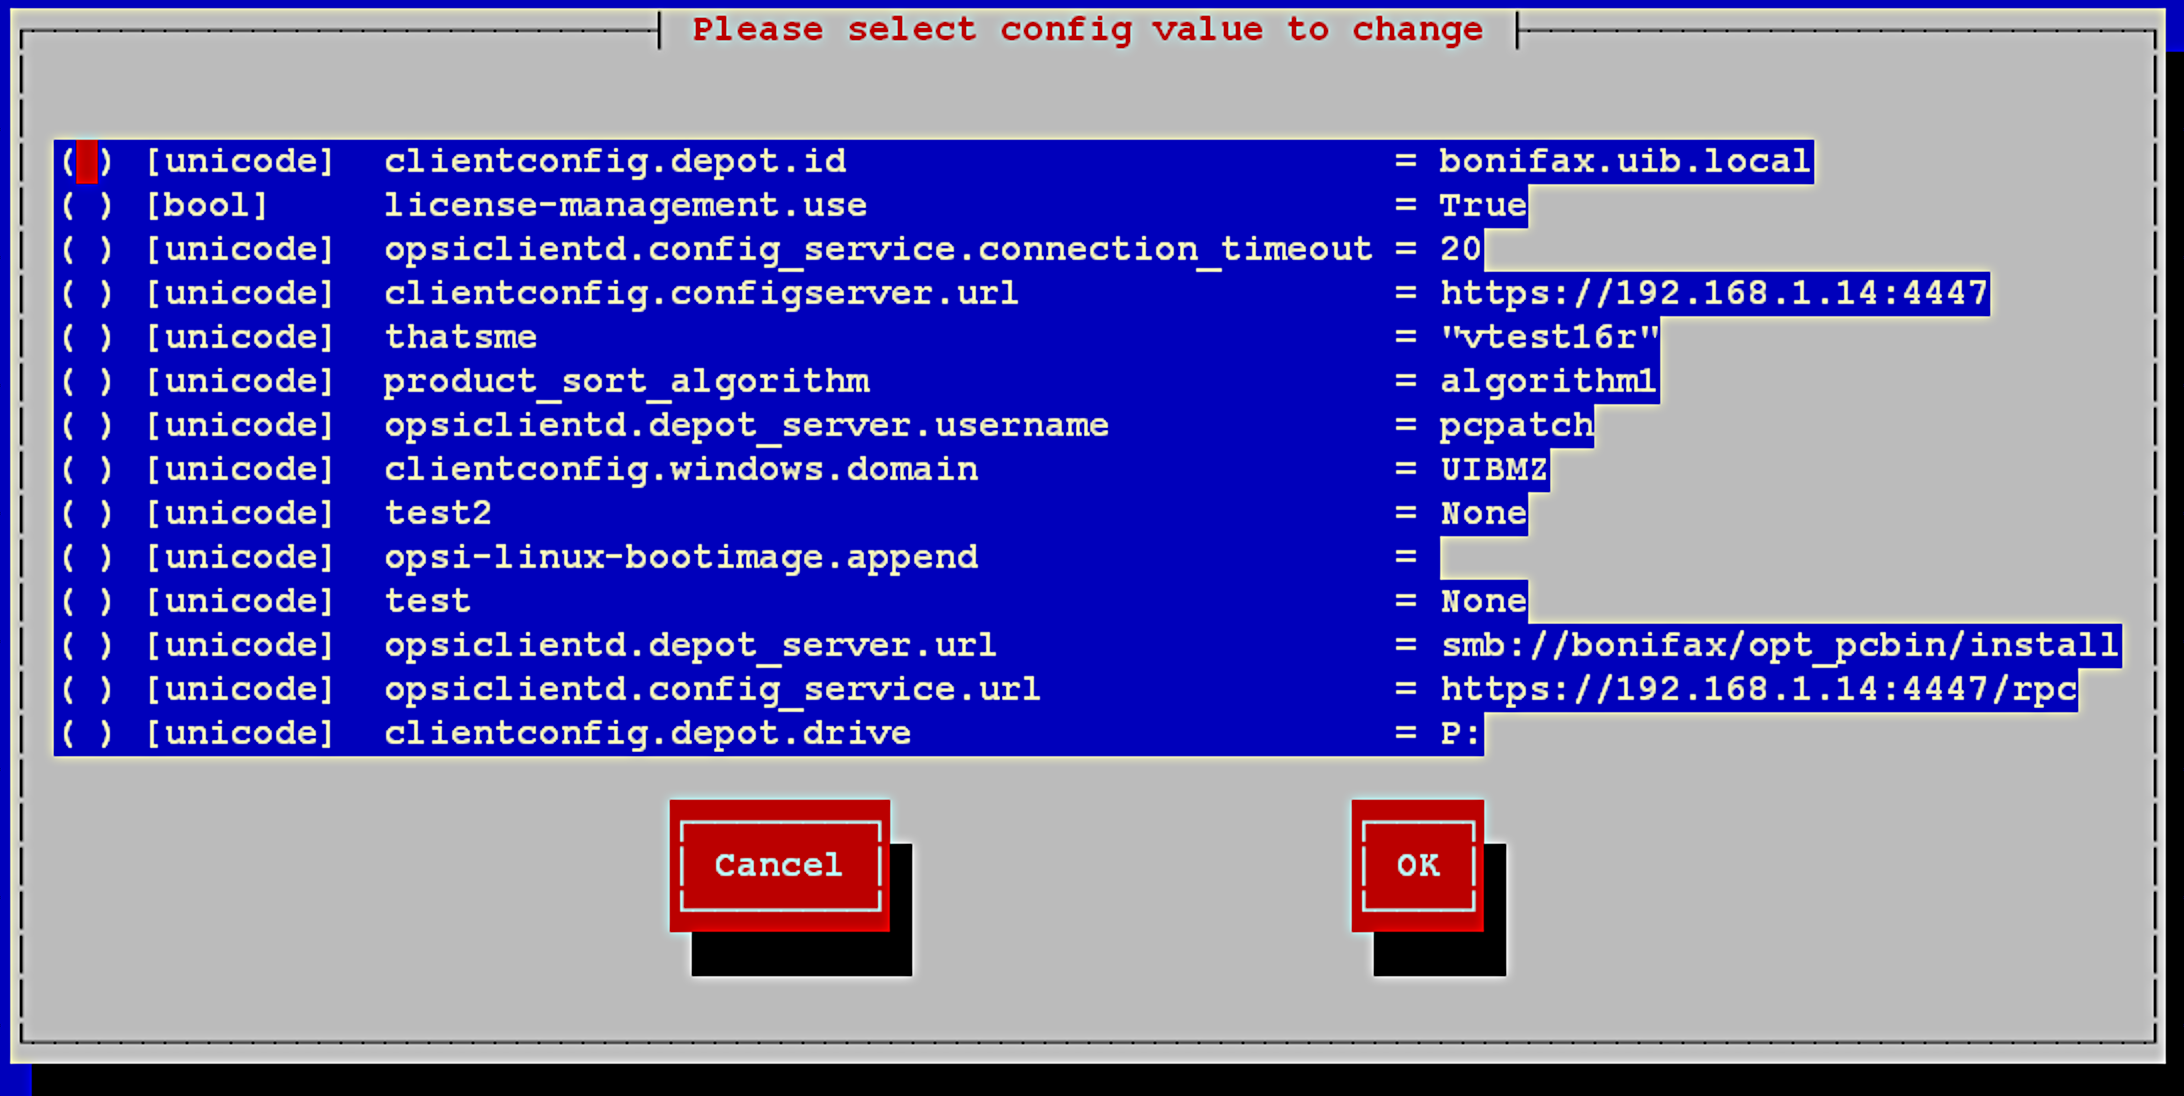
--edit-config-defaults
To edit the default values of some configuration data like in the server configuration of the opsi-configed. --edit-config-defaults
To edit the default values of some configuration data like in the server configuration of the opsi-configed.e.g.:
- clientconfig.depot.id
- The name of the default depot server.
- clientconfig.depot.drive
- The drive letter used for mounting the share with the installation data. You can either select a drive letter or dynamic. With dynamic the client will try to automatically select an drive letter from those not in use.
- license-management.use
- Defines if netboot products should get license keys from license management or from product properties.
- product_sort_algorithm
- Defines the algorithm which is used to calculate the product installation sequence.
-
--cleanup-backend
Check the current backend(s) for entries which are not needed anymore and referential integrity -
--auto-configure-samba
Creates the opsi share entries in the/etc/samba/smb.confconfiguration file -
--auto-configure-dhcpd
Creates the by opsi needed entries in the/etc/dhcp3/dhcpd.conf.
Don’t use this if you not plan to use the dhcpd on the opsi server.
More details in the opsi-getting-started manual
The opsi-configed requires Java 1.7 and a running opsiconfd on the server.
Most times the opsi-configed will be called from the opsi server page with address
https://<servername>:4447
or directly as applet via:
https://<servername>:4447/configed
The opsi-configed can be as well installed as a local application. There the complex security administration of browser based java can be omitted. An opsi-configed opsi package can be found at download.uib.de. The installation produces an entry in the windows start menue.
At the server the opsi-configed is installed as part of the opsi-server installation. It may be started using the menue entry or with the command /usr/bin/opsi-configed.
If the file configed.jar is placed in the current directory, the program can just be started by java -jar configed.jar.
The help option java -jar configed.jar --help shows the available command line options.
java -jar configed.jar --help

configed [OPTIONS]

Options:
     -l, --locale  LOC  Set locale LOC (format: <language>_<country>)
     -h, --host  HOST    Configuration server to connect to
     -u, --user  USER   Username for authentication
     -p, --password  PWD Password for authentication
     -d, --logdirectory DIR Directory for the log files
     -c, --client CLIENT Start with selected client CLIENT
     -g, --group GROUP Start with activated group GROUP
     -t, --tab X Start with selected tab X
     -qs, --querysavedsearch SAVEDSEARCH_NAME Give names of clients on commandline which are produced by this search
      -r, --refreshminutes MIN   Refresh client connect data every MIN (0 = never)
         --help    Show this text
         --gzip  [/y/n] Activate gzip transmission of data from opsi server (default yes)
         --sqlgetrows  Get data by method getRawData where implemented
         --version  Tell configed version
         --loglevel L   Set logging level to L

logging directory not yet set
regularly exiting app with code 0
At login time the opsi-configed tries to connect the opsi server via https. The login is done with the given parameters opsi server[:Port] (default port 4447 – opsiconfd) and the User/Password of the opsi-config-server account. For a successful login the provided user has to be a member of the unix-group opsiadmin.
The gzip compression in HTTP protocol reduces the amount of data to be transferred at the expense of an extended processing time, this is due to the fact that the data must be compressed and decompressed. It has been determined that the reaction times tend to be shorter without compression in the local network, as the effects normally surpass the prolonged processing time. For transmissions over the WAN, it tends to be the opposite. Normally little difference is noticed in WAN connections, but usually necessary, and that is why the Gzip option is enabled by default.
The feature to check which clients are reachable runs in the background and shows the results in the client table. It can be enabled from the login screen mask or via command line parameter. The default refresh interval is 0 min (= deactivated).
You may copy the selected entries from nearly every section of the opsi-configed to the clipboard using the standard key combinations (Strg-Insert, Strg-C). This may be used to transfer interesting data to other programs. For the most tables you may also use Drag & Drop to copy the data to programs like Excel.
Note
Since Java version 1.6.24 Oracle has deactivated the Copy & Paste to and from the system clipboard from a not signed Java Applet for security reasons. The opsi configed applet is delivered with signature since version 4.0.1.11, and has now full system access.
To switch between the different usage modes of the opsi-configed, use the buttons in the upper right corner. Since version 4.0.4, there six buttons.

The first three buttons allow to change the editing target of the main window: client configuration, server configuration. On the other hand, each of the buttons "group actions", "product actions" and "licence management" starts a special window for managing the specific objects or actions.
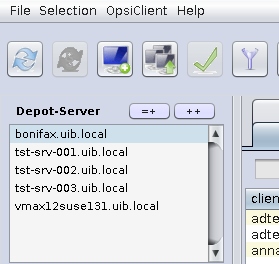
All opsi-depotservers integrated with your server are listed in the upper left corner of the opsi-configed. By default the depot on your opsi-config-server is selected and the clients belonging to this opsi-depot are shown.
You can select multiple Depots at the same time and edit their clients together. However, only if the selected depots are synchronized with each other. Trying to edit clients from asynchronous depots together will be rejected with an appropriate warning and the corresponding error message.
As of version 4.0.5, there is no need to carry out a complete data-reload when changing to a different depot-server, that means, when you select a depot its data is loaded immediately. In addition, there are the following buttons:
- (=+) : Marks all depots with identical product stocks.
- (++) : Marks all depots (you can also use Ctrl-a)
After a successful login the main window pops up and shows the tab Client selection. This tab shows a list of known clients from the selected opsi-depot resp. the clients which are selected using the treeview control on the left side of the opsi-configed.
Since version 4.0.4, the opsi-configed saves on the local machine, for the current user, the current depotserver and group selection. If the opsi-configed is restarted, work may continue at the point where it had been.
Observe that group selection is preserved when changing depot selection. In order to see all clients in the other depot the group selection has to be changed appropriately.
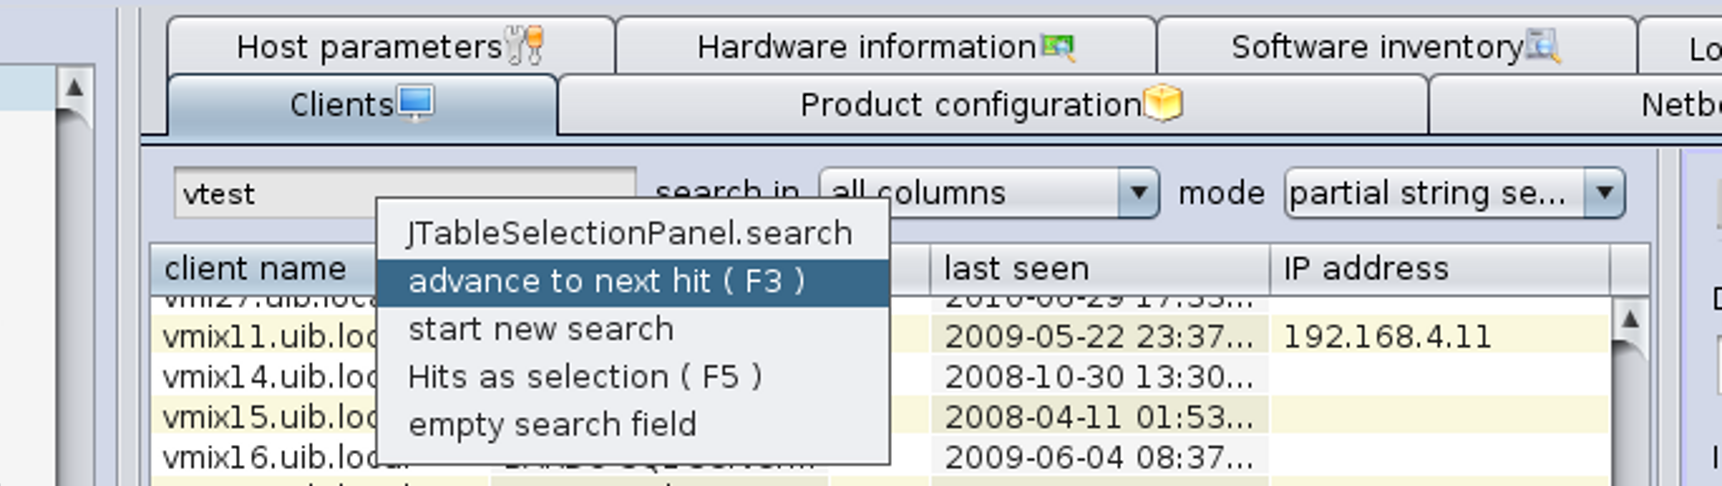
You may select a line of the list not only by manual scrolling and selecting but also by a String search. This requires that you enter a String into the search field at the top of the list In der Liste kann eine Zeile auch über die Suche nach einem Stringwert ausgewählt werden.
How the search works is determined by the selected elements in two drop down lists:
Via field selection you decides if
- all fields (more precisely, all fields that are occuring as columns) are searched (default), or
- only one field (and which one) is searched.
Concerning the method of search you have to choose if a hit is defined
- as occurrence of the search string anywhere in a field value (partial String search, default),
- as occurrence of the search string at the beginning of a field value
- as a pattern match in a regular expression search where the search string serves as the pattern (for experts, based on the java pattern matching).
The enter key leads to the next search hit. More selection functions based on String search are shown in the context menu of the search field.
The clients list has per default the columns client name, description, on, IP address and last seen.
- client name is the full qualified hostname which is the client name including the domain name
- description is a free selectable description which you can edit in the right top part of the window
- On shows after clicking the button Check wich clients are connected the result of this query. This feature runs in the background and shows the results in the client table. It can be enabled from the login screen mask or via command line parameter. The default refresh interval is 0 min (= deactivated).
- IP address shows the IP number to which the opsi server resolves the client name.
- last seen shows the date and a time of the last client connect to the opsiconfd web service
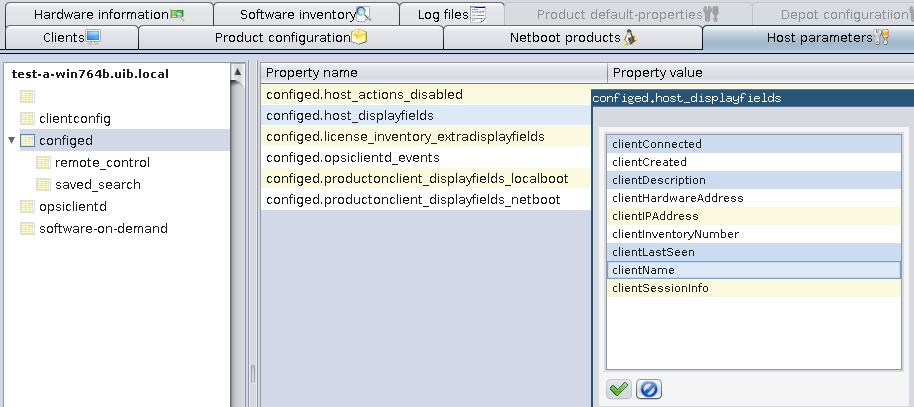
Some columns are deactivated by default:
- session infos (data as retrieved from the operating system running on the specific client)
- Inventory No (displaying some optionally entered data)
- created (date and time of client creation)
- opsi mac address (hardware address of the client as used by opsi)
You may activate these columns using the context menu. The configuration which columns are activated may be changed using the entry configed.host_displayfields in the server configuration.
Adding the column session infos enables the button "request session infos from all clients" in the button panel.
When this button is clicked the opsiconfd tries to connect to all clients and to retrieve data of the active user sessions. From the result, the account names are shown in the column session infos. Instead of using the button you may start the request only for the selected clients via the context menu or the main menu entry OpsiClient. By this, waiting for the network timeouts is avoided.
Since the search function for the client list works (if not configured otherwise) on all displayed columns you may now find out which is the client belonging to a logged in user (with known account name).
To sort the clients by a certain column click on the top header of that column.
You can select one or multiple clients to work with. The client view can be restricted to the selected clients by clicking the funnel icon or from the menu by Grouping / Show only selected clients.
A selected client group can be saved with the icon Save grouping or from the menu by Grouping / save group with a free selectable name.
You can use the mouse to add the selected clients to an existing group (by dragging them to an existing group which is displayed in the tree view).
In the client selection dialog (as called via menu Selection / Define search) clients can be selected using a variety of criteria based on their configurations.
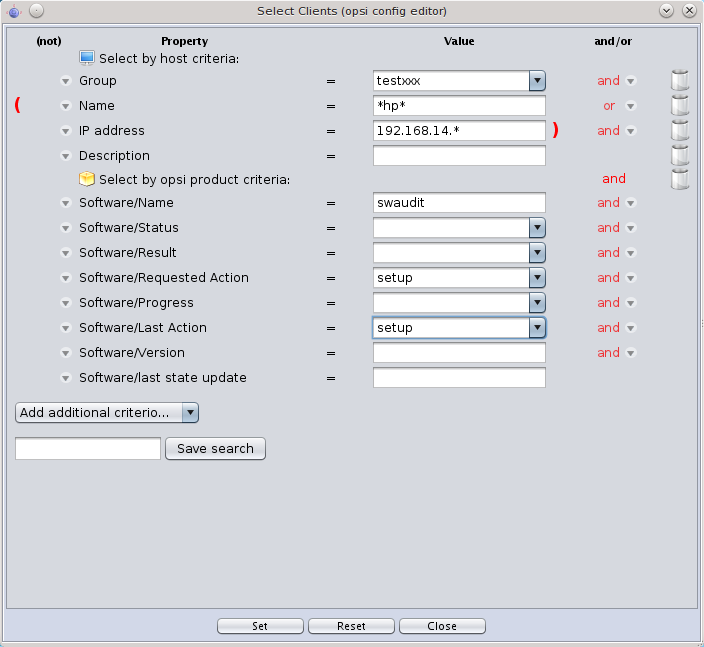
E.g., it is possible to search for opsi installed products as well as software as found by the opsi software audit. You may as well search for PCs satisfying certain hardware conditions. Criteria may be combined by logical and or or operations and may be negated. Search strings can be given as fixed strings combined with asterisks * as wildcard symbols.
Search definitions can be saved and then again used via the menu item Selection/Use saved search definition.
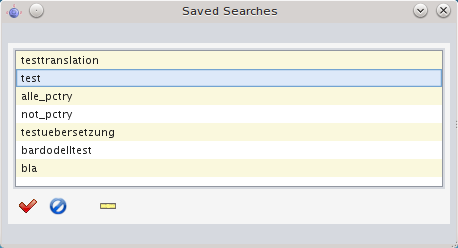
It is also possible to run a saved search from the command line when the opsi-configed editor is started. By including the flag "-qs" and the name of the saved search, the configuration editor will start with the saved search results. If the name is omitted, then a list of available searches will be displayed.
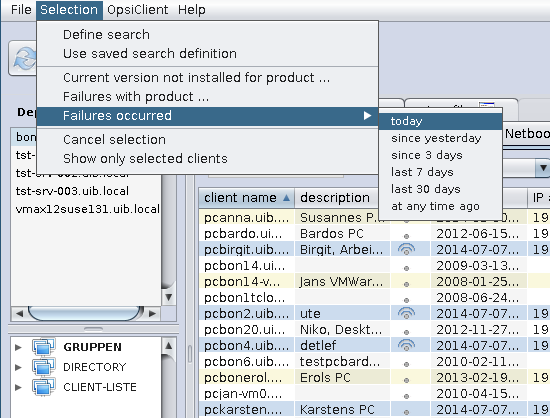
To detect failed installations, the menu item Selection offers Failures with product and Failures occurred (today, since yesterday, …), since version 4.0.5 .
Choose the first setting to get a list of all products. If you select a single product, all clients will be shown, where the installation of this product failed.
When choosing for instance Failures occured - today, all the clients will be marked, where an product installation failed today.
Since opsi 4.0 it is possible to manage groups and clients using a tree view control on the left side of the opsi-configed. A second enhancement is the possibility of hierarchical groups (groups in groups).
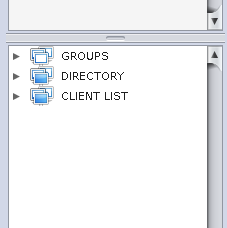
The tree view control has three base nodes "groups", "directory" and "client list". Every known client is alwas in the group client list.
Additionally a client may be in one or more groups. You may build up different group trees which may
represent different ways to organize them, according to your own criteria. Like administrative structure, hardware or typical software inventory.
If a client needs to be in one or more groups use the base node groups.
For clients that need to be exclusively in one group, use the directory node.
If you select a client, all groups where the client belongs will get colored marked icons.
By a click one a node (or a group) all clients beyond this node will be shown in the Clients tab, but none of these clients is selected for processing.
By a click one a client, this client will be shown in the Clients tab and selected for processing. You may also use this way to change the selected client while you are in a other tab like product configuration without coming back to the clients tab.
You may use Ctrl-click and Shift-click to select multiple clients. This tree view control show the groups which are created according the chapter
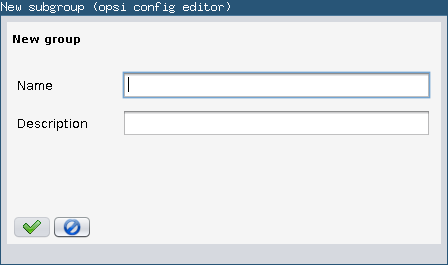
You may also create groups by using the context menu above ALL or any existing group.
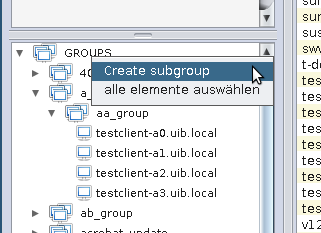
You will be asked for the new groups name.
A group can be populated with clients using Drag&Drop by
- copying clients from the Clients tab to the group in the tree view (left mouse button)
- copying clients from the tree view control below the node ALL to group in the tree view (left mouse button)
- moving clients from a group in the tree view control to a other group in the tree view (left mouse button)
- copying clients from a group in the tree view control to a other group in the tree view (Ctrl-left mouse button)
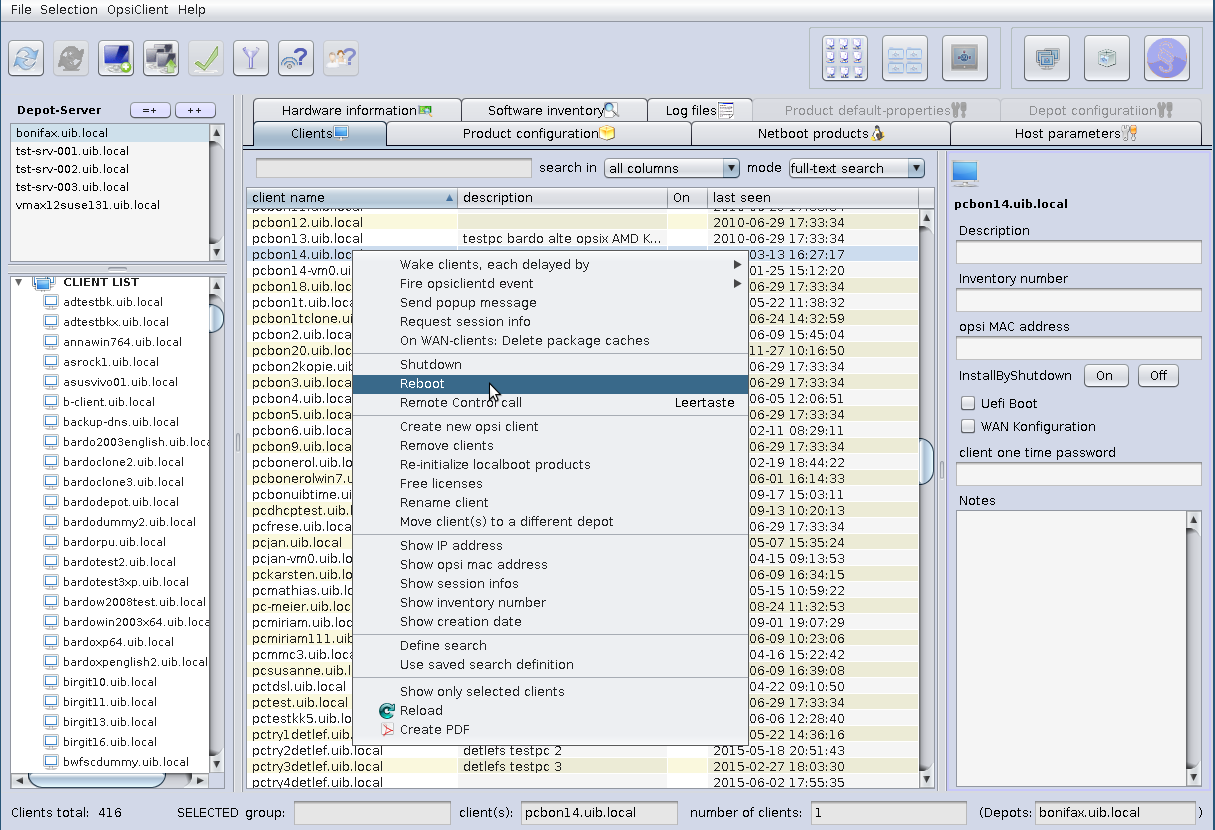
Using the menu OpsiClient or the context menu in the Clients tab you may choose from a lot of client specific operations
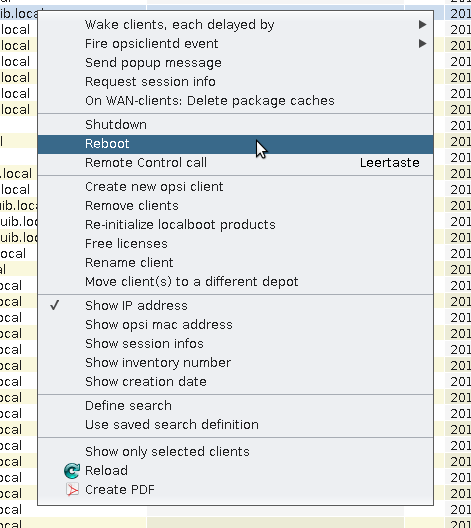
Choosing this menu entry, you will send the selected clients a WakeOnLan signal. Since version 4.0.4 you can choose via submenu if all selected clients get the signal at once or with a certain delay.
This menu entry is used to send to the opsi-client-agent on the selected clients a command to fire the event which is selected in the submenu. The standard event is "on demand" which means the demanded action is started at once. Be aware that this may have the effect that the client is rebooting without any warning.
To incorporate additional events (which should be configured in the opsiclientd.conf) into the submenu you have to edit the config configed.opsiclientd_events via the tab (server) host parameters.
All messages will be shown on the active desktop. If the client isn’t reachable, you will get a message.
What happens exactly if you fire the event on_demand can be configured in the event on_demand configuration.
Choosing the menu entry Show popup message you will get a small edit window where you can type in your message.
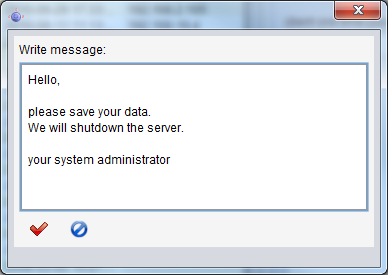
By clicking on the red tick you will send the message to the selected clients.
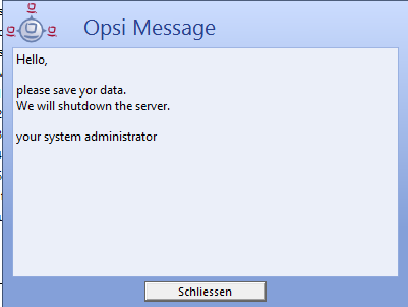
At the selected clients a message window will appear.
On WAN clients there are occasional problems with package cache synchronization. The function resets the cache.
The option Remote Control Software call in the client context menu as well as the client main menu (since opsi-configed version 4.0.1.11) is very powerful. It can be used to use any command that the operating system offers, parametrized e.g. by the client name.
As an example there are configurations automatically generated which can be used to send a ping to the selected client: one
ping command that works in Windows environment and one command that requires a Linux X environment. Please observe:
opsi-configed calls obviously the command in its environment, i.e., we need the Linux command when the opsi-configed
is running in Linux.
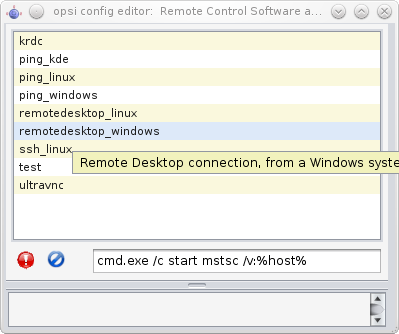
The selection window has three parts. The upper part lists the names of the existing commands. It follows a line, which shows the selected command and offers the chance to edit it (if this is allowed). Additionally, the line contains the buttons to execute or abandon the action. The third text area of the window captures any messages that are returned by the operating system when calling the command.
These calls offer a quasi infinite range of opportunities. For example, a command can be configured to open a Remote Desktop connection to the selected client (if it allows such connections). On a Windows system, such a command is
cmd.exe /c start mstsc /v:%host%
In a Linux environment the following command can be used:
rdesktop -a 16 %host%
In these examples serves %host% as a variable, which opsi-configed automatically replaces
by the value for the selected host. Other variables that can be analogously used in the commands are:
-
%ipaddress% -
%hardwareaddress% -
%opsihostkey% -
%inventorynumber% -
%depotid% -
%configserverid%
If the command is marked by the additional server configuration entry editable as true,
then the command line allows ad hoc editing. For example, you may supply a requested password or vary
the command as needed.
Caution
If there is some command declared as editable then in fact any program addressed at the client computer can be called by changing the editable command.
If more than one client is selected the command will be executed in a own thread for each client.
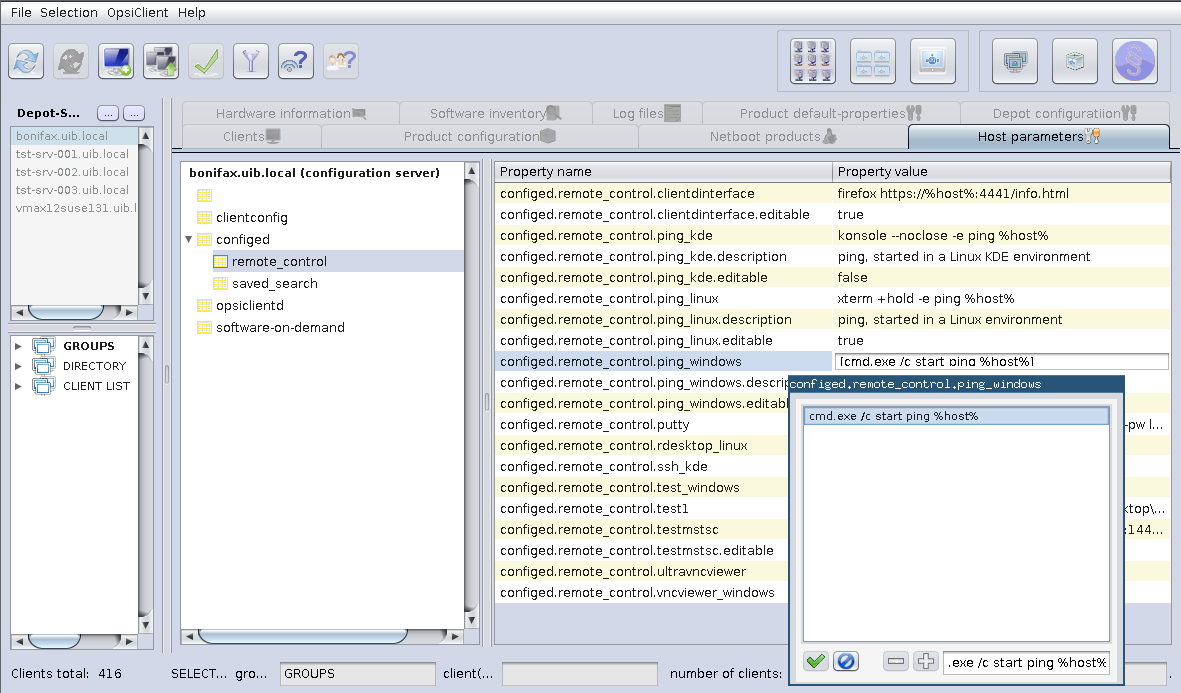
The list of remote control commands is editable via server configuration entries (cf. the section called “Host parameters at client and server configuration”).
To define a command example, at minimum an entry configed.remote_control.example
(or configed.remote_control.example.command) must be generated. The value of property has to be the command
(in which the variables %host%, %ipaddress% etc. can be used). Additionally, an entry configed.remote_control.example.description
can be defined. The value of this entry will be shown as tooltip (if not existing, the command itself will serve as tooltip content).
Furthermore, a Boolean entry configed.remote_control.example.editable can be added. If its value is set to false the command
cannot be edited in the selection window.
You may send the selected clients a shutdown or reboot signal. You have to confirm this command at the opsi-configed.
Caution
If the client received the signal, it will going down with out any more questions.
You may delete the selected clients from the opsi-server.
If you choose to create a client, an input mask opens. There you enter or confirm the required data – client name without domain specification, domain name, depot server name. You may add a textual description for this client and notes on this client.
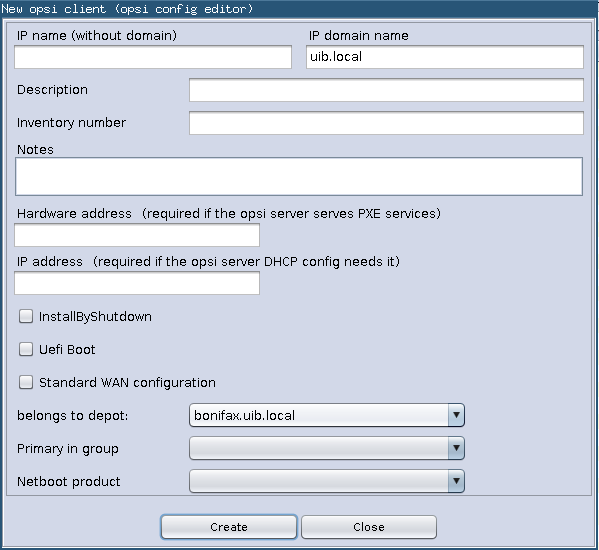
The mask also contains fields for an optional declaration of the IP-number and the ethernet (MAC) address of a client. If the backend is activated for the configuration of a local dhcp-server (which is not the default setting), this information will be used to make the new client known to the dhcp-server. Otherwise the MAC address will be saved in the backend and the IP-number will be discarded.
When creating clients you can directly for the new client specify to which group it should belong, as well as which netboot product should be directly set on setup. In addition, you can activate directly the Install by shutdown, UEFI Boot and the (standard) WAN configuration from the beggining. These settings can easily be made in the Hosts-List. These configurations are only available since the version 4.0.5.8.1 .
Since opsi 4.0.4 it is possible to disable the options for creation and deletion of an opsi client. This is used if the client creation should be managed by a different service, eg. the UCS service.
For the configuration of these options, a host parameter (config) is provided. It is named configed.host_actions_disabled and
offers the list values
-
add client -
remove client
(multiple selection allowed). The default is the empty selection meaning that no option is disabled.
The default setting can be changed so that adding and removing clients from the opsi-configed is disabled:
opsi-admin -d method config_createUnicode "configed.host_actions_disabled" "Disable host actions" ["add client","remove client"] ["add client","remove client"] false true
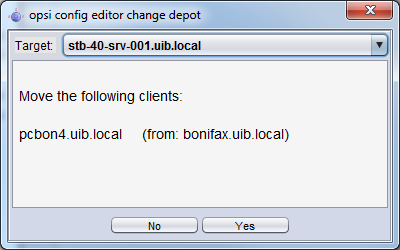
You may rename a selected client, you will be asked for the new name.
Moving a client to a different depot-server. If clicked the following windows appears with a list of existing depot-servers
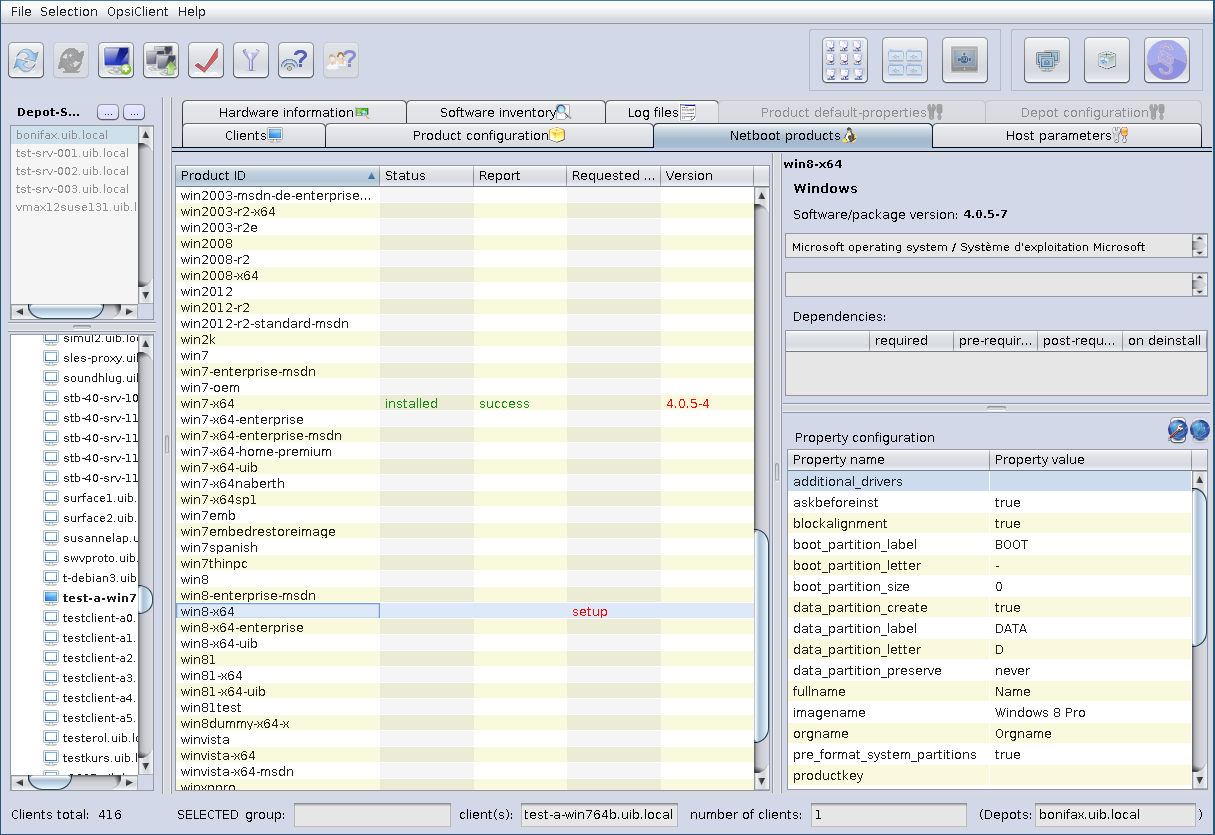
Switching to the tab Product configuration you get a list of available software packets with its installation status and action status for the selected clients.
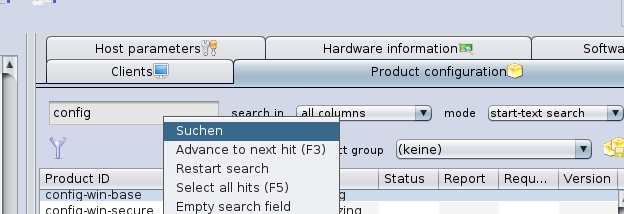
Since opsi 4.0.4 a search function is added.
ith the search function products can be searched by product names and (if desired) in combination with special values in the fields of the product table (like searching the client table). Therefore a search string can be entered. The search starts immediately and the first matching line is marked . If there is no match to be found (or characters are removed from the search string), the first line of the table is marked.
The context menu offers some more options.
To get a better overview, activating the filter function reduces the product view to the selected products only. The selections stays active until the filter is disabled by clicking the filter button again.
If there is a different status for the selected clients this will be marked grey (undefined). The list of the selected clients is shown at right on top.
You can also sort the product list by clicking at the column header.
This are the columns:
- Status is the last announced state of the product and can hold the values installed, not_installed, unknown. The table shows an empty cell if the value is not_installed to improve the usability of the view. The cell becomes grey if a multitude of selected clients is selected and does not share a common value (grey coloring represents the pseudo value mixed).
- Report informs about the progress or the result of the last action using the pattern <action result> (<last action>). During an installation process there may be indicated installing, afterward e. g. failed(setup) or success (uninstall).
- The column Requested action holds the information which action is to be executed. Possible values are none (shown by an empty cell) and the action types for which scripts are defined in the product package (possible values are setup, uninstall, update, once, always, custom).
- The field Version displays the software version number combined with the opsi package number of the software package installed on the client.
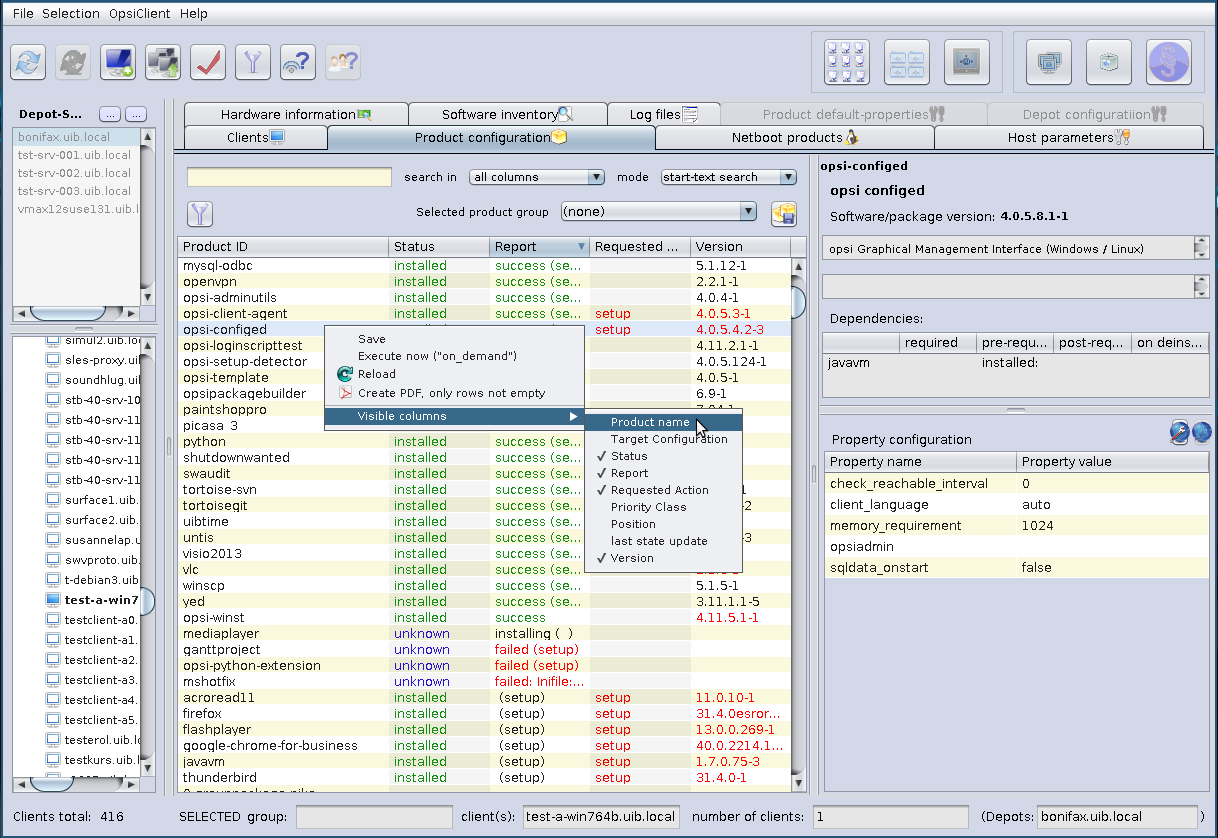
There are two more columns which can be activated via the context menu:
- Priority class displays a priority value that is assigned to the product (highest priority +100, lowest priority -100). It influences the product order when products are installed (by virtue of the product_sort_algorithm)
- The position column displays the product ordering forecast for installation sequences.
Choose a software product to get more product information in the right part of the window like:
- Complete product name: full product name of that software package.
- Software/package version: software version-version of the opsi package of the software package (specified in the opsi installation package).
- Product description: free text to describe the software.
- Hints: free text with advices and caveats for handling the package.
- Requirements: A list of other products which the selected product (say A) depends on combined with the type of dependency: required means that A requires the other product (B), but it doesn’t matter whether B is installed before or after A. pre-required means B has to be installed before A. post-required means B needs to be installed A. on deinstall means this action should take place if A be de-installed.
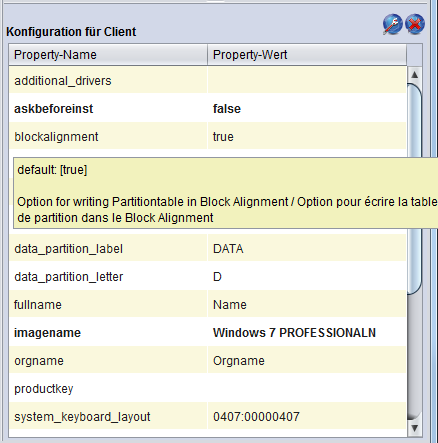
- Configuration for client: It is possible to define additional properties for a product. Their values can be evaluated in a setup script to configure the product per client. Because of the intrinsic complexity of a property definition there is a specific GUI element for displaying and editing the table of properties:
A property table is a two-column table. In each row, the first column contains a property name, the second column displays the assigned property value(s).
It may be configured that a tool tip is displayed showing some information on the meaning of the property and the default value.
If you click at a value a window pops up: the list editor for this property. It shows a value resp. a list of preconfigured values with the current value as selected.
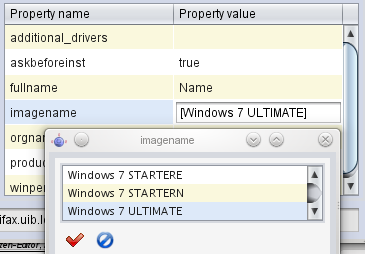
Clicking a new value changes the selection.
If the property value list is editable (new values may be added to the existing list resp. existing values changed) the window comes up with an edit field for the new or modified values.
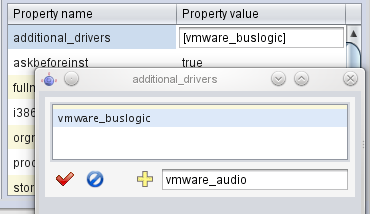
The most comfortable way to get a new value that is a variant of an existing one is double clicking the existing value in the list. This copies it into the edit field where it can be modified.
As soon as the edit field contains a new value – not yet occuring in the value list – the plus button is activated by which the new value can be added to the list of values.
If multiple values are allowed – as it should be e.g. for the property additional drivers – a value may be added to the set of selected values by Strg-Click . The very same action removes the value from the set. The minus button (since opsi-configed version 4.0.2) clears the selection completely.
When the list has been edited the green check mark turns to red as usual in the opsi-configed. Clicking it takes the new selection as new property value (and finishes editing). Clicking the blue cancel button stops editing and resets the original value.
The products on tab Netboot products are mainly used to install the client OS (operating system) and are listed and configured like the products on tab Product configuration.
If for the selected client(s) a netboot product is set to setup, the correspondent bootimage will be loaded and executed at the next client reboot.
This is usually done to initiate an OS installation or any other bootimage task (like a memory test etc.)
With this tab you get the last detected hardware information for this client (only available if a single client is selected).
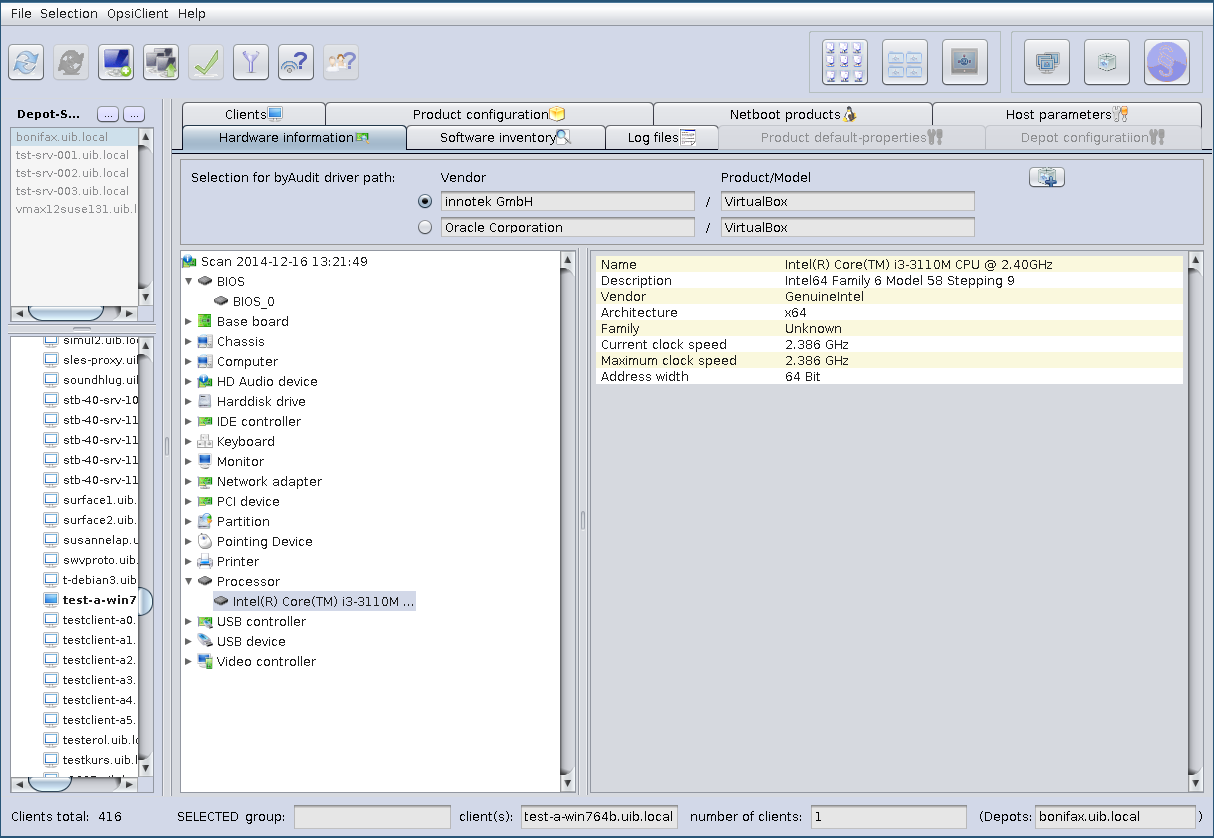
The two offered byAudit driver paths are composed of the manufacturer and the product or the model, which are respectively read from the computer and the mainboard. By clicking the right button to upload a driver, a new window will be displayed to add more settings.
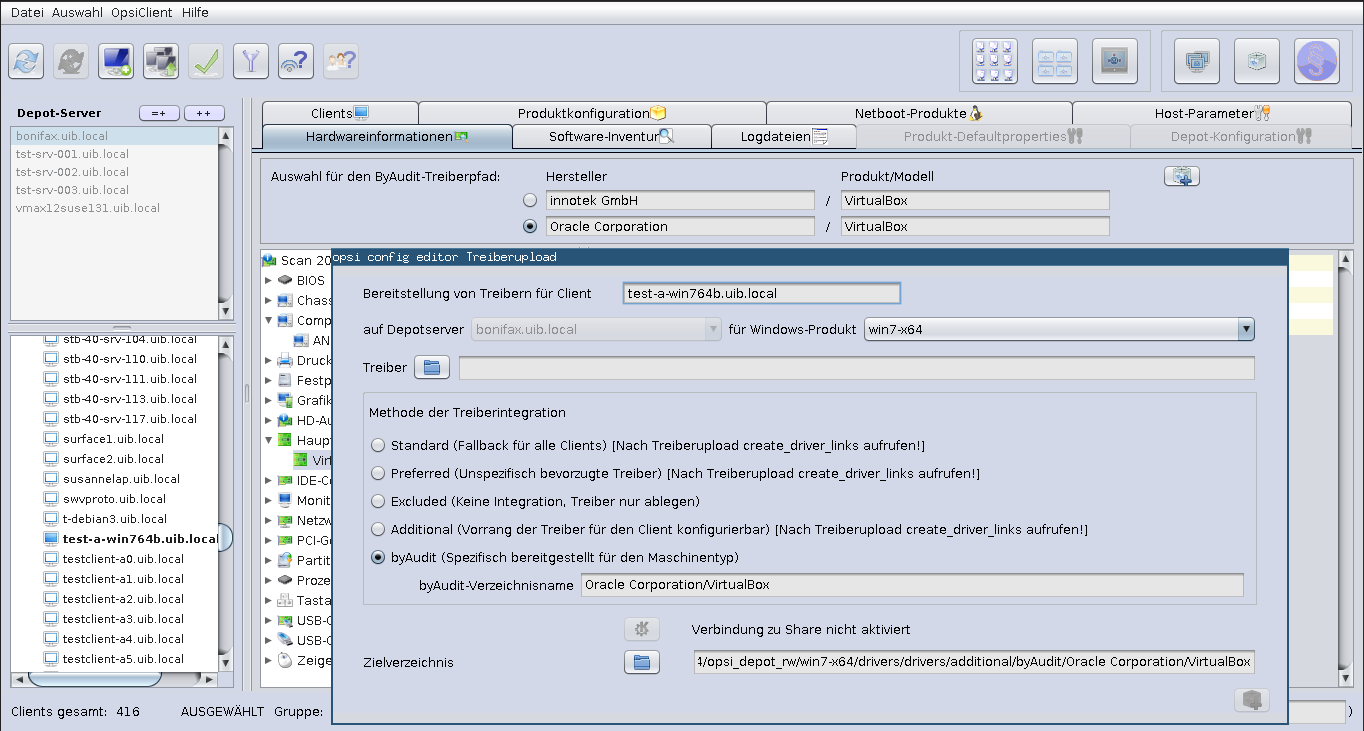
If you open the opsi-configed on a Linux system, it is not directly possible to carry out a driver upload because the connection is carried out via a Share. This needs to be made manually. However, the methods or directory structures are an essential aspect of the drivers integration for linux users as well as for windows users.
Without further settings, the driver upload of a Windows computer, works only if the connection to the Share is enabled.
Among other things, information must be given in a new window, like to which Windows product should the driver be prepared, which drivers are to be uploaded and with which method or the directory in which the driver integration takes place. The target directory is accordingly changed with the selection of another method. The previously selected byAudit driver path can be found again by default in the selected method byAudit, that specifically integrates the selected driver for the type of machine.
Following methods and directories are possible:
-
standard: For the drivers which are found in
./drivers/drivers/, the driver will be matched to the corresponding hardware using the PCI IDs (i.e. USB- or HD_Audio-ID) in the description file, and then integrated into the Windows setup as needed. It may be the case that the drivers found by opsi in this location do not necessarily work with your hardware. For the drivers which are found in./drivers/drivers/, the driver will be matched to the corresponding hardware using the PCI IDs (i.e. USB- or HD_Audio-ID) in the description file, and then integrated into the Windows setup as needed. This is the fallback directory for all clients. -
preferred: In the case that you have to support special hardware, and you can find the additional drivers from the manufacturers, then use the following procedure to include them in the installation. Place the additional drivers in their own directory under:
./drivers/drivers/preferred(the naming and depth of the directory structure is not important). Drivers that are found in the directory./drivers/drivers/preferredwill be integrated into the Windows setup, assuming that opsi finds a suitable match to the drive hardware based off of the PCI IDs (i.e. USB or HD_Audo-ID) in the description file. Problems can occur when the same PCI ID of the drivers is found inpreferred. In this case, a direct mapping of the drivers to the devices is needed. -
excluded: It could be that manufacturers include different drivers for different operating systems (i.e. Vista vs. Win7) or different configurations (ie. SATA vs. SATA RAID). The
create_driver_links.pycannot make this distinction. If you think the wrong driver has been installed, then move the driver to the drivers/exclude directory and then callcreate_driver_links.pyagain. Drivers in the directory drivers/exclude are not used during the integration. -
additional: When installing additional drivers based on the PCI-IDs or USB-IDs, they should be installed under the directory
./drivers/drivers/additional(where name and depth of the directory structure is not important). You can map one or more drivers to a client using the Product-Property additional_drivers and a list of driver directories under./drivers/drivers/additional. The directories specified by additional_drivers are searched recursively until all drivers are found. This method can be used to make a specific directory based on the client type (i.e. dell-optiplex-815). -
byAudit: The previously described mechanisms that directly map drivers to devices is automated since the 4.0.2 Release 2 of opsi. Opsi will search the directory
./drivers/drivers/additional/byAuditfor a director name that matches the field Vendor that was given in the Hardware Inventory. This Vendor directory will be search for a Model directory that corresponds to what is seen in Hardware Inventory. If this directory is found, then it will be manually assigned to the product property additional_drivers. The directory name byAudit is case sensitive. The directory names for Vendor and Model are not case sensitive (Dell and dELL are treated the same way).
Some manufacturers use model names that are very adverse to this method, since some special characters such as / are not allowed to be used in file or directory names. An example for a model name could be: "5000/6000/7000". A directory with this name is not allowed because of the special characters. Since the third Service Release from opsi 4.0.3 the following special characters: < > ? " : | \ / * were replaced internally with an underscore "_" character. With this change can the above example be replaced with: "5000_6000_7000" the directory will automatically be shown, even though the directory structure information in the hardware inventory are not visually the same.
Important
After the driver upload please execute create_driver_links in the opsi-depot-server.
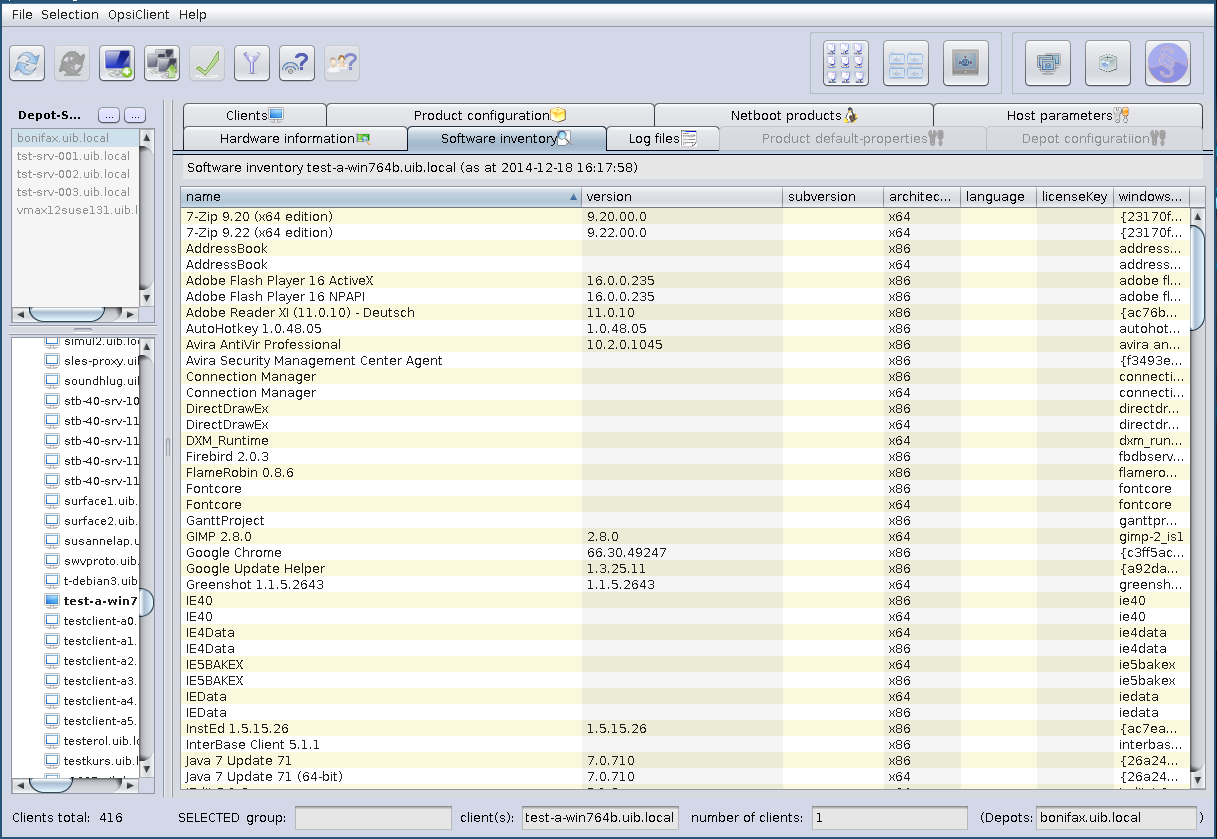
With this tab you get the last known software information for this client (only available if a single client is selected).
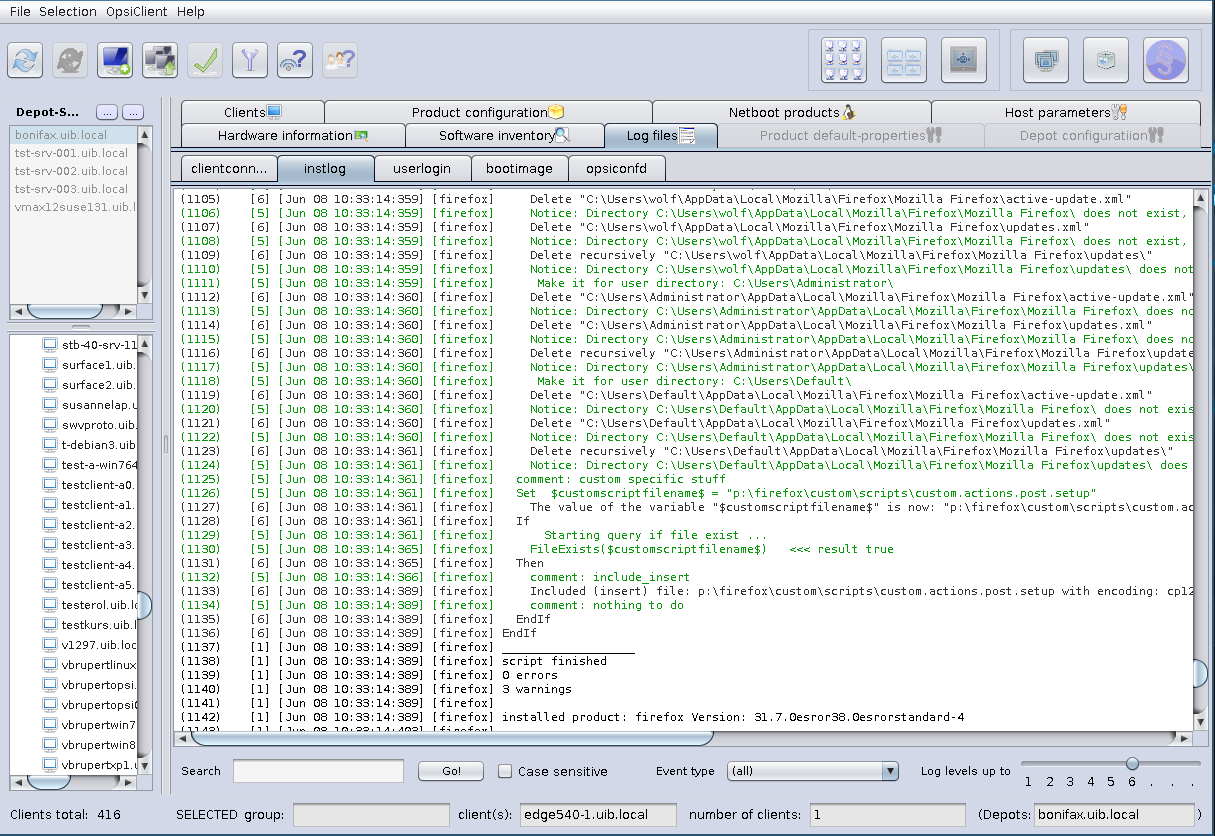
The client specific log files are stored on the server and visible with the opsi-configed via the Tab log files.
The level up to which the log lines are seen can be chosen by a slider (wheel mouse enabled), so that errors can be easily found.
It’s also possible to search in the log file (to continue the search press F3 or n).
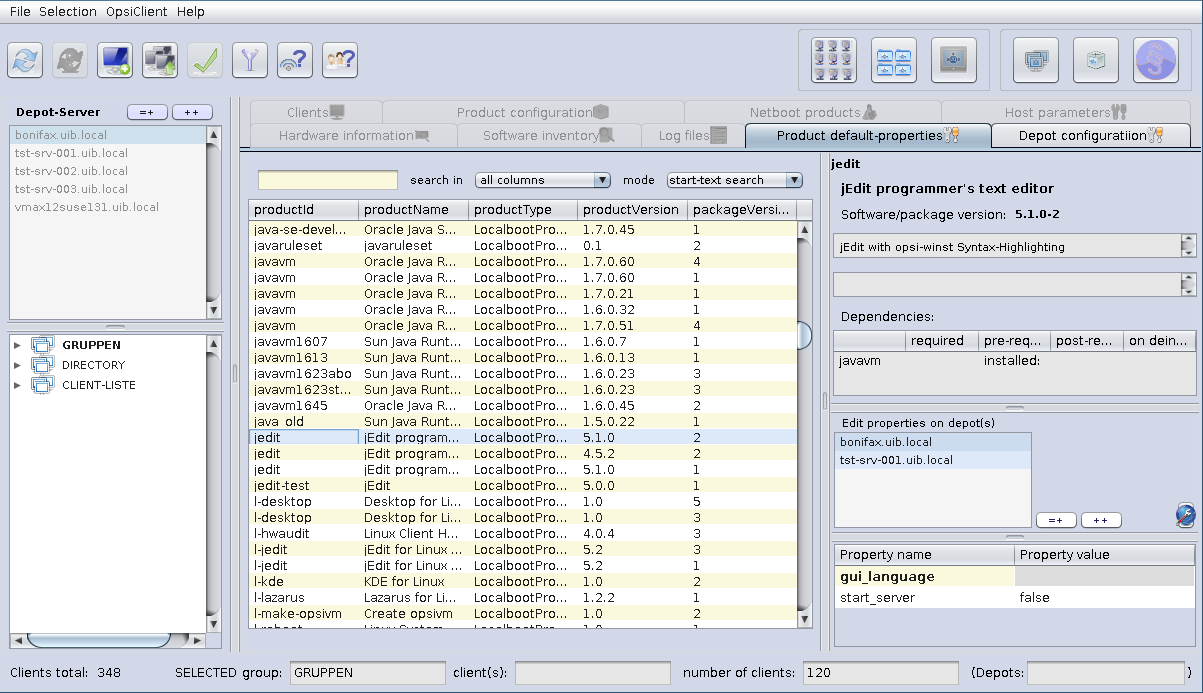
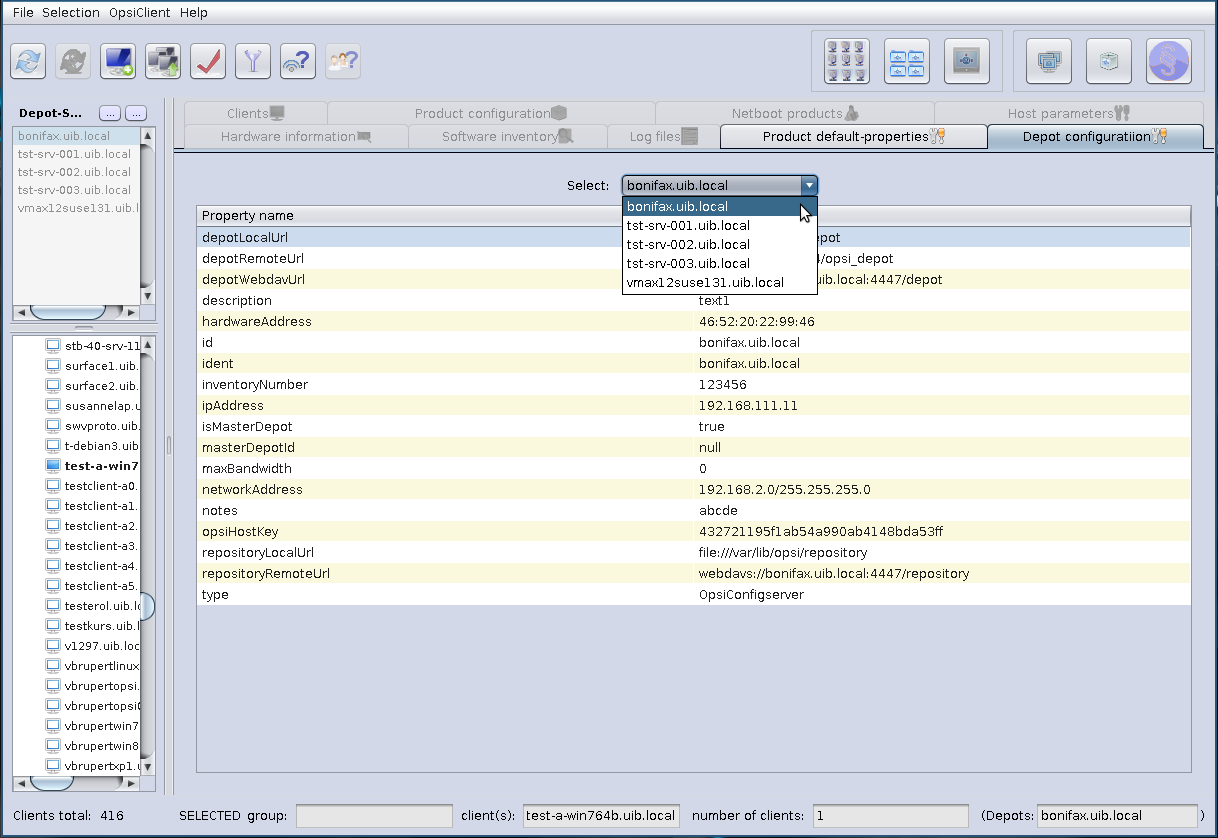
To change the default values of the products for one or more opsi-depots, there is a tab, called Product default-properties.
This is only available if you select Properties of depots (which is the second button at the top right hand side).
In the main table, all products are listed with the product version as well as the package version.
If a product is selected, at the top of the right side (as is customary for the client product configuration) general information about the product packets is shown. Below is the list of all depots, that have installed the selected product. The table below with the property keys and values is also known from the client product configuration.
You can select a single depot or multiple depots to change the default values
(which are also called the depot values) of the product.
As the default, all available depots are preselected. With the usual shortcuts
(Ctrl-a, Ctrl-Click or Shift-Klick) multiple or all clients can be selected.
If the property value is shown greyed (see Figure 37, “opsi-configed: product default properties” - “gui_language”),
the values for that property differ on the selected depots.
On the right side of the depots are three buttons:
-
(=+): Mark all depots that have identical values
All depots, that have the same default values, are marked. - (++): All depots are marked.
-
(globe): set the packet default values
The original packet default values of the products will be set fot the selected depot(s).
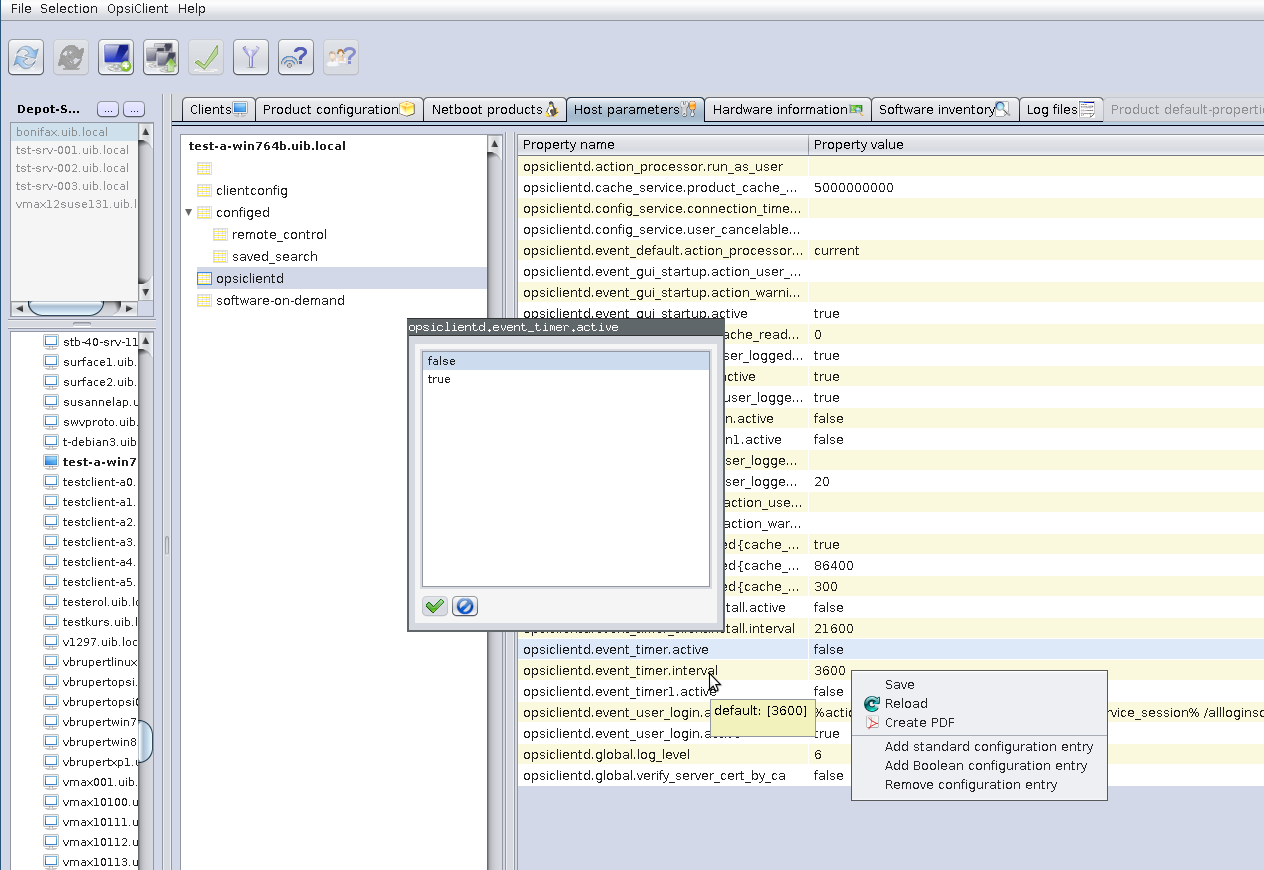
There are many configuration options for the opsi server and the opsi clients that may be set or changed via the tab Host parameters. Server defaults are set in the mode server configuration, client specific values in the mode client configuration plus manual selection of the Host parameters tab (see also the section called “opsi-configed modes Client configuration / server configuration / license management”).
On principle, these configuration entries (config objects of the opsi-server) are conceived as lists of values. Therefore they are edited via the list editor tool (cf. the section called “Property tables with list editor windows”).
Depending on the specific definition of a configuration object
-
the values of a list can be of type text (
Unicode) or of typeBoolean(i.e.true/false); - the list may have only one element or may be a true list with several members;
- the set of values from which list elements are selected may be fixed or extendible.
New configuration entries of types unicode (extendible) and boolean (fixed) may be created via the context menu. It offers also the option to remove existing entries.
The relationship of server and client entries is complicated.
- Server entries hold the defaults for client entries.
- When a server entry (a config object) is deleted the depending client entries (config states) vanish as well.
- Creation of a client entry via opsi-configed entails the automatic creation of an adequate server default.
- Deletion of a client entry via opsi-configed removes only the client specific value (if existing) but leaves the server default (which will be valid for the client).
- If a specific client value exists and is not identical with the server default value it is printed in a bold font.
- There are configurations objects for which client values may be created and edited but only the server objects are used (e.g. the entries for the opsi-configed in the category configed.).
Starting with opsi-configed version 4.0.3, the configurations objects are categorized in some (predefined) groups. The groups are listed in a tree-like manner on the left part of the panel. The entry name/value pairs belonging to the selected group are shown in the right part of the panel. Wheel mouse scrolling is enabled as well on the left as on the right side.
In the mode Properties of depots you will see the tab Depots. There is a drop down menu to select the depot. After selecting the depot you may change the properties of the opsi-depot.
see also:
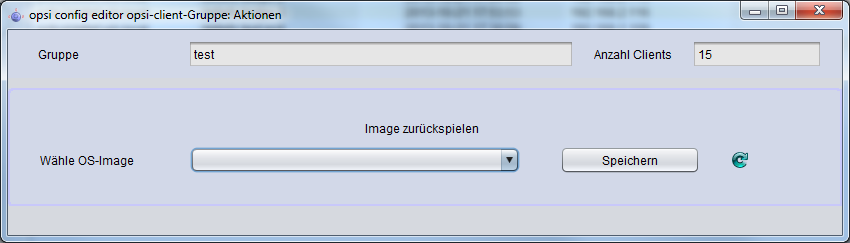
The button "group actions" in the main button bar (cf. the section called “opsi-configed modes Client configuration / server configuration / license management”) opens a window for group related functions.
At the moment, it provides only one function which is relevant for the opsi-localimage module.
- to search for an operating system, that had been installed on all of the clients of the selected group and therefore can be offered for all of the clients of that group.
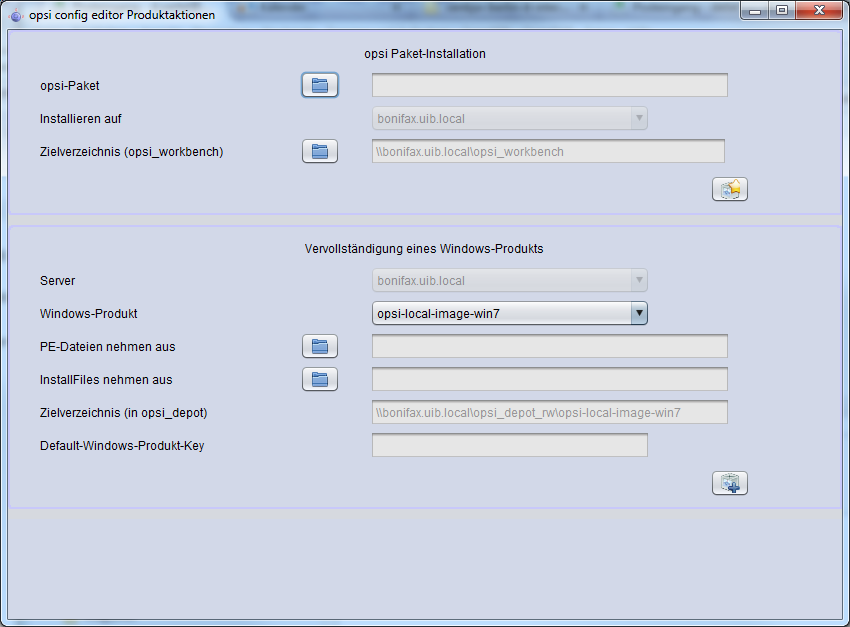
The button "product actions" in the main button bar (cf. the section called “opsi-configed modes Client configuration / server configuration / license management”) opens a window for functions related to products resp. packages.
Currently it offers two options:
- An .opsi file (opsi packet) can be selected or entered and can be uploaded to the opsi server; the default upload directory on the server is the network (samba) share named opsi_workbench. The button click starts installing the packet on the server, like invoking the opsi-package-manager.
- The WinPE files and install files for an Windows product (Windows Vista and above) can be uploaded to the server product directory (share opsi_depot), so that windows products do not have to be managed from the server side.
The opsi-package-manager is used for (de-)installing opsi-product-packages on an opsi-server.
In order to install a opsi-product-package, this opsi-product-package must be readable for the opsi system user opsiconfd. Therefore it is strongly recommended to install those packages from the directory /home/opsiproducts (or a sub directory).
The log file of the opsi-package-managers you will find at /var/log/opsi/package.log.
Install a package (asking no questions):
opsi-package-manager -i softprod_1.0-5.opsi'
Install a package (asking questions):
opsi-package-manager -p ask -i softprod_1.0-5.opsi
Install a package (and switch required action to setup where installed):
opsi-package-manager -S -i softprod_1.0-5.opsi
Deinstall a package (asking no questions):
opsi-package-manager -r softprod
Extract and rename a package:
opsi-package-manager -x opsi-template_<version>.opsi --new-product-id myprod
Calling opsi-package-manager with option --help gives a listing of possible options.
Please note:
-
The option
-dor--depotsare reserved for the use in a multi-depot-server environment. -
Using option
-dthe opsi-package will be copied to the/var/lib/opsi/repositorydirectory of the target server before installing. Please make sure that there is enough free space on this file system. -
If installing new packages fails because there is not enough free space available in your temporary folder you can specify a different temporary folder with the
--temp-diroption.
see also:
# opsi-package-manager --help

Usage: opsi-package-manager [options] <command>

Manage opsi packages

Commands:
  -i, --install      <opsi-package> ...      install opsi packages
  -u, --upload       <opsi-package> ...      upload opsi packages to repositories
  -l, --list         <regex>                 list opsi packages matching regex
  -D, --differences  <regex>                 show depot differences of opsi packages matching regex
  -r, --remove       <opsi-product-id> ...   uninstall opsi packages
  -x, --extract      <opsi-package> ...      extract opsi packages to local directory
  -V, --version                              show program's version info and exit
  -h, --help                                 show this help message and exit

Options:
  -v, --verbose                    increase verbosity (can be used multiple times)
  -q, --quiet                      do not display any messages
  --log-file         <log-file>    path to debug log file
  -d, --depots       <depots>      comma separated list of depot ids to process
                                      all = all known depots
  -p, --properties   <mode>        mode for default product property values
                                      ask     = display dialog
                                      package = use defaults from package
                                      keep    = keep depot defaults (default)
  --purge-client-properties        remove product property states of the installed product(s)
  -f, --force                      force install/uninstall (use with extreme caution)
  -U, --update                     set action "update" on hosts where installation status is "installed"
  -S, --setup                      set action "setup" on hosts where installation status is "installed"
  -o, --overwrite                  overwrite existing package on upload even if size matches
  -n, --no-delta                   full package transfers on uploads (do not use librsync)
  -k, --keep-files                 do not delete client data dir on uninstall
  -t, --temp-dir     <path>        tempory directory for package install
  --max-transfers    <num>         maximum number of simultaneous uploads
                                      0 = unlimited (default)
  --max-bandwidth    <kbps>        maximum transfer rate for each transfer (in kilobytes per second)
                                      0 = unlimited (default)
--new-product-id <product-id> set a new product id when extracting opsi packageThe command line utility opsi-product-updater is designed to download and install comfortable opsi packages from a repository or a other opsi server. Using the opsi-product-updater make it easy to keep the opsi server up to date. It may be also used in a cronjob to keep depot server in sync with the config server.
# opsi-product-updater --help

Usage: opsi-product-updater [options]
Options:
    -h    Show this help text
    -v    Increase verbosity (can be used multiple times)
    -V    Show version information and exit
    -c    Location of config file
    -i    Install all downloadable packages from configured repositories (ignores excludes)
    -p    List of productIds that will be processed: opsi-winst,opsi-client-agent
The main features are:
- configurable repositories
- configurable actions
All configuration will be done at the configuration file /etc/opsi/opsi-product-updater.conf.
Repositories are the sources which will be used by the opsi-product-update to fetch new opsi packages
There are two kinds of repostories:
Internet Repositories
Example: download.uib.de
This are repositories which are configured by:
- baseURL (z.B. http://download.uib.de)
- dirs ( A list of directories e.g.. opsi4.0/produkte/essential)
- and if needed username and password for password protected repositories (e.g. for the opsi patch management subscriptions)
You may also configure a proxy here.
opsi-server
This is (using a opsi-depot-server) the central opsi-config-server will be used to fetch the opsi-packages.
The central configuration item is here:
- opsiDepotId
This in most cases on a a opsi-depot-server the central opsi-config-server. So on any call of the opsi-product-updater the opsi-product-packages wil be fechted from the opsi-config-server. This can be done for example by a cronjob.
For each repository you have to configure which actions to run:
- autoupdate: Newer versions of installed packages will be downloaded and installed
- autoinstall: Also packages which are not installed yet, will be downloaded and installed
- autoinstall: For all new installed packages and all clients on which these pacakages are installed the action request will be set to setup.
In addition it is possible to send all these clients a Wake-On-LAN signal to install the new software to the clients. Using the opsi-product shutdownwanted you can make shure that the clients will be powered off after the installation.
- time window for autosetup: You can give time window which may be used to that client action requests to setup.
- Automatic WakeOnLan with shutdown: If there is new software Clients could be waked up and shutdown after installation automatically
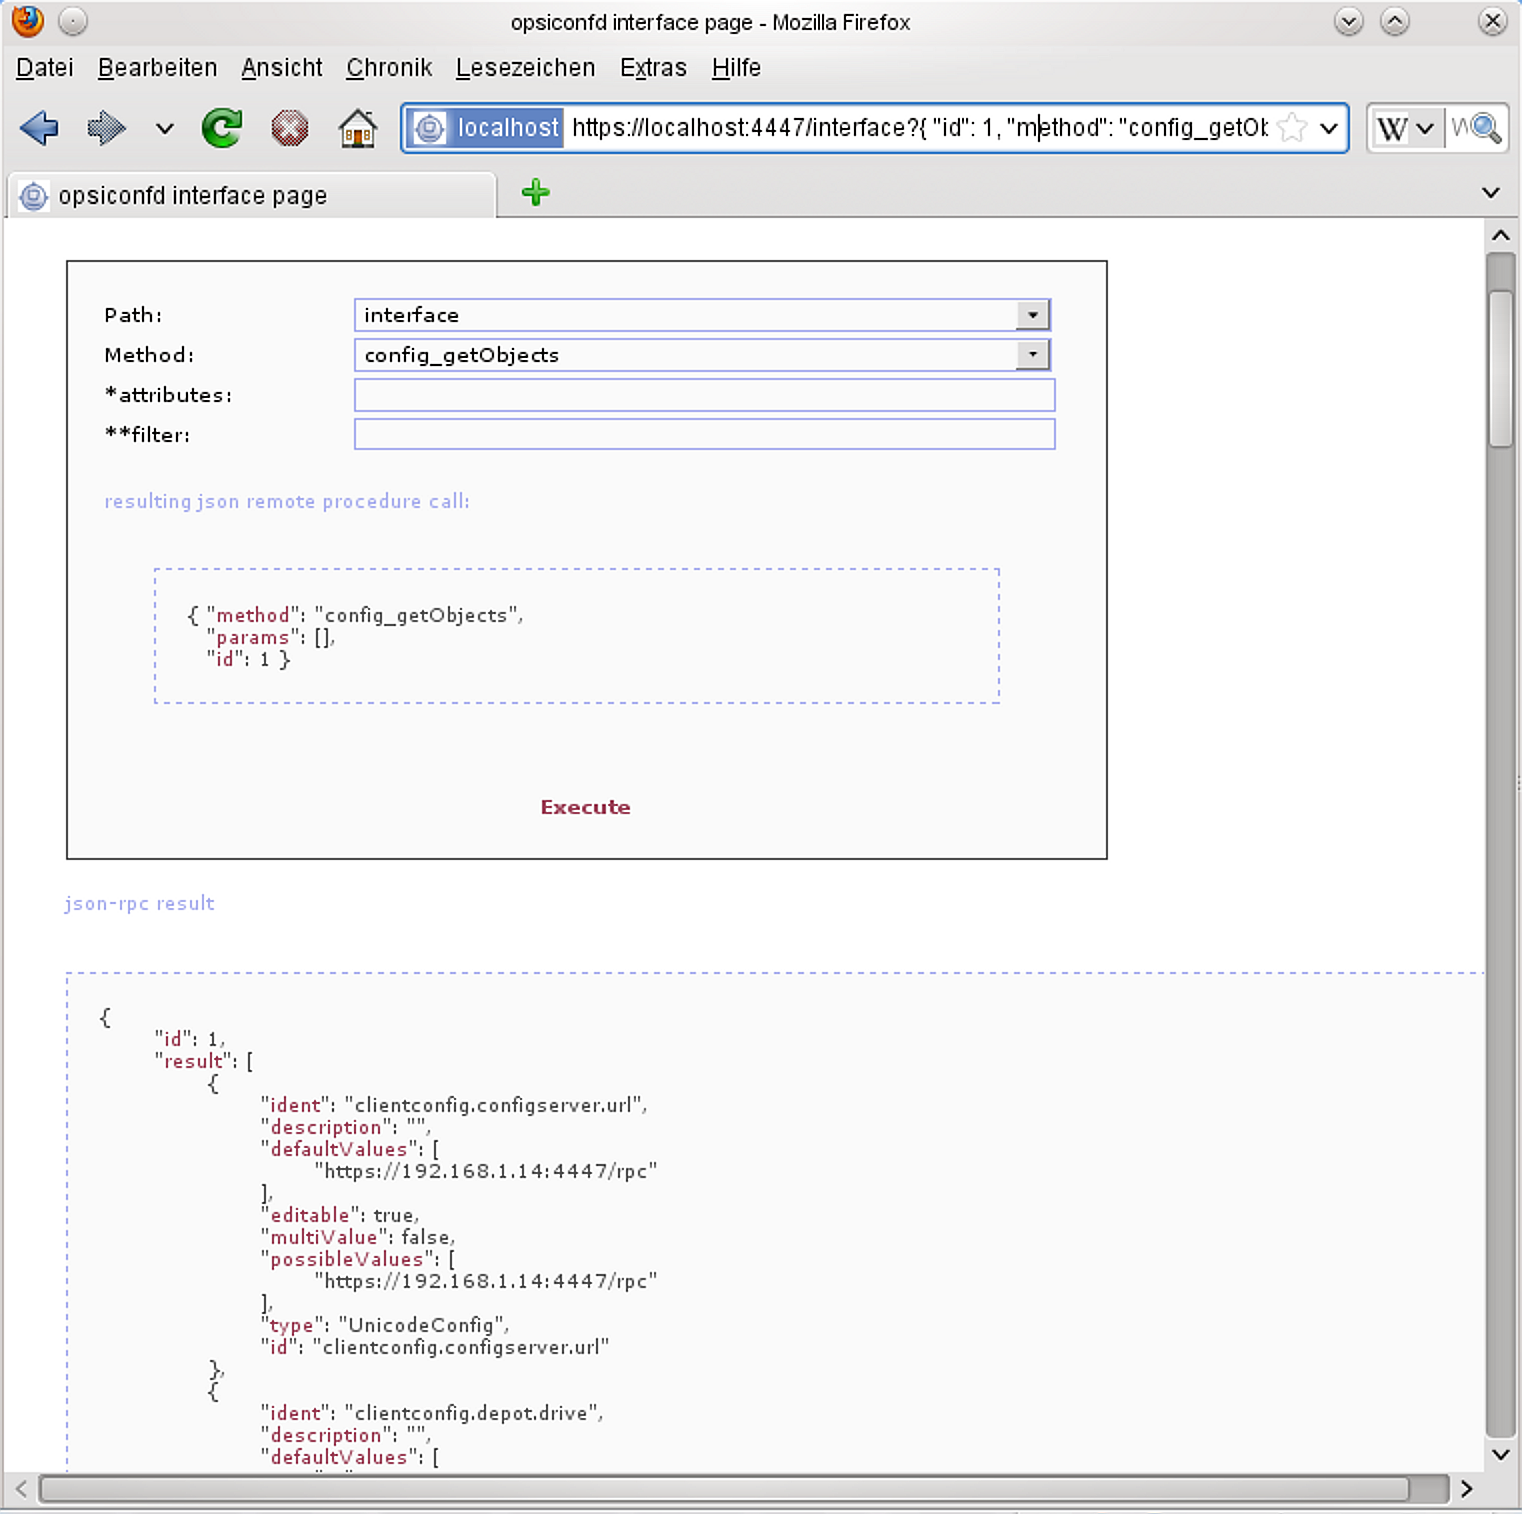
opsi V3 introduced an opsi owned python library which provides an API for opsi configuration. The opsiconfd provides this API as a web service, whereas opsi-admin is the command line interface for this API.
Calling https://<opsi-server>:4447/interface in your browser gives you agraphical interface to the opsi web service. You have to login as a member of the unix group opsiadmin.
At the command line opsi-admin provides an interface to the opsi-API. There is a interactive mode and a non interactive mode for batch processing from within scripts.
The help option opsi-admin --help shows a list of available command line options:
# opsi-admin --help

Verwendung: opsi-admin [options] [command] [args...]
Optionen:
  -h, --help           Diesen Hilfetext anzeigen
  -V, --version        Versionsnummer ausgeben und beenden
  -u, --username       Benutzername (standard: momentaner Benutzer)
  -p, --password       Passwort (standard: Passwort interaktiv abfragen)
  -a, --address        URL des opsiconfd (standard: https://localhost:4447/rpc)
  -d, --direct         opsiconfd umgehen
      --no-depot       Depotserver-Backend nicht verwenden
  -l, --loglevel       Log-Level (standard: 3)
                       0=nichts, 1=essenziell, 2=kritisch, 3=Fehler, 4=Warnungen
                       5=Hinweise, 6=Informationen, 7=debug, 8=debug2, 9=vertraulich
  -f, --log-file       Pfad zur Log-Datei
  -i, --interactive    Im interaktiven Modus starten
  -c, --colorize       Farbige Ausgabe
  -S, --simple-output  Einfache Ausgabe (nur für Skalare und Listen)
  -s, --shell-output   Shell-Ausgabe
  -r, --raw-output     Rohdaten-Ausgabe
opsi-admin can use the opsi web service or directly operate on the data backend. To work with the web service you have to provide the URL and also an username and password. Due to security reasons you probably wouldn’t like to do this from within a script. In that case you’d prefer direct access to the data base using the -d option: opsi-admin -d.
In interactive mode (start with opsi-admin -d or opsi-admin -d -i -c or short opsi-admin -dic) you get input support with the TAB-key. After some input, with the TAB-button you get a list or details of the data type of the next expected input.
The option -s or -S generates an output format which can be easily parsed by scripts.
There are some methods which are directly based on API-requests, and there are some tasks, which are a collection of function calls to do a more complex special job.
opsi-admin -d task setupWhereInstalled "softprod"
opsi-admin -d method host_delete <clientname>
e.g.:
opsi-admin -d method host_delete "pxevm.uib.local"
opsi-admin -d method host_createOpsiClient <full qualified clientname>
e.g.:
opsi-admin -d method host_createOpsiClient "pxevm.uib.local"
opsi-admin -d method setProductActionRequest <productId> <clientId> <actionRequest>
e.g.:
opsi-admin -d method setProductActionRequest win7 pxevm.uib.local setup
opsi-admin -d method setHostDescription "dpvm02.uib.local" "Client unter VMware"
The opsipxeconfd provides the named pipes in the tftpboot directories. which are used to control the PXE boot process.
The configuration file is /etc/opsi/opsipxeconfd.conf
The log file is /var/log/opsi/opsipxeconfd.log.
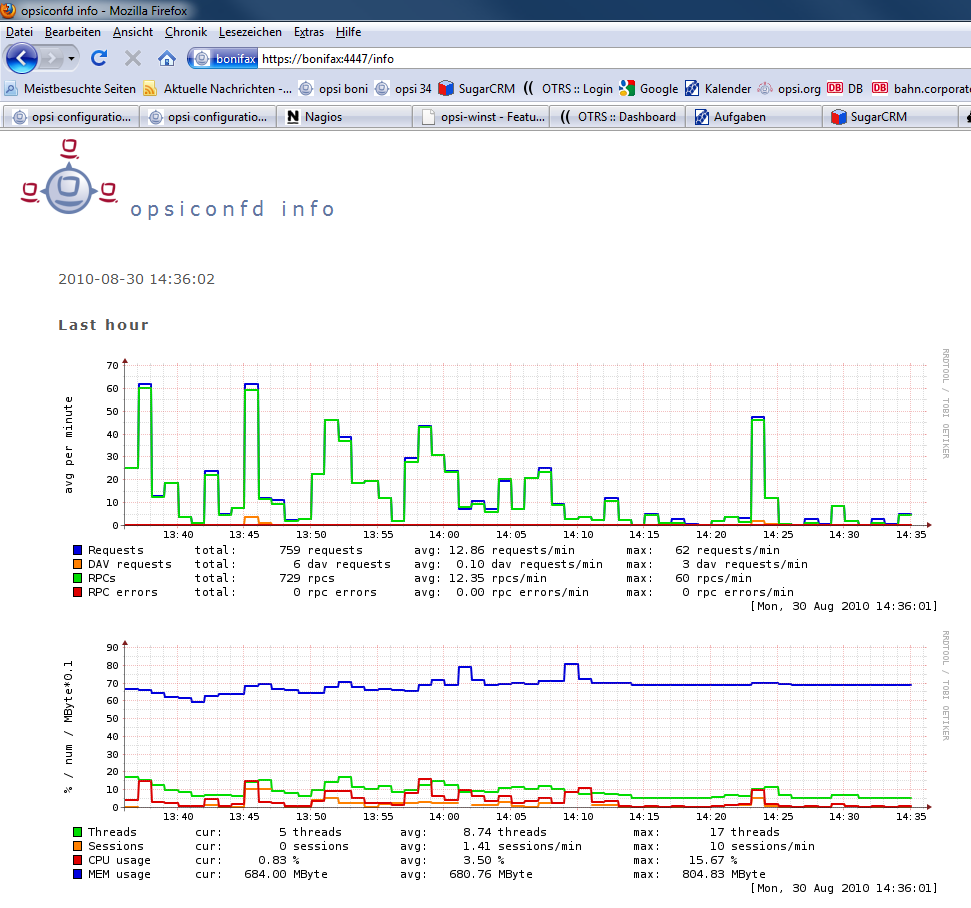
The opsiconfd provides the opsi API as JSON web service and have a lot of other important tasks. Therefore the opsiconfd is the central opsi service and does all the communication to the clients.
Regarding this central rule, a tool to monitor this process gives a lot of information about load and possible problems. This tool is the opsiconfd info page.
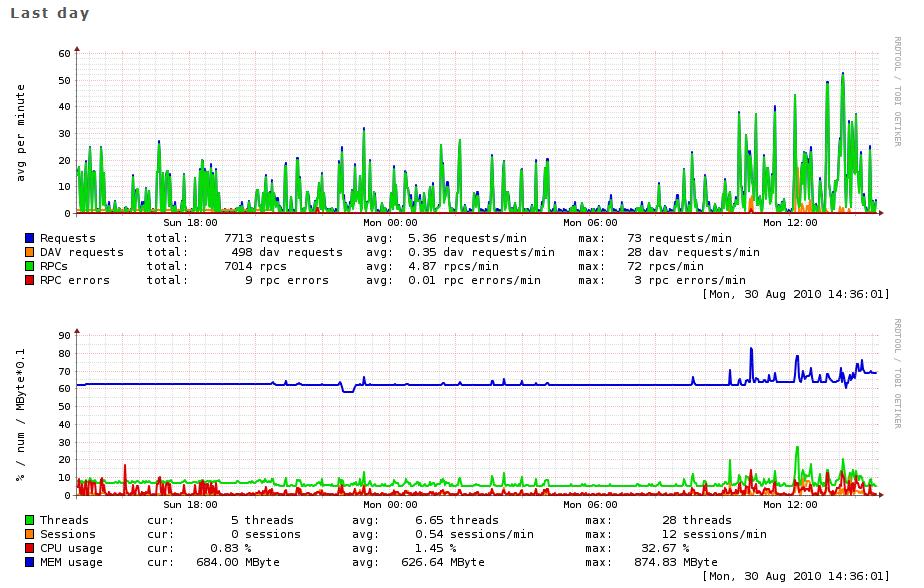
Using the web address https://<opsi-server>:4447/info you will get a graphical chart of opsiconfd load and cpu/memory usage in the last hour/day/month/year. This information is completed by tabulary information to the actual tasks and sessions.
The opsi-atftpd is based on the standard atftpd with the additional feature to handle named pipes.
By default the opsi-atftd is configured to not run as daemon but to be started by t the inetd process.
To change this configuration in order to run the opsi-atftpd as daemon, the following changes must be done:
In the file
/etc/inetd.confthe line for the tftp protocol has to be removed or commented out. After you changed this configuration file, you have to reload the theinetdprocess. The command to do this differs by the used Linux Distribution:-
Ubuntu / Debian:
service openbsd-inetd reload -
Suse / RedHat / CentOS:
service xinetd reload
-
Ubuntu / Debian:
-
In the file
/etc/default/atfpdthe lineUSE_INETD=truehas to be changed toUSE_INETD=false. Then you have to restart the opsi-atftpd as daemon with the command:service opsi-atftpd restart
In opsi 4 the data structure of all backends and the web service methods are completely new designed.
The new design is object / database oriented. A Object has some properties.
As a example let us have a look at the object product. A object of the type product which describes the product javavm may look like this:
"ident": "javavm;1.6.0.20;2"
"id": "javavm"
"description": "Java 1.6"
"changelog": ""
"advice": ""
"userLoginScript": ""
"name": "SunJavaRuntimeEnvironment"
"priority": 0
"packageVersion": "2"
"productVersion": "1.6.0.20"
"windowsSoftwareIds": None
"productClassIds": None
"type": "LocalbootProduct"
"licenseRequired": False
"setupScript": "javavm.ins"
"updateScript": ""
"uninstallScript": "deljvm.ins"
"alwaysScript": ""
"onceScript": ""
"customScript": ""
Every object has a set of operators which ćan be used to work with this obect. Most time these operators are:
- getObjects (returns the objects)
- getHashes (Variant, which delivers for performance reasons the backend objects readonly. For a large count of objects this method is much faster then calling getObjects)
- create (create one object comfortable)
- createObjects (create one or more objects)
- delete (delete one object)
- deleteObjects (delete one or more objects)
- getIdents (returns the object id’s)
- insertObject (create a new object)
- updateObject (update a object, if the object doesn’t exists it will be created)
- updateObjects (update a bundle of objects)
The method names are concatenated:
<object name>_<operation>
According to this naming rule, these new methods are easily to difference from the old legacy opsi 3 methods, which almost start with get, set or create.
The getObjects methods have two optional parameters:
- attributes
- filter
The attributes parameter is used query only for some properties of an object. If you are using attributes the returned object has all attribute keys, but only values the attribute you asked for and for all attributes which are used to identify this object. All other attributes have the value none.
For Example you will get by calling the method product_getObjects with attributes:["name"] for the product javavm:
"onceScript": None,
"ident": "javavm;1.6.0.20;2",
"windowsSoftwareIds": None,
"description": None,
"setupScript": None,
"changelog": None,
"customScript": None,
"advice": None,
"uninstallScript": None,
"userLoginScript": None,
"name": "Sun Java Runtime Environment",
"priority": None,
"packageVersion": "2",
"productVersion": "1.6.0.20",
"updateScript": None,
"productClassIds": None,
"alwaysScript": None,
"type": "LocalbootProduct",
"id": "javavm",
"licenseRequired": None
If you like to not ask for attributes but want to use the second parameter filter you have to give as attribute parameter [].
The parameter filter is used to define which objects you want to get. For example if you are using the filter { "id":"javavm" } on the method product_getObjects you will get only the object(s) which describe the product javavm.
If you are using methods which expecting one ore more objects, these objects have to be given as JSON objects or as array of JSON objects.
The most important objects are:
- auditHardwareOnHost (client specific hardware information)
- auditHardware (client independent hardware information)
- auditSoftwareOnClient (client specific software information)
- auditSoftware (client independent software information)
- auditSoftwareToLicensePool (license management)
- configState (administration of client host parameters)
- config (administration of host parameter defaults)
- group (group administration)
- host (server and clients)
- licenseContract (license management)
- licenseOnClient (license management)
- licensePool (license management)
- objectToGroup (group administration)
- productDependency (product dependencies)
- productOnClient (client specific information to a product e.g. installation state)
- productOnDepot (depot specific information to a product)
- productPropertyState (depot or client specific product property settings)
- productProperty (definition of product properties)
- product (product meta data)
- softwareLicenseToLicensePool (license management)
- softwareLicense (license management)
In addition to the described objects and methods there are some more for special operations.
This design:
- is created for fast transmitting information about a lot of clients
- filter data by a unified syntax
- allows to check all input for correct synatx
According to these facts we get a increased stability and performance.
Example for a OpsiClient:
 method host_getObjects [] {"id":"xpclient.vmnat.local"}
[
          {
          "ident" : "xpclient.vmnat.local",
          "description" : "",
          "created" : "2012-03-22 12:13:52",
          "inventoryNumber" : "",
          "ipAddress" : "172.16.166.101",
          "notes" : "Created by opsi-deploy-client-agent at Wed, 24 Aug 2011 10:24:36",
          "oneTimePassword" : "",
          "lastSeen" : "2012-03-30 16:20:04",
          "hardwareAddress" : "00:0c:29:35:70:a7",
          "opsiHostKey" : "1234567890abcef1234567890abcdef",
          "type" : "OpsiClient",
          "id" : "xpclient.vmnat.local"
          }
]
Most of these data are displayed in the clients tab of the opsi-configed.
Possible types are:
- OpsiClient
- OpsiConfigserver (which means implicit this is also a OpsiDepotserver)
- OpsiDepotserver
The server type have different and additional data.
Example for a server:
 method host_getObjects [] {"id":"sepiolina.vmnat.local"}
[
          {
          "masterDepotId" : null,
          "ident" : "sepiolina.vmnat.local",
          "networkAddress" : "172.16.166.0/255.255.255.128",
          "description" : "",
          "inventoryNumber" : "",
          "ipAddress" : "172.16.166.1",
          "repositoryRemoteUrl" : "webdavs://sepiolina.vmnat.local:4447/repository",
          "depotLocalUrl" : "file:///var/lib/opsi/depot",
          "isMasterDepot" : true,
          "notes" : "",
          "hardwareAddress" : null,
          "maxBandwidth" : 0,
          "repositoryLocalUrl" : "file:///var/lib/opsi/repository",
          "opsiHostKey" : "1234567890abcef1234567890abcdef",
          "type" : "OpsiConfigserver",
          "id" : "sepiolina.vmnat.local",
          "depotWebdavUrl" : "webdavs://sepiolina:4447/depot",
          "depotRemoteUrl" : "smb://sepiolina/opsi_depot"
          }
]
Most of these data are displayed in the depot configuration of the opsi-configed.
Describes groups and their hierarchical structure.
Example for a group object:
 method group_getObjects
 [
       {
          "ident" : "sub2",
          "description" : "sub2",
          "notes" : "",
          "parentGroupId" : null,
          "type" : "HostGroup",
          "id" : "sub2"
          },
          {
          "ident" : "subsub",
          "description" : "subsub",
          "notes" : "",
          "parentGroupId" : "sub2",
          "type" : "HostGroup",
          "id" : "subsub"
          }
]Describes the membership of an object in a group.
There are Hostgroups and Productgroups
Example for a objectToGroup objects:
 method objectToGroup_getObjects
[
         {
          "groupType" : "HostGroup",
          "ident" : "HostGroup;sub2;win7.vmnat.local",
          "type" : "ObjectToGroup",
          "groupId" : "sub2",
          "objectId" : "win7.vmnat.local"
          },
          {
          "groupType" : "HostGroup",
          "ident" : "HostGroup;subsub;win7x64.vmnat.local",
          "type" : "ObjectToGroup",
          "groupId" : "subsub",
          "objectId" : "win7x64.vmnat.local"
          },
        {
          "groupType" : "ProductGroup",
          "ident" : "ProductGroup;opsiessentials;opsi-client-agent",
          "type" : "ObjectToGroup",
          "groupId" : "opsiessentials",
          "objectId" : "opsi-client-agent"
          },
          {
          "groupType" : "ProductGroup",
          "ident" : "ProductGroup;opsiessentials;opsi-winst",
          "type" : "ObjectToGroup",
          "groupId" : "opsiessentials",
          "objectId" : "opsi-winst"
          }
]Describes the meta data of a product which are defined while creating the package.
Example for a product object:
 method product_getObjects [] {"id":"jedit","productVersion":"4.5"}
[
          {
          "onceScript" : "",
          "ident" : "jedit;4.5;3",
          "windowsSoftwareIds" :
                    [

                    ],
          "description" : "jEdit with opsi-winst Syntax-Highlighting",
          "setupScript" : "setup.ins",
          "changelog" : "",
          "customScript" : "",
          "advice" : "",
          "uninstallScript" : "uninstall.ins",
          "userLoginScript" : "",
          "name" : "jEdit programmer's text editor",
          "priority" : 0,
          "packageVersion" : "3",
          "productVersion" : "4.5",
          "updateScript" : "update.ins",
          "productClassIds" :
                    [

                    ],
          "alwaysScript" : "",
          "type" : "LocalbootProduct",
          "id" : "jedit",
          "licenseRequired" : false
          }
]
Note
If you have multiple depot server, you may have different versions of one product.
The entries productClassIds and windowsSoftwareIds are not used right now.
Describes the properties of a product which are defined while creating the package.
Example for a productProperty object:
 method productProperty_getObjects [] {"productId":"jedit","productVersion":"4.5"}
[
          {
          "ident" : "jedit;4.5;3;start_server",
          "description" : "Should the jedit derver started at every startup ?",
          "editable" : false,
          "defaultValues" :
                    [
                    false
                    ],
          "multiValue" : false,
          "productVersion" : "4.5",
          "possibleValues" :
                    [
                    false,
                    true
                    ],
          "packageVersion" : "3",
          "type" : "BoolProductProperty",
          "propertyId" : "start_server",
          "productId" : "jedit"
          }
]
Note
The real default values are stored in the context of the depot in a productPropertyState object.
Describes:
* the default value of a product property on a given depot
properties of a product which are defined while creating the package.
* the client specific settings of product properies.
Example for a productPropertyState objects:
 method productPropertyState_getObjects [] {"productId":"jedit"}
[
          {
          "ident" : "jedit;start_server;sepiolina.vmnat.local",
          "objectId" : "sepiolina.vmnat.local",
          "values" :
                    [
                    false
                    ],
          "type" : "ProductPropertyState",
          "propertyId" : "start_server",
          "productId" : "jedit"
          },
         {
          "ident" : "jedit;start_server;xpclient.vmnat.local",
          "objectId" : "xpclient.vmnat.local",
          "values" :
                    [
                    true
                    ],
          "type" : "ProductPropertyState",
          "propertyId" : "start_server",
          "productId" : "jedit"
          }

]Describes the dependencies of a product to another product as it is defined while creating the package.
Example for a productDependency object:
method productDependency_getObjects [] {"productId":"jedit","productVersion":"4.5"}
[
          {
          "ident" : "jedit;4.5;3;setup;javavm",
          "productAction" : "setup",
          "requiredPackageVersion" : null,
          "requirementType" : "before",
          "requiredInstallationStatus" : "installed",
          "productVersion" : "4.5",
          "requiredProductId" : "javavm",
          "requiredAction" : null,
          "requiredProductVersion" : null,
          "type" : "ProductDependency",
          "packageVersion" : "3",
          "productId" : "jedit"
          }
]Describes which products in which versions are installed on which client..
Example for a productOnClient object:
 method productOnClient_getObjects [] {"productId":"jedit","clientId":"xpclient.vmnat.local"}
[
          {
          "ident" : "jedit;LocalbootProduct;xpclient.vmnat.local",
          "actionProgress" : "",
          "actionResult" : "successful",
          "clientId" : "xpclient.vmnat.local",
          "modificationTime" : "2012-03-30 15:49:04",
          "actionRequest" : "none",
          "targetConfiguration" : "installed",
          "productVersion" : "4.5",
          "productType" : "LocalbootProduct",
          "lastAction" : "setup",
          "packageVersion" : "3",
          "actionSequence" : -1,
          "type" : "ProductOnClient",
          "installationStatus" : "installed",
          "productId" : "jedit"
          }
]Describes which product is installed in which version on a given depot..
Example for a productOnDepot objects:
 method productOnDepot_getObjects [] {"productId":"jedit"}
[
          {
          "ident" : "jedit;LocalbootProduct;4.4.1;2;depotserver.vmnat.local",
          "locked" : false,
          "productVersion" : "4.4.1",
          "productType" : "LocalbootProduct",
          "depotId" : "depotserver.vmnat.local",
          "type" : "ProductOnDepot",
          "packageVersion" : "2",
          "productId" : "jedit"
          },
          {
          "ident" : "jedit;LocalbootProduct;4.5;3;sepiolina.vmnat.local",
          "locked" : false,
          "productVersion" : "4.5",
          "productType" : "LocalbootProduct",
          "depotId" : "sepiolina.vmnat.local",
          "type" : "ProductOnDepot",
          "packageVersion" : "3",
          "productId" : "jedit"
          }
]
Note
If you have multiple depot server, you may have different versions of one product.
Describes the Hostparameter of the opsi-configeds Server configuration.
Example for a config object:
 method config_getObjects [] {"id":"opsiclientd.event_gui_startup.active"}
[
          {
          "ident" : "opsiclientd.event_gui_startup.active",
          "description" : "gui_startup active",
          "defaultValues" :
                    [
                    true
                    ],
          "editable" : false,
          "multiValue" : false,
          "possibleValues" :
                    [
                    false,
                    true
                    ],
          "type" : "BoolConfig",
          "id" : "opsiclientd.event_gui_startup.active"
          }
]Describes the Hostparameter of the opsi-configeds client configuration.
Example for a configState object:
 method configState_getObjects [] {"configId":"opsiclientd.event_gui_startup.active"}
[
          {
          "configId" : "opsiclientd.event_gui_startup.active",
          "ident" : "opsiclientd.event_gui_startup.active;wanclient.vmnat.local",
          "values" :
                    [
                    false
                    ],
          "objectId" : "wanclient.vmnat.local",
          "type" : "ConfigState"
          }
]
Note
A configState object can not be created without a existing config object to which it references.
Describes the detected hardware types (including the client specific values). The idea is that you will see here the client specific data and in auditHardware only one entry for a network card which is used in all your computers.
Unfortunally in reality this idea doesn’t work as you might think.
Example for a auditHardwareOnHost object:
 method auditHardwareOnHost_getObjects [] {"hostId":"xpclient.vmnat.local","hardwareClass":"NETWORK_CONTROLLER","ipAddress":"172.16.166.101"}
[
          {
          "vendorId" : "1022",
          "macAddress" : "00:0C:29:35:70:A7",
          "hardwareClass" : "NETWORK_CONTROLLER",
          "state" : 1,
          "deviceType" : "PCI",
          "subsystemVendorId" : "2000",
          "ipEnabled" : "True",
          "type" : "AuditHardwareOnHost",
          "firstseen" : "2012-03-30 15:48:15",
          "revision" : "10",
          "hostId" : "xpclient.vmnat.local",
          "vendor" : "Advanced Micro Devices (AMD)",
          "description" : "Ethernetadapter der AMD-PCNET-Familie",
          "subsystemDeviceId" : "1022",
          "deviceId" : "2000",
          "autoSense" : null,
          "netConnectionStatus" : "Connected",
          "maxSpeed" : null,
          "name" : "Ethernetadapter der AMD-PCNET-Familie",
          "serialNumber" : null,
          "lastseen" : "2012-03-30 15:48:15",
          "model" : null,
          "ipAddress" : "172.16.166.101",
          "adapterType" : "Ethernet 802.3"
          },
          {
          "vendorId" : "1022",
          "macAddress" : "00:0C:29:35:70:A7",
          "hardwareClass" : "NETWORK_CONTROLLER",
          "state" : 0,
          "deviceType" : "PCI",
          "subsystemVendorId" : "2000",
          "ipEnabled" : "True",
          "type" : "AuditHardwareOnHost",
          "firstseen" : "2012-03-08 14:26:14",
          "revision" : "10",
          "hostId" : "xpclient.vmnat.local",
          "vendor" : "VMware, Inc.",
          "description" : "VMware Accelerated AMD PCNet Adapter",
          "subsystemDeviceId" : "1022",
          "deviceId" : "2000",
          "autoSense" : null,
          "netConnectionStatus" : "Connected",
          "maxSpeed" : null,
          "name" : "VMware Accelerated AMD PCNet Adapter",
          "serialNumber" : null,
          "lastseen" : "2012-03-10 14:47:15",
          "model" : null,
          "ipAddress" : "172.16.166.101",
          "adapterType" : "Ethernet 802.3"
          },
   {
          "vendorId" : "1022",
          "macAddress" : "00:0c:29:35:70:a7",
          "hardwareClass" : "NETWORK_CONTROLLER",
          "state" : 0,
          "deviceType" : null,
          "subsystemVendorId" : "1022",
          "ipEnabled" : null,
          "type" : "AuditHardwareOnHost",
          "firstseen" : "2012-02-29 15:43:21",
          "revision" : "10",
          "hostId" : "xpclient.vmnat.local",
          "vendor" : "Advanced Micro Devices [AMD]",
          "description" : "Ethernet interface",
          "subsystemDeviceId" : "2000",
          "deviceId" : "2000",
          "autoSense" : "",
          "netConnectionStatus" : "yes",
          "maxSpeed" : null,
          "name" : "79c970 [PCnet32 LANCE]",
          "serialNumber" : "00:0c:29:35:70:a7",
          "lastseen" : "2012-03-30 14:58:30",
          "model" : "79c970 [PCnet32 LANCE]",
          "ipAddress" : "172.16.166.101",
          "adapterType" : ""
          }
]Describes the detected hardware types (independed from client specific values). The idea is that you will see here only one entry for a network card which is used in all your computers.
Unfortunally in reality this idea doesn’t work as you might think.
Example for a auditHardware object:
 method auditHardware_getObjects [] {"hardwareClass":"NETWORK_CONTROLLER","vendorId":"1022"}
[
          {
          "vendorId" : "1022",
          "deviceId" : "2000",
          "maxSpeed" : null,
          "vendor" : "Advanced Micro Devices [AMD]",
          "name" : "79c970 [PCnet32 LANCE]",
          "subsystemDeviceId" : "2000",
          "deviceType" : null,
          "subsystemVendorId" : "1022",
          "autoSense" : "",
          "model" : "79c970 [PCnet32 LANCE]",
          "revision" : "10",
          "type" : "AuditHardware",
          "hardwareClass" : "NETWORK_CONTROLLER",
          "adapterType" : "",
          "description" : "Ethernet interface"
          },
          {
          "vendorId" : "1022",
          "deviceId" : "2000",
          "maxSpeed" : null,
          "vendor" : "VMware, Inc.",
          "name" : "VMware Accelerated AMD PCNet Adapter",
          "subsystemDeviceId" : "1022",
          "deviceType" : "PCI",
          "subsystemVendorId" : "2000",
          "autoSense" : null,
          "model" : null,
          "revision" : "10",
          "type" : "AuditHardware",
          "hardwareClass" : "NETWORK_CONTROLLER",
          "adapterType" : "Ethernet 802.3",
          "description" : "VMware Accelerated AMD PCNet Adapter"
          },
          {
          "vendorId" : "1022",
          "deviceId" : "2000",
          "maxSpeed" : null,
          "vendor" : "Advanced Micro Devices (AMD)",
          "name" : "Ethernetadapter der AMD-PCNET-Familie",
          "subsystemDeviceId" : "1022",
          "deviceType" : "PCI",
          "subsystemVendorId" : "2000",
          "autoSense" : null,
          "model" : null,
          "revision" : "10",
          "type" : "AuditHardware",
          "hardwareClass" : "NETWORK_CONTROLLER",
          "adapterType" : "Ethernet 802.3",
          "description" : "Ethernetadapter der AMD-PCNET-Familie"
          },
  {
          "vendorId" : "1022",
          "deviceId" : "2000",
          "maxSpeed" : null,
          "vendor" : "Advanced Micro Devices (AMD)",
          "name" : "Ethernetadapter der AMD-PCNET-Familie",
          "subsystemDeviceId" : "1022",
          "deviceType" : "PCI",
          "subsystemVendorId" : "2000",
          "autoSense" : null,
          "model" : null,
          "revision" : "10",
          "type" : "AuditHardware",
          "hardwareClass" : "NETWORK_CONTROLLER",
          "adapterType" : "Ethernet 802.3",
          "description" : "Ethernetadapter der AMD-PCNET-Familie"
          },
          {
          "vendorId" : "1022",
          "deviceId" : "2000",
          "maxSpeed" : null,
          "vendor" : "Advanced Micro Devices (AMD)",
          "name" : null,
          "subsystemDeviceId" : "2000",
          "deviceType" : "PCI",
          "subsystemVendorId" : "1022",
          "autoSense" : null,
          "model" : "",
          "revision" : null,
          "type" : "AuditHardware",
          "hardwareClass" : "NETWORK_CONTROLLER",
          "adapterType" : null,
          "description" : "Ethernetadapter der AMD-PCNET-Familie"
          },
(....)
[Describes the detected software types (including the client specific values). The idea is that you will see here the client specific data and in auditSoftware only one entry for a office software which is used in all your computers.
Example for a auditSoftwareOnClient object:
 method auditSoftwareOnClient_getObjects  [] {"name":"jEdit 4.5.0","clientId":"xpclient.vmnat.local"}
[
          {
          "ident" : "jEdit 4.5.0;4.5.0;;;x86;xpclient.vmnat.local",
          "licenseKey" : "",
          "name" : "jEdit 4.5.0",
          "uninstallString" : "\\\"C:\\\\Programme\\\\jEdit\\\\unins000.exe\\\"",
          "usageFrequency" : -1,
          "clientId" : "xpclient.vmnat.local",
          "lastUsed" : "0000-00-00 00:00:00",
          "subVersion" : "",
          "language" : "",
          "state" : 1,
          "version" : "4.5.0",
          "lastseen" : "2012-03-30 16:19:55",
          "binaryName" : "",
          "type" : "AuditSoftwareOnClient",
          "firstseen" : "2012-03-30 16:19:55",
          "architecture" : "x86"
          }
]Describes the detected software types (independed from client specific values). The idea is that you will see here only one entry for a office software which is used in all your computers.
Example for a auditSoftware object:
 method auditSoftware_getObjects  [] {"name":"jEdit 4.5.0"}
[
          {
          "windowsDisplayVersion" : "4.5.0",
          "ident" : "jEdit 4.5.0;4.5.0;;;x64",
          "name" : "jEdit 4.5.0",
          "windowsSoftwareId" : "jedit_is1",
          "windowsDisplayName" : "jEdit 4.5.0",
          "installSize" : -1,
          "subVersion" : "",
          "language" : "",
          "version" : "4.5.0",
          "architecture" : "x64",
          "type" : "AuditSoftware"
          },
          {
          "windowsDisplayVersion" : "4.5.0",
          "ident" : "jEdit 4.5.0;4.5.0;;;x86",
          "name" : "jEdit 4.5.0",
          "windowsSoftwareId" : "jedit_is1",
          "windowsDisplayName" : "jEdit 4.5.0",
          "installSize" : -1,
          "subVersion" : "",
          "language" : "",
          "version" : "4.5.0",
          "architecture" : "x86",
          "type" : "AuditSoftware"
          }
]Describes which license pools are assinged to which auditSoftware patterns.
Example for a auditSoftwareToLicensePool object:
 method auditSoftwareToLicensePool_getObjects [] {"licensePoolId":"win7-msdn-prof"}
[
          {
          "ident" : "Windows 7 Professional N;6.1;00376-165;de-DE;x64;win7-msdn-prof",
          "name" : "Windows 7 Professional N",
          "language" : "de-DE",
          "subVersion" : "00376-165",
          "licensePoolId" : "win7-msdn-prof",
          "version" : "6.1",
          "architecture" : "x64",
          "type" : "AuditSoftwareToLicensePool"
          },
          {
          "ident" : "Windows 7 Professional N;6.1;00376-165;de-DE;x86;win7-msdn-prof",
          "name" : "Windows 7 Professional N",
          "language" : "de-DE",
          "subVersion" : "00376-165",
          "licensePoolId" : "win7-msdn-prof",
          "version" : "6.1",
          "architecture" : "x86",
          "type" : "AuditSoftwareToLicensePool"
          }
]Describes which softwareLicenseId is assinged to which licensePoolId.
Example for a softwareLicenseToLicensePool object:
method softwareLicenseToLicensePool_getObjects [] {"licensePoolId":"win7-msdn-prof"}
[
          {
          "licensePoolId" : "win7-msdn-prof",
          "softwareLicenseId" : "uib-msdn-win7-vol",
          "ident" : "uib-msdn-win7-vol;win7-msdn-prof",
          "licenseKey" : "12345-12345-12345-12345-3dbv6",
          "type" : "SoftwareLicenseToLicensePool"
          }
]Describes the existing software licenses and their meta data.
Example for a softwareLicense object:
 method softwareLicense_getObjects [] {"id":"uib-msdn-win7-vol"}
[
          {
          "ident" : "uib-msdn-win7-vol;msdn-uib",
          "maxInstallations" : 0,
          "boundToHost" : null,
          "expirationDate" : "0000-00-00 00:00:00",
          "licenseContractId" : "msdn-uib",
          "type" : "VolumeSoftwareLicense",
          "id" : "uib-msdn-win7-vol"
          }
]Describes the existing licenses contracts and their meta data.
Example for a licenseContract object:
 method licenseContract_getObjects [] {"id":"msdn-uib"}
[
          {
          "ident" : "msdn-uib",
          "description" : "",
          "conclusionDate" : "2011-04-22 00:00:00",
          "notificationDate" : "0000-00-00 00:00:00",
          "notes" : "",
          "expirationDate" : "0000-00-00 00:00:00",
          "partner" : "Microsoft",
          "type" : "LicenseContract",
          "id" : "msdn-uib"
          }
]Describes which license is used by which client.
Example for a licenseOnClient object:
 method licenseOnClient_getObjects  [] {"clientId":"win7client.vmnat.local"}
[
          {
          "softwareLicenseId" : "uib-msdn-win7-vol",
          "ident" : "uib-msdn-win7-vol;win7-msdn-prof;win7client.vmnat.local",
          "licenseKey" : "12345-12345-12345-12345-3dbv6",
          "notes" : "",
          "clientId" : "win7client.vmnat.local",
          "licensePoolId" : "win7-msdn-prof",
          "type" : "LicenseOnClient"
          }
]Describes the licensepool and to which opsi product the license pool is assinged.
Example for a licensePool object:
 method licensePool_getObjects [] {"id":"win7-msdn-prof"}
[
          {
          "ident" : "win7-msdn-prof",
          "type" : "LicensePool",
          "description" : "MSDN Keys",
          "productIds" :
                    [
                    "win7",
                    "win7-x64"
                    ],
          "id" : "win7-msdn-prof"
          }
]This is in fact also a storage object, but it is a little aside of the standard. It tells us to which depot a client is assigned.
The syntax is
 method configState_getClientToDepotserver *depotIds *clientIds
*masterOnly *productIds
Example:
method configState_getClientToDepotserver [] "pcbon4.uib.local"
[
          {
          "depotId" : "bonifax.uib.local",
          "alternativeDepotIds" :
                    [

                    ],
          "clientId" : "pcbon4.uib.local"
          }
]The hostControl Methods are used to communicate and control the clients.
Since opsi 4.0.3 we strongly recommend to use the hostControlSafe methods.
All hostControlSafe or hostControl Methods have as last parameter the hostIds. The hostIds are the list of clients this method should work on.
In all hostControlSafe methods this parameter is not optional, if you want to send a method to all clients you have to give a "*". In the older hostControl methods it is allowed to omit this parameter, which means send to all. This has caused some trouble to people which tried this with methods like
hostControl_reboot. So with opsi 4.0.3 we breaked the backward compatibilty and now a empty hostIds is not any more allowed for the hostControl_reboot and hostControl_shutdown methods.
-
hostControlSafe_execute
Excute a command on the client.
Connect the opsiclientd of the givenhostIdsand tell them to startcommand.
Parameters:command hostIds -
hostControlSafe_fireEvent
Starts a opsiclientd event on the client.
Connect the opsiclientd of the givenhostIdsand tell them to start theevent.
Parameters:event hostIds -
hostControlSafe_getActiveSessions
Get information of the logged on users on the client.
Connect the opsiclientd of the givenhostIdsand ask for the active sessions.
Parameters:hostIds -
hostControlSafe_opsiclientdRpc
Run the web servicemethodof the opsiclientd.
Connect the opsiclientd of the givenhostIdsand tell them to run the web servicemethodusing the givenparameters. This is the most generic hostControlSafe method, because you may start any possible method. The best way to find out what is possible, is to have a look at control interface https://<clientId>:4441
Parameters:method *params hostIds -
hostControlSafe_reachable
Checks if the opsiclientd is reachable.
Connect the opsiclientd of the givenhostIdsbut do not a login.
Parameters:hostIds -
hostControlSafe_reboot
Reboot the clients.
Connect the opsiclientd of the givenhostIdsand starts a reboot.
Parameters:hostIds -
hostControlSafe_showPopup
Shows a popup message on the clients.
Connect the opsiclientd of the givenhostIdsand starts a popup windows with themessage.
Parameters:message hostIds -
hostControlSafe_shutdown
Shutdown the clients.
Connect the opsiclientd of the givenhostIdsand starts a shutdown.
Parameters:hostIds -
hostControlSafe_start
Sends a wakeOnLan signal the clients.
This is the only hostControlSafe method that not use the opsiclientd.
Parameters:hostIds -
hostControlSafe_uptime
Asks for the clients uptime.
Connect the opsiclientd of the givenhostIdsand get the clients uptime in seconds.
Parameters:hostIds
-
lor_readorreadlog
Reads a opsi log file from the server.
Parameters:logType *objectId *maxSize
Possible logTypes are instlog (opsi-winst), clientconnect (opsiclientd), userlogin, bootimage, opsiconfd. The objectId is normally the clientId to which the log belongs. -
log_writeorwritelog
Writes a opsi log file to the server.
Parameters:logType data *objectId *append
Logtypes and objectId see above,append(true/false) (Default = false) should the log be appended to an existing log. There is an internal maximum size of 5 GB for theses log files.
These methods are still available as legacy methods, which means that calls to these methods are mapped to the new methods internally.
Here comes a short list of some methods with a short description. This is meant mainly for orientation and not as a complete reference. The short description does not necessarily provide all information you need to use this method.
method addHardwareInformation hostId, info
Adds hardware information for the computer <hostid>. The hash <info> is passed. Existing information will be overwritten for matching keys. Applicable for special keys only.
method authenticated
Prove whether the authentication on the server was successful.
method checkForErrors
Test the backend for consistency (only available for file backend by now).
method createClient clientName, domain, description=None, notes=None
Creates a new client.
method createGroup groupId, members = [], description = ""
Creates a group of clients (as used by the opsi-Configed).
method createLicenseKey productId, licenseKey
Assigns an (additional) license key to the product <productId>.
method createLocalBootProduct productId, name, productVersion, packageVersion, licenseRequired=0, setupScript="", uninstallScript="", updateScript="", alwaysScript="", onceScript="", priority=10, description="", advice="", productClassNames=('localBoot')Creates a new localBoot product (opsi-winst product).
method createNetBootProduct productId, name, productVersion, packageVersion, licenseRequired=0, setupScript="", uninstallScript="", updateScript="", alwaysScript="", onceScript="", priority=10, description="", advice="", productClassNames=('netboot')Creates a new netBoot (boot image) product.
method createProduct productType, productId, name, productVersion, packageVersion, licenseRequired=0,setupScript="", uninstallScript="", updateScript="", alwaysScript="", onceScript="", priority=10, description="", advice="", productClassNames=""
Creates a new product.
method createProductDependency productId, action, requiredProductId="", requiredProductClassId="", requiredAction="", requiredInstallationStatus="", requirementType=""
Creates product dependencies.
method createProductPropertyDefinition productId, name, description=None, defaultValue=None, possibleValues=[]
Creates product properties.
method deleteClient clientId
Deletes a client.
method deleteGeneralConfig objectId
Deletes a client configuration or domain configuration.
method deleteGroup groupId
Deletes a client group.
method deleteHardwareInformation hostId
Deletes all hardware information for the computer <hostid>.
method deleteLicenseKey productId, licenseKey
Deletes a license key for product <productId>.
method deleteNetworkConfig objectId
Deletes network configuration (for example depot share entry) for a client or domain.
method deleteOpsiHostKey hostId
Deletes a pckey from the pckey data base.
method deleteProduct productId
Deletes a product from the data base.
method deleteProductDependency productId, action, requiredProductId="", requiredProductClassId="", requirementType=""
Deletes product dependencies.
method deleteProductProperties productId *objectId
Deletes all properties of a product.
method deleteProductProperty productId property *objectId
Deletes a single product property.
method deleteProductPropertyDefinition productId, name
method deleteProductPropertyDefinitions productId
Deletes a single property or all properties from the product <productId>.
method deleteServer serverId
Deletes a server configuration
method exit
Quit the opsi-admin.
method getBackendInfos_listOfHashes
Supplies information about the available backends of the opsi depot server and which of them are activated.
method getBootimages_list
Supplies the list of the available boot images.
method getClientIds_list serverId = None, groupId = None, productId = None, installationStatus = None, actionRequest = None
Supplies a list of clients which meet the assigned criteria.
method getClients_listOfHashes serverId = None, groupId = None, productId = None, installationStatus = None, actionRequest = No
Supplies an extended list of clients which meet the assigned criteria (with description, notes and last seen for each client).
method getDefaultNetBootProductId clientId
Supplies the netboot product (for example: system software) which will be installed when the boot image install is assigned.
method getDomain hostId
Supplies the computer domain.
method getGeneralConfig_hash objectId
Supplies the general configuration of a client or a domain.
method getGroupIds_list
Supplies the list of saved client groups.
opsi-admin -d -S method auditHardwareOnHost_getObjects '[]' '{"hostId":"<hostId"}'Supplies the hardware information of the specified computer.
method getHostId hostname
Supplies the hostid of the specified host name.
method getHost_hash hostId
List of properties of the specified computer.
method getHostname hostId
Supplies the host name of the specified host id.
method getInstallableLocalBootProductIds_list clientId
Supplies a list of all localBoot products that could be installed on the client.
method getInstallableNetBootProductIds_list clientId
Supplies a list of all netBoot products that could be installed on the client.
method getInstallableProductIds_list clientId
Supplies a list of all products that could be installed on the client.
method getInstalledLocalBootProductIds_list hostId
Supplies a list of all localBoot products that are installed on the client.
method getInstalledNetBootProductIds_list hostId
Supplies a list of the installed netBoot products of a client or server.
method getInstalledProductIds_list hostId
Supplies a list of the installed products for a client or server.
method getIpAddress hostId
Supplies the IP address of a host.
method getLicenseKey productId, clientId
Supplies an available license key of the specified product or the product license key which is assigned to the client.
method getLicenseKeys_listOfHashes productId
Supplies a list of all license keys for the specified product.
method getLocalBootProductIds_list
Supplies a list of all known localBoot products.
method getLocalBootProductStates_hash clientIds = []
Supplies for all clients the installation status and action request of all localBoot products.
method getMacAddresses_list hostId
Supplies the MAC address of the specified computer.
method getNetBootProductIds_list
Supplies a list of all NetBoot products.
method getNetBootProductStates_hash clientIds = []
Supplies for all clients the installation status and action request of all netBoot products.
method getNetworkConfig_hash objectId
Supplies the network specific configurations of a client or a domain.
method getOpsiHostKey hostId
Supplies the pckey of the specified hostid.
method getPcpatchPassword hostId
Supplies the password of pcpatch (encrypted with the pckey of hostId).
method getPossibleMethods_listOfHashes
Supplies the list of callable methods (approximately like in this chapter).
method getPossibleProductActionRequests_list
Lists the available action requests of opsi.
method getPossibleProductActions_hash
Supplies the available actions for each product (setup, deinstall , ….).
method getPossibleProductActions_list productId=softprod
Supplies the list of all actions (setup, deinstall,….).
method getPossibleProductInstallationStatus_list
Supplies the list of all installation states (installed, not_installed,… )
method getPossibleRequirementTypes_list
Supplies the list of types of product requirement (before, after, … )
method getProductActionRequests_listOfHashes clientId
Supplies the list of upcoming actions of the specified client.
method getProductDependencies_listOfHashes productId = None
Supplies the list of product dependencies of all or the specified product.
method getProductIds_list productType = None, hostId = None, installationStatus = None
Supplies a list of products which meet the specified criteria.
method getProductInstallationStatus_hash productId, hostId
Supplies the installation status for the specified client and product.
method getProductInstallationStatus_listOfHashes hostId
Supplies the installation status of the specified client.
method getProductProperties_hash productId, objectId = None
Supplies the product properties of the specified product and client.
method getProductPropertyDefinitions_hash
Supplies all known product properties with description, allowed values,…
method getProductPropertyDefinitions_listOfHashes productId
Supplies the product properties of the specified product with description, allowed values,… .
method getProductStates_hash clientIds = []
Supplies installation status and action requests of all products (for the specified clients).
method getProduct_hash productId
Supplies the meta data (description, version, …) of the product
method getProvidedLocalBootProductIds_list serverId
Supplies a list of available localBoot products on the specified server.
method getProvidedNetBootProductIds_list serverId
Supplies a list of available netBoot products on the specified server.
method getServerId clientId
Supplies the opsi-config-server in charge of the specified client.
method getServerIds_list
Supplies a list of the known opsi-config-server.
method getServerProductIds_list
Supplies a list of the server products.
method getUninstalledProductIds_list hostId
Supplies the products which are uninstalled.
method powerOnHost mac
Send a WakeOnLan signal to the specified MAC address.
method setBootimage bootimage, hostId, mac=None
Set a bootimage for the specified client.
method setGeneralConfig config, objectId = None
Set for client or domain the generalConfig
method setHostDescription hostId, description
Set a description for a client.
method setHostLastSeen hostId, timestamp
Set the last seen time stamp of a client.
method setHostNotes hostId, notes
Set the notes for a client.
method setMacAddresses hostId, macs
Set the client MAC address in the data base.
method setNetworkConfig objectId, serverId='', configDrive='', configUrl='', depotDrive='', depotUrl='', utilsDrive='', utilsUrl='', winDomain='', nextBootServiceURL=''
Set the specified network data for the opsi-client-agent for a client.
method setOpsiHostKey hostId, opsiHostKey
Set the pckey for a computer.
method setPXEBootConfiguration hostId *args
Set the pipe for PXE-Boot with *args in the append-List.
method setPcpatchPassword hostId password
Set the encrypted (!) password for hostId
method setProductActionRequest productId, clientId, actionRequest
Set an action request for the specified client and product.
method setProductInstallationStatus productId, hostId, installationStatus, policyId="", licenseKey=""
Set an installation status for the specified client and product.
method setProductProperties productId, properties, objectId = None
Set the product properties for the specified product (and the specified client).
method unsetBootimage hostId
Unset the boot image start for the specified client.
method unsetPXEBootConfiguration hostId
Delete PXE-Boot pipe.
method unsetProductActionRequest productId, clientId
Set the action request to none.
In opsi 4 is we have the possibility to extend the basic opsi 4 methods with
own additional methods which use the opsi 4 base methods. This is done for
example to implement the opsi 3 legacy methods or to create methods which fit
better to the needs of the opsi-configed.
These extenstions has to be written as Python code in the /etc/opsi/backendManager/extend.d directory.
Extensions are loaded "on to" an BackendManager-instance and can reference
it with self.
Even opsi is open source, there are some components which are not free at the moment. At this time (June 2012) the following components of opsi are not free:
- the MySQL backend for configuration data (see the section called “mysql backend for configuration data”)
- license management (see Section 15, “opsi License Management”)
- WAN/VPN extension (see Section 16, “opsi WAN/VPN extension”)
- Dynamic Depot Assignment (see Section 18, “Dynamic Depot Assignment”)
- User Profile Management (see Section 20, “opsi extension User Profile Management”)
- opsi Nagios Connector (see Section 21, “opsi-Nagios-Connector”)
See also at our website: http://uib.de/en/opsi_cofunding/index.html
These components are developed in a co-funding project which means that until the complete development costs are payed by co-funders, they are only allowed to use by the co-funders or for evaluation purposes. If we have earned the development cost we will give these modules for everybody for free. To control the use of these components until they are free there is a activation file /etc/opsi/modules, which is protected against changes via electronic signature. If this activation file doesn’t exist, only the free parts of opsi will work.
If you need for evaluation a temporary valid activation file please contact info@uib.de. If you become a co-funder, you will get a unlimited activation file.
If you got an activation file, copy this file as root to /etc/opsi/modules. If this is done, execute:
opsi-setup --set-rights /etc/opsi
You may check your activation state with one of the following methods:
Using the opsi-configed choose the menu entry Help/opsi-Module which shows a window with the activation state.
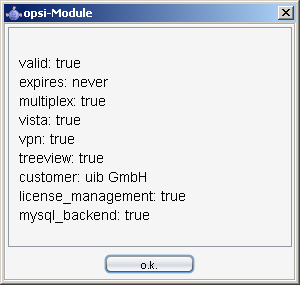
At the command line you may use the command opsi-admin with the method backend_info. (Remark: Never give your activation file or the output of this command to third people without deleting the signature).
opsi-admin -d method backend_info
{
"opsiVersion" : "3.99.0.0",
"modules" :
{
"customer" : "uib GmbH",
"vista" : true,
"vpn" : true,
"license_management" : true,
"expires" : "never",
"valid" : true,
"multiplex" : true,
"signature" : "DIES-IST-KEINE-ECHTE-SIGNATUR",
"treeview" : true,
"mysql_backend" : true
}
}To make Software distribution manageable for the system administrator, a client computer has to notice that new software-packets or updates are available and install them without user interaction. It is important to make user-interaction completely obsolete as the installation can run unattended this way and a user cannot stop the installation during the installation process.
These requirements are implemented in opsi by the opsi-client-agent:
On the client side the service opsiclientd examines usually at boot time, before the user logs in, whether an update has to be installed for this client.
If there are software packets to be installed on the client, the script processing program opsi-winst is being started to do the installation job. The server provides all the installation scripts and software files on a file share. At this time the user has no chance to interfere with the installation process.
As an additional option the module loginblocker can be installed to prevent a user login before the end of the installation process is reached.
Before any software can be installed with the opsi-winst program, it has to be prepared as opsi-product-package. For details see Chapter Integration of new software packets into the opsi software deployment from the getting started manual.
The opsi-client-agent is installed at %ProgramFiles%\opsi.org\opsi-client-agent.
This directory contains all programs of the opsi-client-agent like e.g. the opsiclientd, the opsiclientd notifier, the opsi-winst and some required libraries. Also we will find here the configuration files and graphical templates (skins) of the mentioned programs.
The directory %ProgramFiles%\opsi.org\opsi-client-agent is protected against manipulation by users without administrator privileges.
The directory %ProgramFiles%\opsi.org\opsi-client-agent\opsiclientd contains the configuration file of the opsiclientd and you need administrator privileges to read it.
There also is the directory c:\opsi.org.
This directory is used (at the moment) for caching installation files and data (see WAN-Extension). In future it will have some more functions like containing log files.
You need administrator privileges to read the directory c:\opsi.org.
The log files of the opsi-client-agent you will find in c:\tmp.
The opsiclientd is the core of the opsi-client-agent. The opsiclientd starts at boot time and runs with administrative privileges.
The important features are:
-
Event based control:
The activity of the opsi client agent (opsiclientd) may be triggered by different events in the client system. According to this fact, the start of the installation can be triggered by the system start up event or can be configured to be triggered by some other system event. -
Control via web service:
This interface is used for push installations and for maintenance purposes as well. -
Remote configuration:
The configuration data for the clients may be changed (globally or client specific) at the server by editing the Host parameters.
The opsi-client-agent consists of multiple components :
- opsiclientd: the main service
- opsiclientd notifier: information and communication window
- opsi-login-blocker: block the user login until the installation has finished
In case of automatic OS-Installation with opsi (not image based), the opsi-client-agent will be installed automatically.
You may set the action request uninstall to uninstall the opsi-client-agent.
For a subsequent installation on an existing Windows system or for repair purposes see the getting started manual. Section 7.6, “Subsequent installation of the opsi-client-agents”.
Core component of the opsi-client-agent is the service opsiclientd. This service starts at the boot time.
The opsiclientd has the following tasks:
- while the system is booting and the opsiclientd is waiting for the GUI to come up, the block_login_notifier is started and shows a padlock at the right upper corner of the screen.
-
Getting in action if the configuration event takes place. In case of action the opsiclientd contacts the opsi server via web service (JSON-RPC) and asks for the configuration data and required actions.
The default event is gui_startup which will fire at boot time before user login. - Creates a named pipe which is used by the opsi-login-blocker to ask via JSON-RPC the opsiclientd when to unblock the login.
- Starting the opsiclientd notifier as a thread for information and interaction with the user.
- If needed, it connects to the opsi-depot to update the local installation of the opsi-winst and then starts it to process the action requests (software packet installations).
The opsiclientd notifier implements the interaction with the user. It displays status messages and may give the possibility to interact with the process.
There are different situations where the opsiclientd notifier will become active in different ways:
- blocking notifier
- Indicates that the opsi-login-blocker is blocking

- event notifier
- Shows information about the current event.

- action notifier
- Shows state of the event processing
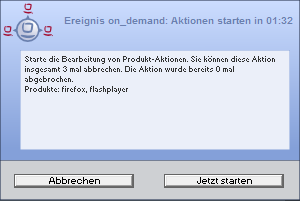
- shutdown notifier
-
Gives information about a requested reboot / shutdown
(if
shutdown_warning_time> 0)
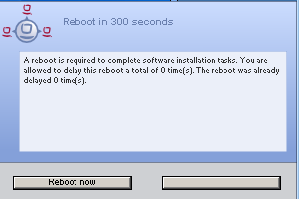
Caution
Names and functionality of the notifier have changed from opsi 4.0 to opsi 4.0.1.
The opsi 4.0 event notifier doesn’t exist anymore.
The opsi 4.0.1 event notifier equals the opsi 4.0 action notifier.
The opsi 4.0.1 action notifier has almost the same functionality as the opsi 4.0 event notifier, but it will only be activated if there is a action request.
The opsi-login-blocker for NT5 (Win2K/WinXP) is implemented as a GINA (opsigina.dll).
This GINA waits until the opsiclientd reports, that all product actions are finished or, if the opsiclientd is not reachable, until the connection timeout to the opsiclientd is reached (normally 120 seconds). Then the complete control is forwarded to the next GINA, which is normally the msgina.dll.
The opsi-login-blocker for NT6 (Vista/Win7) is implemented as a credential provider filter (OpsiLoginBlocker.dll). This credential provider filter blocks all credential providers until the opsiclientd reports, that all product actions are finished or, if the opsiclientd is not reachable, until the connection timeout to the opsiclientd is reached (normally 120 seconds).
How the opsiclientd works may be configured in many details. To understand these configuration options, it is necessary to understand the processing sequence. Here comes an overview of the work flow of a standard event like the event_gui_startup.

The most important parameters have the following relations:
Tip
If there is an error while connecting to the opsi-config-server, the log of this problem cannot be sent to the server. But you may find the log in the local logfile opsiclientd.log in the log directory (c:\tmp) at the client.
-
If an event fires, the
event_notifier_commandwill be started.
Now the opsiclientd tries to reach the opsi-config-server using the url address.
If afteruser_cancelable_afterseconds there is still no connection established, so the opsiclientd notifier will enable an Abort button. If no connection could be established inconnection_timeoutseconds, the opsiclientd connection process will be aborted and the event ends with an error message. To avoid a user from aborting, setuser_cancelable_after=connection_timeout. -
After a successful connection to the opsi-config-server, the opsiclientd checks if there are action requests for this client. If there are action requests and the
action_warning_time> 0, theaction_notifier_commandwill be executed.
This is normally the opsiclientd notifier, which shows now the list of action requests for this client foraction_warning_timeseconds.
Is theaction_warning_time= 0 (default) theaction_notifier_commandwill not be executed.
You may allow the user to suspend the process at this time by settingaction_user_cancelable>= 0. The user may suspend the actions up toaction_user_cancelabletimes. Afteraction_user_cancelableaborts in sequence or ifaction_user_cancelable= 0 the user gets no possibility to suspend the actions.
In every case there will be a button which allows the user to start the installations immediately without waiting for the count down ofaction_warning_timeseconds. The messages displayed by the opsiclientd notifier may be configured with the optionsaction_messageoraction_message[lang]. This messages may contain the placeholders%action_user_cancelable%(total number of allowed suspensions) and%action_cancel_counter%(number of suspensions already used by the user).
If the actions are not suspended by the user, theaction_cancel_counterwill reset and the opsi-winst will be executed to process the action requests. -
If the opsi-winst terminates with a reboot or shutdown request, the
shutdown_notifier_commandwill be executed ifshutdown_warning_time> 0.
The now startingshutdown_notifier_commandshows forshutdown_warning_timeseconds a message saying that the client will be rebooted. Ifshutdown_user_cancelable> 0 the user may suspend the reboot up toshutdown_user_cancelabletimes in sequence. If the user suspends the reboot, theshutdown_notifier_commandwill be restarted aftershutdown_warning_repetition_time. Theshutdown_notifier_commandshows a message which may be configured byshutdown_warning_messageorshutdown_warning_message[lang]. This message may contain the placeholders%shutdown_user_cancelable%(maximum number of allowed suspensions) and%shutdown_cancel_counter%number of suspensions already done by the user).
If the client is rebooted (by the user or the opsi-client-agent) the%shutdown_cancel_counter%will be reset.
Tip
The sequence of event processing and user actions is visualized as a timeline graphic at the info page of the opsiclientd.
(the section called “opsiclientd infopage”).
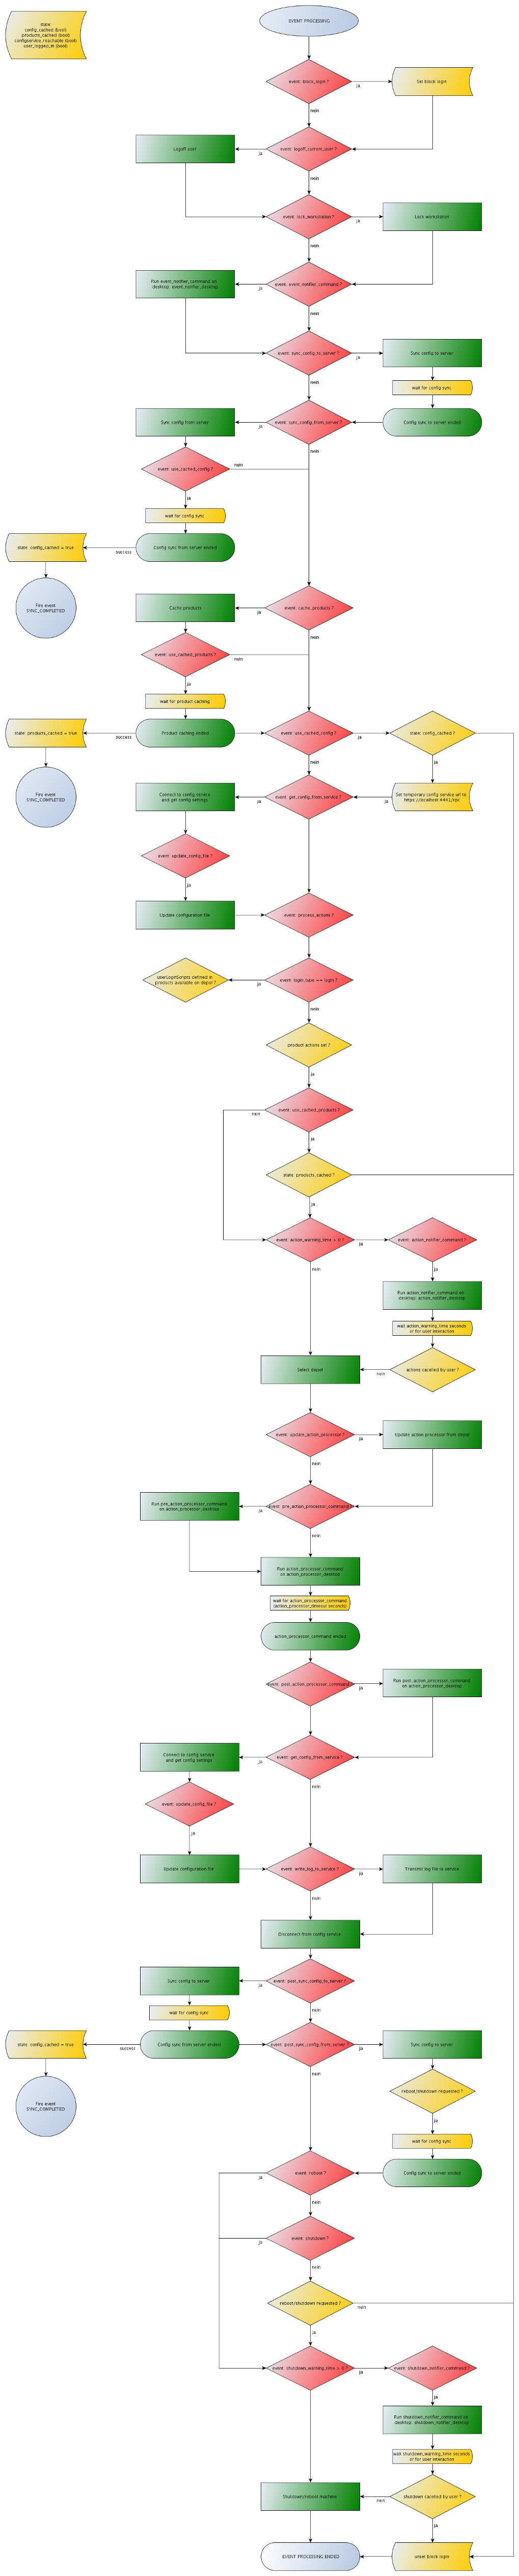
To meet the requirements of the various different situations in which the opsi-client-agent will become active, a slightly complex configuration is needed. To reduce the complexity, the configuration file uses something like inheritance.
In the opsiclientd configuration section headers like [event_<config-id>] introduce a new event configuration section. An event configuration may be disabled by setting the section option active = false.
There are different types of event configurations (type).
-
There are event configuration templates (type = template).
Event configurations may inherit configurations from another event. In this case the optionsuperpoints to the other event to inherit all parameters from (excluding the parameteractive). These inherited parameters may be overridden by local parameters in the current event section. So an event section needs only those parameters which are different from thesuperevent.
Setting an event toactive = falsedoes not change anything in the inheritance process. The other event types are:
-
gui startup
Agui startupevent starts while booting the client and loading the graphical user interface (GUI). It is the most used event and set to active in the default configuration. -
custom
Event configurations of the typecustomare fired by awqlevent. Awqlevent is defined by the correspondingwqlstatement in the event configuration. If thewqlstatement is empty, the event will never be fired, but can be executed from the interactive web interface. -
user login
will be fired at the login of a user -
timer
will be fired allintervalseconds -
sync completed
will be fired if the synchronisation of configurations (sync_config_from_server) or products (cache_products) is completed. -
sw on demand
will be fired by the user choosing Start actions now in the software-on-demand web page of the opsiclientd. It will never be fired if software-on-Demand is not used.
-
There are Preconditions
Preconditions define special system states (e.g. a user is logged on). In the opsiclientd configuration a section header of the form[precondition_<precondition-id>]starts the declaration of a Precondition. A Precondition is true, if all declared options are true. An option not declared (but possible) is assumed as true.
Possible options for Preconditions are:-
user_logged_in: is true if currently a user is logged on. -
config_cached: is true if the caching of configuration data is completed (see:sync_config_from_server). -
products_cached: is true if the caching of product files is completed (see:cache_products).
-
-
A Precondition can be assigned to an event configuration.
If there is a Precondition in an event configuration header, there also must be a configuration for this event without any precondition. The event configuration with the precondition inherits all the parameters from the event configuration without precondition.
If the event is fired, first it will be checked which preconditions are true. If there is no precondition true, the configuration without precondition is used. Is one precondition true, the configuration is used, which is bound to this precondition. If more than one of the preconditions are true, the most specific event configuration is used (which is the configuration with the most matching options).
A small example for a better understanding:
While installing software it may be necessary to reboot the computer. Is there currently a user logged on, you should warn about the pending reboot. This warning should have a timeout and it may make sense to ask the user, if the reboot should be cancelled (at the moment).
Is there no user logged on, it makes no sense to ask and wait for an answer. So in this case the reboot should take place immediatly.
To handle these different situations, we configure the event_on_demand in the following way:
-
We define a Precondition
user_logged_inwhich comes true if a user is logged on to the system (user_logged_in = true). -
In the default configuration for the event
event_on_demand(without any Precondition) we setshutdown_warning_time = 0(immediate reboot without warning). -
At the configuration
event_on_demand{user_logged_in}we setshutdown_warning_time = 300(warning with 300 seconds timeout).
The configuration file is:
c:\program files\opsi.org\opsi-client-agent\opsiclientd\opsiclientd.conf
Caution
This configuration file is UTF-8 encoded.
Any changes using editors which do not support this encoding (e.g. notepad.exe) may destroy any umlaut in this file.
The configuration written in this file may be changed by different configuration data, which come via web service after a successful connection to the opsi-server.
A sample opsiclientd.conf:
; = = = = = = = = = = = = = = = = = = = = = = = = = = = = = = = = = = = =
; =     configuration file for opsiclientd                              =
; = = = = = = = = = = = = = = = = = = = = = = = = = = = = = = = = = = = =


; - - - - - - - - - - - - - - - - - - - - - - - - - - - - - - - - - - - -
; -     global settings                                                 -
; - - - - - - - - - - - - - - - - - - - - - - - - - - - - - - - - - - - -
[global]

# Location of the log file.
log_file = c:\\tmp\\opsiclientd.log

# Set the log (verbosity) level
# (0 <= log level <= 9)
# 0: nothing, 1: essential, 2: critical, 3: errors, 4: warnings, 5: notices
# 6: infos, 7: debug messages, 8: more debug messages, 9: passwords
log_level = 4

# Client id.
host_id =

# Opsi host key.
opsi_host_key =

# Verify opsi server certs
verify_server_cert = false

# Verify opsi server certs by ca
verify_server_cert_by_ca = false

# On every daemon startup the user login gets blocked
# If the gui starts up and no events are being processed the login gets unblocked
# If no gui startup is noticed after <wait_for_gui_timeout> the login gets unblocked
# Set to 0 to wait forever
wait_for_gui_timeout = 120

# Application to run while blocking login
block_login_notifier = %global.base_dir%\\notifier.exe -s notifier\\block_login.ini

; - - - - - - - - - - - - - - - - - - - - - - - - - - - - - - - - - - - -
; -     config service settings                                         -
; - - - - - - - - - - - - - - - - - - - - - - - - - - - - - - - - - - - -
[config_service]
# Service url.
# http(s)://<opsi config server address>:<port>/rpc
url = https://opsi.uib.local:4447/rpc

# Conection timeout.
connection_timeout = 30

# The time in seconds after which the user can cancel the connection establishment
user_cancelable_after = 30

; - - - - - - - - - - - - - - - - - - - - - - - - - - - - - - - - - - - -
; -     depot server settings                                           -
; - - - - - - - - - - - - - - - - - - - - - - - - - - - - - - - - - - - -
[depot_server]

# Depot server id
depot_id =

# Depot url.
# smb://<depot address>/<share name>/<path to products>
url =

# Local depot drive
drive =

# Username that is used for network connection [domain\]<username>
username = pcpatch

; - - - - - - - - - - - - - - - - - - - - - - - - - - - - - - - - - - - -
; -     cache service settings                                          -
; - - - - - - - - - - - - - - - - - - - - - - - - - - - - - - - - - - - -
[cache_service]
# Maximum product cache size in bytes
product_cache_max_size = 5000000000

; - - - - - - - - - - - - - - - - - - - - - - - - - - - - - - - - - - - -
; -     control server settings                                         -
; - - - - - - - - - - - - - - - - - - - - - - - - - - - - - - - - - - - -
[control_server]

# The network interfaces to bind to.
# This must be the IP address of an network interface.
# Use 0.0.0.0 to listen to all interfaces
interface = 0.0.0.0

# The port where opsiclientd will listen for HTTPS rpc requests.
port = 4441

# The location of the server certificate.
ssl_server_cert_file = %global.base_dir%\\opsiclientd\\opsiclientd.pem

# The location of the server private key
ssl_server_key_file = %global.base_dir%\\opsiclientd\\opsiclientd.pem

# The location of the static files
static_dir = %global.base_dir%\\opsiclientd\\static_html

; - - - - - - - - - - - - - - - - - - - - - - - - - - - - - - - - - - - -
; -     notification server settings                                    -
; - - - - - - - - - - - - - - - - - - - - - - - - - - - - - - - - - - - -
[notification_server]

# The network interfaces to bind to.
# This must be the IP address of an network interface.
# Use 0.0.0.0 to listen to all interfaces
interface = 127.0.0.1

# The first port where opsiclientd will listen for notification clients.
start_port = 44000

# Port for popup notification server
popup_port = 45000

; - - - - - - - - - - - - - - - - - - - - - - - - - - - - - - - - - - - -
; -     opsiclientd notifier settings                                   -
; - - - - - - - - - - - - - - - - - - - - - - - - - - - - - - - - - - - -
[opsiclientd_notifier]

# Notifier application command
command = %global.base_dir%\\notifier.exe -p %port% -i %id%

; - - - - - - - - - - - - - - - - - - - - - - - - - - - - - - - - - - - -
; -     opsiclientd rpc tool settings                                   -
; - - - - - - - - - - - - - - - - - - - - - - - - - - - - - - - - - - - -
[opsiclientd_rpc]

# RPC tool command
command = %global.base_dir%\\opsiclientd_rpc.exe "%global.host_id%" "%global.opsi_host_key%" "%control_server.port%"

; - - - - - - - - - - - - - - - - - - - - - - - - - - - - - - - - - - - -
; -     action processor settings                                       -
; - - - - - - - - - - - - - - - - - - - - - - - - - - - - - - - - - - - -
[action_processor]
# Locations of action processor
local_dir = %global.base_dir%\\opsi-winst
remote_dir = opsi-winst\\files\\opsi-winst
filename = winst32.exe

# Action processor command
command = "%action_processor.local_dir%\\%action_processor.filename%" /opsiservice "%service_url%" /clientid %global.host_id% /username %global.host_id% /password %global.opsi_host_key%

# Load profile / environment of %run_as_user%
create_environment = false

; - - - - - - - - - - - - - - - - - - - - - - - - - - - - - - - - - - - -
; -     events                                                          -
; - - - - - - - - - - - - - - - - - - - - - - - - - - - - - - - - - - - -
[event_default]
; === Event configuration
# Type of the event (string)
type = template
# Interval for timer events in seconds (int)
interval = -1
# Maximum number of event repetitions after which the event will be deactivated (int, -1 = forever)
max_repetitions = -1
# Time in seconds to wait before event becomes active (int, 0 to disable delay)
activation_delay = 0
# Time in seconds to wait before an event will be fired (int, 0 to disable delay)
notification_delay = 0
# Event notifier command (string)
event_notifier_command = %opsiclientd_notifier.command% -s notifier\\event.ini
# The desktop on which the event notifier will be shown on (current/default/winlogon)
event_notifier_desktop = current
# Block login while event is been executed (bool)
block_login = false
# Lock workstation on event occurrence (bool)
lock_workstation = false
# Logoff the current logged in user on event occurrence (bool)
logoff_current_user = false
# Get config settings from service (bool)
get_config_from_service = true
# Store config settings in config file (bool)
update_config_file = true
# Transmit log file to opsi service after the event processing has finished (bool)
write_log_to_service = true
# Shutdown machine after action processing has finished (bool)
shutdown = false
# Reboot machine after action processing has finished (bool)
reboot = false

; === Sync/cache settings
# Sync configuration from local config cache to server (bool)
sync_config_to_server = false
# Sync configuration from server to local config cache (bool)
sync_config_from_server = false
# Sync configuration from local config cache to server after action processing (bool)
post_sync_config_to_server = false
# Sync configuration from server to local config cache after action processing (bool)
post_sync_config_from_server = false
# Work on local config cache
use_cached_config = false
# Cache products for which actions should be executed in local depot cache (bool)
cache_products = false
# Maximum transfer rate when caching products in byte/s (int, 0 = no limit)
cache_max_bandwidth = 0
# Dynamically adapt bandwith to other network traffic (bool)
cache_dynamic_bandwidth = false
# Work on local depot cache
use_cached_products = false

; === Action notification (if product actions should be processed)
# Time in seconds for how long the action notification is shown (int, 0 to disable)
action_warning_time = 0
# Action notifier command (string)
action_notifier_command = %opsiclientd_notifier.command% -s notifier\\action.ini
# The desktop on which the action notifier will be shown on (current/default/winlogon)
action_notifier_desktop = current
# Message shown in the action notifier window (string)
action_message = Starting to process product actions. You are allowed to cancel this event a total of %action_user_cancelable% time(s). The event was already canceled %state.action_processing_cancel_counter% time(s).
# German translation (string)
action_message[de] = Starte die Bearbeitung von Produkt-Aktionen. Sie können diese Aktion insgesamt %action_user_cancelable% mal abbrechen. Die Aktion wurde bereits %state.action_processing_cancel_counter% mal abgebrochen.
# French translation (string)
action_message[fr] = Traitement des actions du produit. Vous êtes autorisé à annuler cet événement un total de %action_user_cancelable% fois. L'événement a été déjà annulée %state.action_processing_cancel_counter% fois.
# Number of times the user is allowed to cancel the execution of actions (int)
action_user_cancelable = 0

; === Action processing
# Should action be processed by action processor (bool)
process_actions = true
# Type of action processing (default/login)
action_type = default
# Update the action processor from server before starting it (bool)
update_action_processor = true
# Command which should be executed before start of action processor
pre_action_processor_command =
# Action processor command (string)
action_processor_command = %action_processor.command%
# The desktop on which the action processor command will be started on (current/default/winlogon)
action_processor_desktop = current
# Action processor timout in seconds (int)
action_processor_timeout = 10800
# Command which should be executed before after action processor has ended
post_action_processor_command =

; === Shutdown notification (if machine should be shut down or rebooted)
# Process shutdown requests from action processor
process_shutdown_requests = true
# Time in seconds for how long the shutdown notification is shown (int, 0 to disable)
shutdown_warning_time = 0
# Shutdown notifier command (string)
shutdown_notifier_command = %opsiclientd_notifier.command% -s notifier\\shutdown.ini
# The desktop on which the action notifier will be shown on (current/default/winlogon)
shutdown_notifier_desktop = current
# Message shown in the shutdown notifier window (string)
shutdown_warning_message = A reboot is required to complete software installation tasks. You are allowed to delay this reboot a total of %shutdown_user_cancelable% time(s). The reboot was already delayed %state.shutdown_cancel_counter% time(s).
# German translation (string)
shutdown_warning_message[de] = Ein Neustart wird benötigt um die Software-Installationen abzuschliessen. Sie können diesen Neustart insgesamt %shutdown_user_cancelable% mal verschieben. Der Neustart wurde bereits %state.shutdown_cancel_counter% mal verschoben.
# French translation (string)
shutdown_warning_message[fr] = Un redémarrage est nécessaire pour terminer l'installation du logiciel. Vous êtes autorisé à retarder le redémarrage un total de %shutdown_user_cancelable% fois. Le redémarrage a été déjà retardé %state.shutdown_cancel_counter% fois.
# Number of times the user is allowed to cancel the shutdown (int)
shutdown_user_cancelable = 0
# Time in seconds after the shutdown notification will be shown again after the user has canceled the shutdown (int)
shutdown_warning_repetition_time = 3600

[event_gui_startup]
super = default
type = gui startup
name = gui_startup
block_login = true

[event_gui_startup{user_logged_in}]
name = gui_startup
shutdown_warning_time = 300
block_login = false

[event_gui_startup{cache_ready}]
use_cached_config = true
use_cached_products = true
action_user_cancelable = 3
action_warning_time = 60

[event_gui_startup{installation_pending}]
name = gui_startup
active = true

[event_on_demand]
super = default
type = custom
name = on_demand

[event_on_demand{user_logged_in}]
name = on_demand
shutdown_warning_time = 300

[event_software_on_demand]
super = default
type = sw on demand

[event_sync]
super = default
type = template
process_actions = false
event_notifier_command =
sync_config_to_server = true
sync_config_from_server = true
cache_products = true
cache_dynamic_bandwidth = true

[event_timer]
super = sync
type = timer
active = false
interval = 3600

[event_net_connection]
super = sync
type = custom
active = false
wql = SELECT * FROM __InstanceModificationEvent WITHIN 2 WHERE TargetInstance ISA 'Win32_NetworkAdapter' AND TargetInstance.NetConnectionStatus = 2

[event_sync_completed]
super = default
type = sync completed
event_notifier_command =
process_actions = false
get_config_from_service = false
write_log_to_service = false

[event_sync_completed{cache_ready_user_logged_in}]
reboot = true
shutdown_user_cancelable = 10
shutdown_warning_time = 300

[event_sync_completed{cache_ready}]
reboot = true

[event_user_login]
super = default
type = user login
action_type = login
active = false
action_message = Starting to process user login actions.
action_message[de] = Beginne mit der Verarbeitung der Benutzer-Anmeldungs-Aktionen.
action_message[fr] = Traitement des actions à la connexion de l'utilisateur.
block_login = false
process_shutdown_requests = false
get_config_from_service = false
update_config_file = false
write_log_to_service = false
update_action_processor = true
event_notifier_command = %opsiclientd_notifier.command% -s notifier\\userlogin.ini
event_notifier_desktop = default
action_processor_command = %action_processor.command% /sessionid %service_session% /allloginscripts /silent
action_processor_desktop = default
action_processor_timeout = 300

[event_on_shutdown]
super = default
type = custom
name = on_shutdown
active = False

[event_on_shutdown{installation_pending}]
name = on_shutdown
active = False

[event_silent_install]
super = default
type = custom
name = silent_install
event_notifier_command =
process_shutdown_requests = false
action_processor_productIds = swaudit,hwaudit
action_processor_command = %action_processor.command% /productlist %action_processor_productIds% /silent
action_processor_desktop = winlogon
action_processor_timeout = 300

[event_timer_silentinstall]
super = silent_install
type = timer
active = false
interval = 21600

[precondition_user_logged_in]
user_logged_in = true

[precondition_cache_ready]
config_cached = true
products_cached = true

[precondition_cache_ready_user_logged_in]
user_logged_in = true
config_cached = true
products_cached = true

[precondition_installation_pending]
installation_pending = trueThe opsiclientd configuration can be changed by the host parameter tab at the opsi management interface.
The entries in the host parameter have to be according to the following patterns:
opsiclientd.<name of the section>.<name of the key>
Example:
opsiclientd.event_gui_startup.action_warning_time = 20
set in the configuration file opsiclientd.conf in the section [event_gui_startup] the value of action_warning_time to the value 20.
The following figure shows how to change the serverwide general configure via opsi-configed
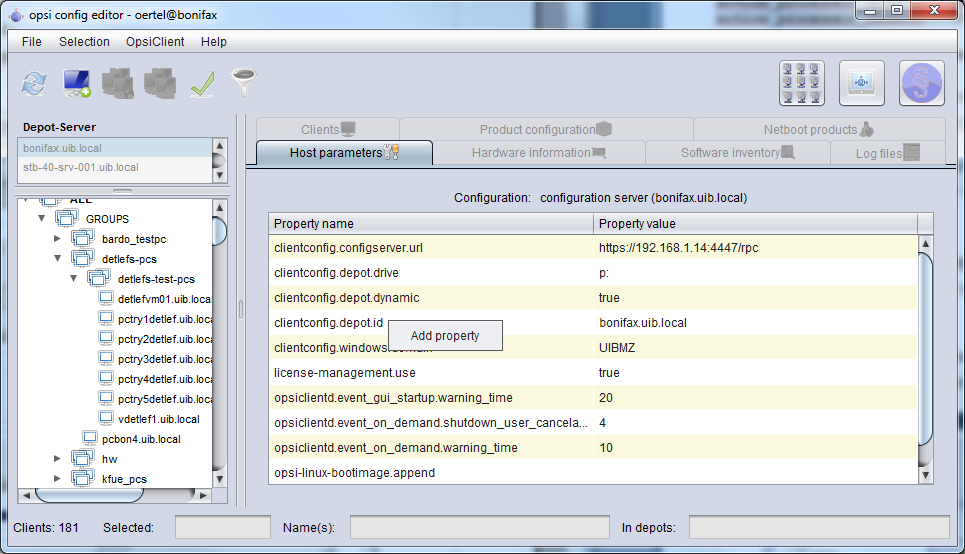
Using the context menu you may choose add property to set a new key/value pair.
To delete a server default, please use the opsi-admin tool:
Example:
opsi-admin -d method config_delete "opsiclientd.event_gui_startup.action_warning_time"
It is also possible to manipulate these entries client specific via opsi-configed.
To delete a client specific entry, please use the opsi-admin tool:
Example:
@opsi-admin> method configState_delete "opsiclientd.event_gui_startup.action_warning_time" "myclient.uib.local"
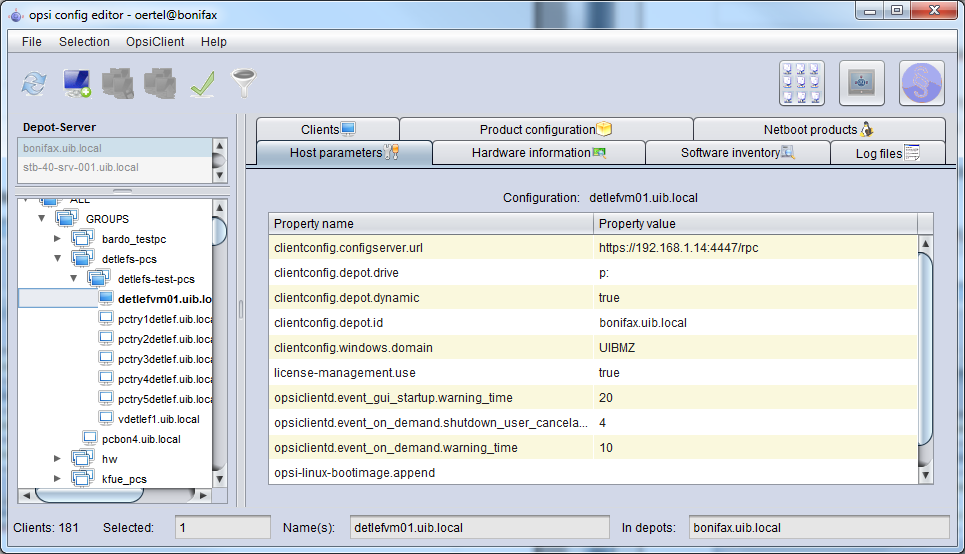
The opsiclientd logs to:
c:\tmp\opsiclientd.log.
All log information will be transferred to the opsi-config-server via web service. At the server you find these log infos at /var/log/opsi/clientconnect/<ip-or-name-of-the-client>.log. They are presented in the opsi configed at the tab logfiles / client connect.
Every line at the log has the pattern:
[<log level>] [<time stamp>] [message source] message.
There are the following log levels:
# Set the log (verbosity) level
# (0 <= log level <= 9)
# 0: nothing, 1: essential, 2: critical, 3: errors, 4: warnings, 5: notices
# 6: infos, 7: debug messages, 8: more debug messages, 9: passwords
Example:
(...)
[5] [Mar 22 10:17:46] [ event processing gui_startup  ] Event config 'sync_completed{cache_ready}' added to event generator 'sync_completed'   (Events.pyo|1107)
[5] [Mar 22 10:17:46] [ event processing gui_startup  ] Event config 'gui_startup' added to event generator 'gui_startup'   (Events.pyo|1107)
[5] [Mar 22 10:17:46] [ event processing gui_startup  ] Event config 'gui_startup{cache_ready}' added to event generator 'gui_startup'   (Events.pyo|1107)
[5] [Mar 22 10:17:46] [ event processing gui_startup  ] Event config 'on_demand' added to event generator 'on_demand'   (Events.pyo|1107)
[5] [Mar 22 10:17:46] [ event processing gui_startup  ] Event config 'sync_completed{cache_ready_user_logged_in}' added to event generator 'sync_completed'   (Events.pyo|1107)
[5] [Mar 22 10:17:46] [ event processing gui_startup  ] Event config 'gui_startup{user_logged_in}' added to event generator 'gui_startup'   (Events.pyo|1107)
[5] [Mar 22 10:17:46] [ event processing gui_startup  ] Event config 'sync_completed' added to event generator 'sync_completed'   (Events.pyo|1107)
[5] [Mar 22 10:17:46] [ event processing gui_startup  ] Event config 'software_on_demand' added to event generator 'software_on_demand'   (Events.pyo|1107)
[5] [Mar 22 10:17:46] [ event processing gui_startup  ] Event config 'on_demand{user_logged_in}' added to event generator 'on_demand'   (Events.pyo|1107)
[5] [Mar 22 10:17:46] [ event processing gui_startup  ] Updating config file: 'C:\Program Files (x86)\opsi.org\opsi-client-agent\opsiclientd\opsiclientd.conf'   (Config.pyo|287)
[5] [Mar 22 10:17:46] [ event processing gui_startup  ] No need to write config file 'C:\Program Files (x86)\opsi.org\opsi-client-agent\opsiclientd\opsiclientd.conf', config file is up to date   (Config.pyo|318)
[5] [Mar 22 10:17:46] [ event processing gui_startup  ] No product action requests set   (EventProcessing.pyo|591)
[5] [Mar 22 10:17:49] [ event processing gui_startup  ] Writing log to service   (EventProcessing.pyo|247)
[6] [Mar 22 10:17:49] [ opsiclientd                   ] shutdownRequested: 0   (Windows.pyo|340)
[6] [Mar 22 10:17:49] [ opsiclientd                   ] rebootRequested: 0   (Windows.pyo|326)
[5] [Mar 22 10:17:49] [ opsiclientd                   ] Block login now set to 'False'   (Opsiclientd.pyo|111)
[6] [Mar 22 10:17:49] [ opsiclientd                   ] Terminating block login notifier app (pid 1620)   (Opsiclientd.pyo|148)
[6] [Mar 22 10:17:49] [ event processing gui_startup  ] Stopping notification server   (EventProcessing.pyo|225)
[6] [Mar 22 10:17:51] [ control server                ] client connection lost   (Message.pyo|464)
[6] [Mar 22 10:17:52] [ event processing gui_startup  ] Notification server stopped   (Message.pyo|651)
[5] [Mar 22 10:17:52] [ event processing gui_startup  ] ============= EventProcessingThread for event 'gui_startup' ended =============   (EventProcessing.pyo|1172)
[5] [Mar 22 10:17:52] [ opsiclientd                   ] Done processing event '<ocdlib.Events.GUIStartupEvent object at 0x023CE330>'   (Opsiclientd.pyo|405)
[5] [Mar 22 10:19:41] [ opsiclientd                   ] Session 'HSzMB1wtOiBS6vHl7mh3ro5r6s3TanFu' from ip '127.0.0.1', application 'opsi jsonrpc module version 4.0.1' expired after 120 seconds   (Session.pyo|184)
[6] [Mar 22 10:19:41] [ opsiclientd                   ] Session timer <_Timer(Thread-20, started daemon 2636)> canceled   (Session.pyo|120)
[5] [Mar 22 10:19:41] [ opsiclientd                   ] Session 'HSzMB1wtOiBS6vHl7mh3ro5r6s3TanFu' from ip '127.0.0.1', application 'opsi jsonrpc module version 4.0.1' deleted   (Session.pyo|207)
[6] [Mar 22 10:27:55] [ control pipe                  ] Creating pipe \\.\pipe\opsiclientd   (ControlPipe.pyo|253)
[5] [Mar 22 10:27:55] [ event generator wait_for_gui  ] -----> Executing: getBlockLogin()   (JsonRpc.pyo|123)
[5] [Mar 22 10:27:55] [ opsiclientd                   ] rpc getBlockLogin: blockLogin is 'False'   (ControlPipe.pyo|428)
[6] [Mar 22 10:27:55] [ event generator wait_for_gui  ] Got result   (JsonRpc.pyo|131)
'
The opsi-login-blocker logging to the log file: c:\tmp\opsi_loginblocker.log.
According to the fact that there are a lot of subcomponents of the opsiclientd which work and log at the same time, the log file of the opsiclientd becomes complex.
In order to make it easier to understand how the different subcomponents work together, the opsiclientd has an own info page which visualizes the running tasks on a timeline.
You may view this info page at the browser calling the url:
https://<address-of-the-client>:4441/info.html
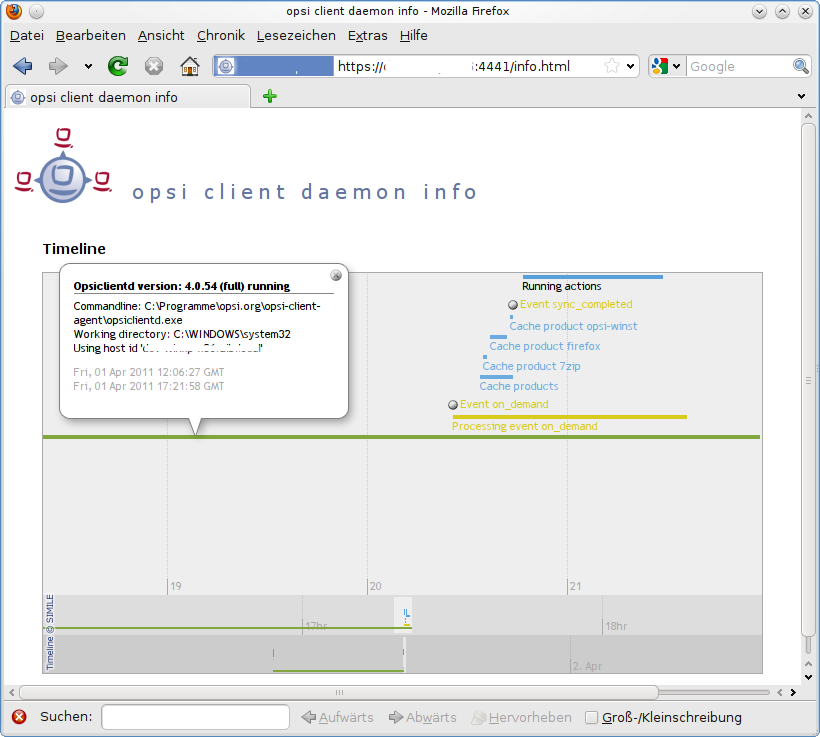
The opsiclientd has its own web service interface which can be used to transmit commands to the opsiclientd. The possible commands can be divided in the following categories:
- send Messages (Popup)
- Push installation (start the event on_demand)
- other maintenance tasks
This can be done on the command line using the tool opsi-admin by calling one of the hostControl_* methods. Calling one of these methods takes the parameter *hostid which:
- can be dropped to send the command to all clients
- can be the name of a client (e.g.. "pcbon4.uib.local")
-
can be a list of client names according to the pattern [ <client1>, <client2>]
e.g.. ["pcbon1.uib.local", "pcbon2.uib.local"] may contain wildcards like
*e.g.. "pcbon4.*" or "pcbon*"
If a client isn’t reachable (e.g. powerd off) you will get a message.
Using the opsi-configed you may send messages to the clients. the section called “Sending messages (Show popup message)”
At the command line you may do this with the tool opsi-admin:
opsi-admin -d method hostControl_showPopup message *hostid
Example:
opsi-admin -d method hostControl_showPopup "This is my message" "myclient.uib.local"
The opsi-server may send a command to the client that the client should process the configured action requests immediately. This is done by activating the event on_demand at the client.
This is possible using the opsi-configed and is described in chapter: Push installationen: start the event on demand
From the opsi-server the client can be instructed to execute the product actions.
Executing Events can also be done from the opsi-configed. the section called “Fire opsiclientd event (Push Installation)”
On the command line you may use opsi-admin to fire an event:
opsi-admin -d method hostControl_fireEvent event *hostIds
Example:
opsi-admin -d method hostControl_fireEvent "on_demand" "myclient.uib.local"
Using the control server port you may remote control the opsiclientd. In order to do this you have to authenticate yourself at the web service. This could be done either with the local administrator account (with a not empty password) or with the opsi-host-Id (FQDN, client name and DNS Domain name) as user name and the opsi-hostkey as password.
Using the opsi-configed you may choose the menu opsiClient or the context menu in the Clients Tab.
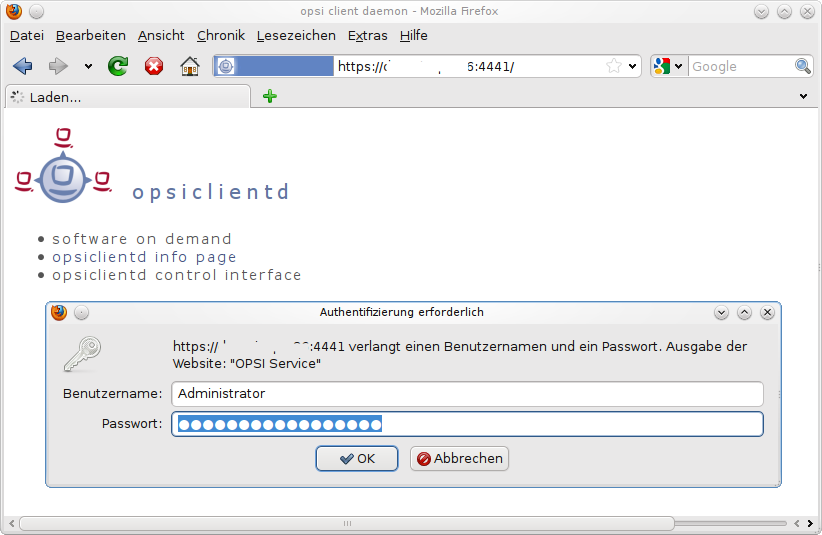
At the command line you also can initiate a client:
shutdown:
opsi-admin -d method hostControl_shutdown *hostIds
reboot:
opsi-admin -d method hostControl_reboot *hostIds
Adapting the opsi-client-agent to your Corporate Identity can be important for the user acceptance when rolling out opsi. By adding your corporate logo to the opsi background image, the users feel more familiar with the opsi installation instead of being puzzled by something unknown.
The files to be configured for opsi-winst are to be found in the directory /var/lib/opsi/depot/opsi-client-agent/files/opsi/opsi-winst/winstskin:
-
bg.png
This is the opsi-winst background image, where during installation text messages and product logos are shown. -
skin.ini
This is the configuration file to specify the position, font and color of text messages during installation.
In the directory
/var/lib/opsi/depot/opsi-client-agent/files/opsi/dist/notifier
are the files to configure the look of the notifiers. Each notifier has an image and a configuration file:
-
block_login.bmp
background image of the login blocker notifier. -
block_login.ini
configuration file of the login blocker notifier. -
event.bmp
background image of the server connection event notifier. -
event.ini
configuration file of the server connection event notifier. -
action.bmp
background image of the action notifier (software installation). -
action.ini
configuration file of the action notifier. -
shutdown.bmp
background image of the shutdown/reboot action notifier. -
shutdown.ini
configuration file of the shutdown/reboot action notifier. -
popup.bmp
background image of the popup message notifier. -
popup.ini
configuration file of the popup message notifier. -
userlogin.bmp
background image of the user login event notifier. -
userlogin.ini
configuration file of the user login event notifier.
(available since opsi-client-agent version 4.0.2.3)
The custom directory can be used to protect your configuration changes during opsi-client-agent updates: (/var/lib/opsi/depot/opsi-client-agent/files/opsi/custom). During server updates of opsi-client-agent the whole custom directory will be saved and restored after the update, so that your custom changes will persist.
-
custom/config.ini
Values from this config file override values from the defaultcfg/config.ini. Except of the values forpckeyandbootmode, which never are picked from that file. Add to your custom config file only those values, that are different from the default settings. -
custom/winstskin/*.*
All the files from this directory will be copied to the clientsC:\Program Files (x86)\opsi.org\opsi-client-agent\custom\winstskindirectory during installation of the opsi-client-agent on the client. Thiswinstskindirectory, if it exists, since opsi-winst Version 4.11.3.4. is the preferred one. It must contain all required winstskin files and configurations, for the content of the default directory is ignored. -
custom/notifier/*.*
All the files from this directory will be copied to the clientsC:\Program Files (x86)\opsi.org\opsi-client-agent\notifierdirectory during installation of the opsi-client-agent and overwrite the files from the server sidefiles/opsi/dist/notifier/directory. -
custom/opsiclientd.conf
If it exists, thecustom/opsiclientd.confwill be copied to the clientsC:\Program Files (x86)\opsi.org\opsi-client-agent\opsiclientddirectory during installation of the opsi-client-agent and overwrites the default opsiclientd.conf from the server sidefiles/opsi/dist/opsiclientd/directory. So the custom opsiclientd.conf must contain all the required configuration entries.
Attention:
Using a customopsiclientd.confis not recommended. To customize your client configuration, use the host parameter configuration for single features as described in the opsi-client-agent chapter. Using a customopsiclientd.confis applicable for very complex configurations only. By using a customopsiclientd.conf, after each update of opsi-client-agent it is required to check the server default filefiles/opsi/dist/opsiclientd/opsiclientd.conffor changes to be patched to your customopsiclientd.conf.
So: hands off this feature, unless you really know what you are doing!
To prevent a user login before all installations are completed, opsi provides the optional opsi-login-blocker.
The opsi-login-blocker is implemented as the Gina opsigina.dll. Gina means Graphical Identification and Authentication and is the official Microsoft hook to manipulate the login process.
If you already have a special Gina-DLL installed, which is different from the original Microsoft msgina.dll (e.g. Novell nwgina.dll), you should not install the opsi-login-blocker without consulting uib or https://forum.opsi.org. It is possible to chain different gina.dll’s, but therefore the installation has to be customized. Proper chaining of Gina DLLs is a quite critical task and might result in a locked up computer if done improperly.
Whether the opsi-login-blocker is installed or not is configured by the switch LoginBlockerStart=on/off in section [opsi-client-agent-install] of the client configuration.
The information about the Subsequent installation of the opsi-client-agent you will find in the opsi-getting-started manual (Chapter First Steps).
In order to install the opsi-client-agent from a prepared (sysprep) masterimage, the opsi-client-agent has to be (re)installed while the clone awakes and get a new personality.
To do this use the following steps:
-
Copy from the share
opsi_depotthe complete content of the directoryopsi-client-agentin a temporary directory on the master. Edit there the file
files\opsi\cfg\config.ini:-
In section
[installation]set forservice_user=the login name of a user that is member of the opsiadmin group.. -
NOT RECOMMENDED: In section
[installation]set forservice_password=the uncoded password of this user. Better: -
In section
[installation]set forservice_hidden_password=the base64 encoded password of this user. For encoding of the pawword you may use the opsi-winst functionbase64EncodeStr(<string>)or a online service like http://www.base64encode.org/
Ifservice_hidden_password=has any value the keyservice_password=will be ignored. -
In section
[opsiclientd]`set for `config_service.url =the web service address of your opsi-config-server e.g.. https://192.168.1.10:4447
-
In section
-
Make sure that the script
silent_setup.cmdfrom the temporary directory is called after the clone has its new personality. -
After the call of
silent_setup.cmdis finished, the temporary directory should be deleted.
If you like you may pack the temporary directory to a self extracting exe with final program start using a tool like filzip.
A localboot product is a opsi product which will be installed by the opsi-client-agent after the client started it’s default OS from the local hard disk. This diskriminate them form the netboot products which will be described later
The following products are basic products which come with the opsi-server installation.
The opsi-client-agent packet contains the installation and update mechanism of the opsi-client-agent.
The opsi-winst packet is a special case. It includes the actual opsi-winst winst32.exe, which is updated by the opsi-client-agent packet itself. The opsi-client-agent checks the server for there is a different version of the winst32.exe and then copies the new opsi-winst (all it’s files) to the client.
This automatic update do no more work for Windows 2000 since opsi 4.
he product javavm installs the required Java 1.6 runtime environment (required for opsi-configed) on the clients.
The product opsi-adminutils offers some utilities and a local installation of the opsi-configed.
The products hwaudit and swaudit provide the hardware and software inventories. The hardware data are acquired using WMI and written to the hardware inventory via opsi web service. The data for the software inventory are taken from the registry (HKEY_LOCAL_MACHINE\SOFTWARE\Microsoft\Windows\CurrentVersion\Uninstall) and passed to the inventory server via opsi web service.
Template for you own opsi scripts.
You may extract this template with:
`opsi-package-manager -x opsi-template_<version>.opsi`
it is also possible to rename it at the same time:
`opsi-package-manager -x opsi-template_<version>.opsi --new-product-id myprod`
Since opsi 4.0 the installation sequence will be calculated by regarding product dependencies and product priotities.
-
product dependencies
defines dependencies and needed installation sequence between opsi-packages. A typical example is the dependency between a java program and the java runtime environment (javavm). -
product priorities
will be used to push some packages to the beginning of the installation sequence and other packages to the end. For example it is useful install service pack and hotfixes at the beginning of a installation sequence and software inventory at the end.
Product priorities are numbers between 100 and -100 (0 is the default)
There are different possibilities how these two factors are used to calculate the installation sequence. According to this opsi provides two different algorithms.
You may switch between these algorithms:
- using the opsi-configed, in the Host parameter Tab of the server configuration
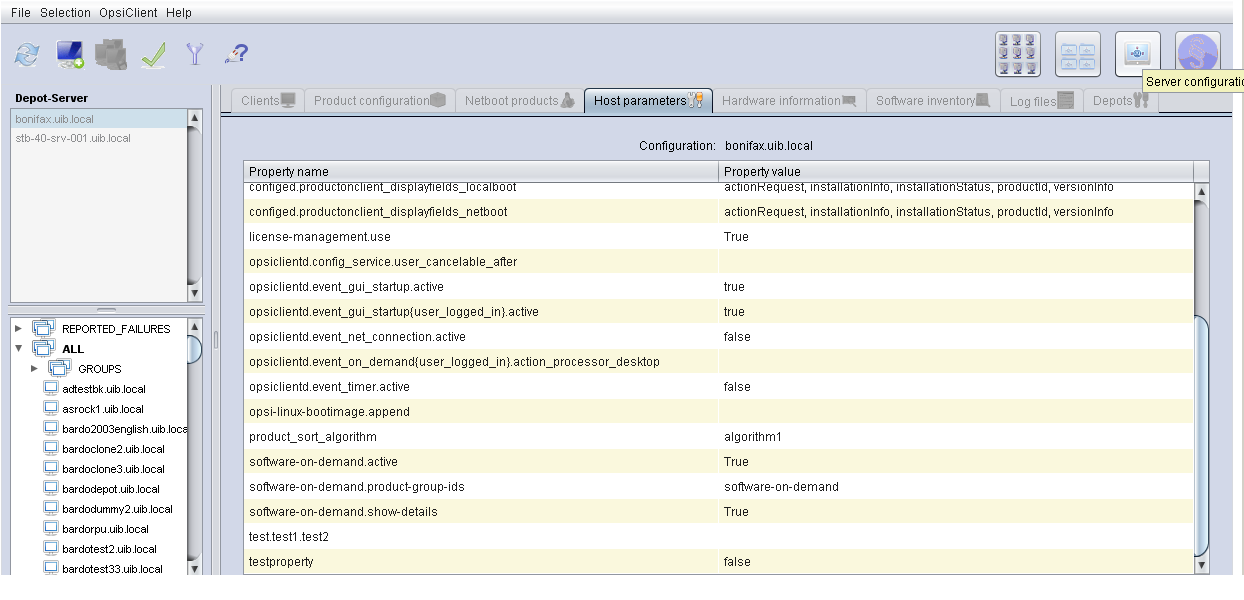
or you can do this on the commend line:
opsi-setup --edit-config-defaults
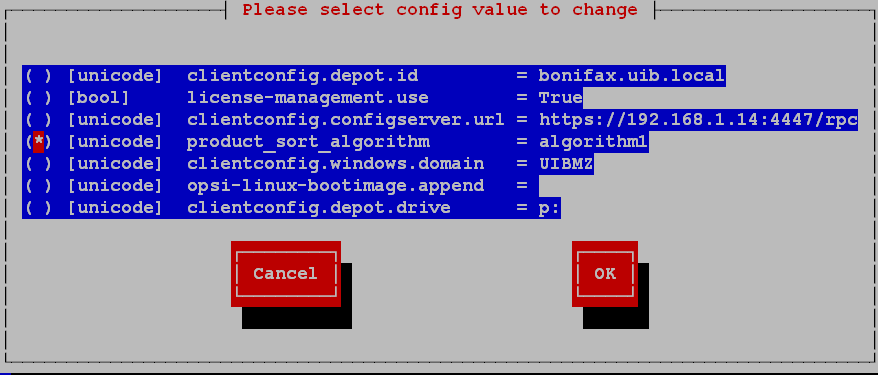
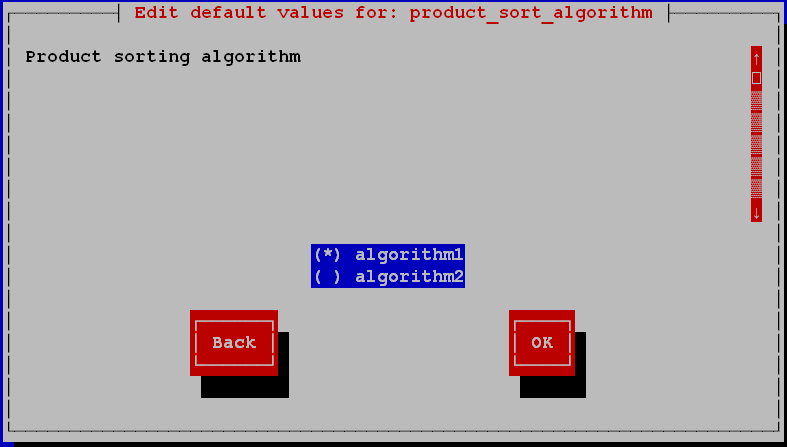
Using this algorithm, the product installation sequence at first will be calculated by the product priorities. In a second step it will be resorted to met the product dependencies. This algorithm may push products with low priority before products with higher priority to met the needs of product dependencies. But therefore you will not see installation problems as result of not resolved product dependencies.
The base philosophy of this algorithm is, that in practice there are three needed priority classes:
- Products which have to be installed at the beginning of a sequence, like OS-Patches. These products need a high priority (e.g. 100)
- "normal" products to install applications (default priority = 0)
- Products which have to be installed at the end of a installation sequence, like software inventory. These products need a low priority (e.g. -100)
Product dependicies will only resolved inside of priority class. This guarantees that products with a high priority will be installed very early. But is in your reponsibility that there are non product dependencies which go cross priority class borders.
Product priorities and dependencies belong to the meta data of a product. You will be asked for these meta data creating a new product using the command
opsi-newprod.
These meta data will be stored in the product control file and may be edited there. After changing the control file you have create and install the package again.
For more details see at getting started manual in the chapter creating a opsi-package.
The opsi linux boot image has some parameters which may be used to change the behaviour of the boot image. You will try this if the opsi linux boot images do not run properly with the standard parameters on your hardware (e.g. black screen).
You may change these standard parameters by the opsi-configed choosing the Tab Hostparameter and use there the entry opsi-linux-bootimage.append.
Typical values are here (may be combined):
-
acpi=off -
noapic -
irqpoll -
reboot=bios
A other important default is the password of the user root at the opsi linux boot image. This password is linux123 by default and you should change this for security reasons.
To do this change the opsi-linux-bootimage.append entry at the server-configuration.
The option you have to change is pwh (password hash). As value to this option you have to give a new password hash, which will be loaded to the /etc/shadow at boot time.
The best way to get the correct password hash is to login via ssh to your bootimage:
ssh root@<client.domain.tld>
The old password is linux123.
Now set a new password for root:
passwd
Get the new hash
grep root /etc/shadow
The output should look like this:
root:$6$344YXKIT$D4RPZfHMmv8e1/i5nNkOFaRN2oYNobCEjCHnkehiEFA7NdkDW9KF496OHBmyHHq0kD2FBLHZoTdr5YoDlIoWz/:14803:0:99999:7:::
Now copy from after the first colon until to the second colon and use this as value for pwh.
So the option for opsi-linux-bootimage.append may be:
pwh=$6$344YXKIT$D4RPZfHMmv8e1/i5nNkOFaRN2oYNobCEjCHnkehiEFA7NdkDW9KF496OHBmyHHq0kD2FBLHZoTdr5YoDlIoWz/
Steps of a re-installation:
Using PXE-Boot:
- Choose the client which has to be installed with the utility opsi-configed or opsi-admin.
- At the next reboot, the client detects (via PXE-Bootprom) the re-installation request and loads the boot image from the opsi-server.
Using CD-Boot: * The client boots the boot image from the opsi-client-bootcd. *The boot image starts and asks for confirmation to proceed with the re-installation. This is the only interactive question. After confirming this, the installation proceeds without any further request for interaction. * The boot image partitions and formats the hard disk. * The boot image copies the required installation files and configuration information from the opsi-server to the client and initiates a reboot. * After the reboot the client installs the OS according to the provided configuration information without any interaction. * Next the opsi-client-agent is installed as the opsi installer for automated software distribution. * The automated software distribution then installs all the software packages as defined in the client’s configuration.
The client PC has to be equipped with a bootable network controller. Most recent network controllers provide this functionality (PXE boot), also recent network controllers which are integrated on the PC’s main board. The PXE software, which is stored in the bootprom of the network controller, controls the boot process via network according to the BIOS boot device sequence. Usually the boot sequence has to be set in the BIOS, network-boot has to be the first boot device. If there is no possibility to use PXE you may boot from the opsi-client-bootcd.
The opsi installation package for the OS to be installed needs to be provided on the depot server. In the following we assume Windows XP to be the OS to install.
The PXE firmware gets activated at startup of the PC. Part of the PXE implementation is a DHCP client.
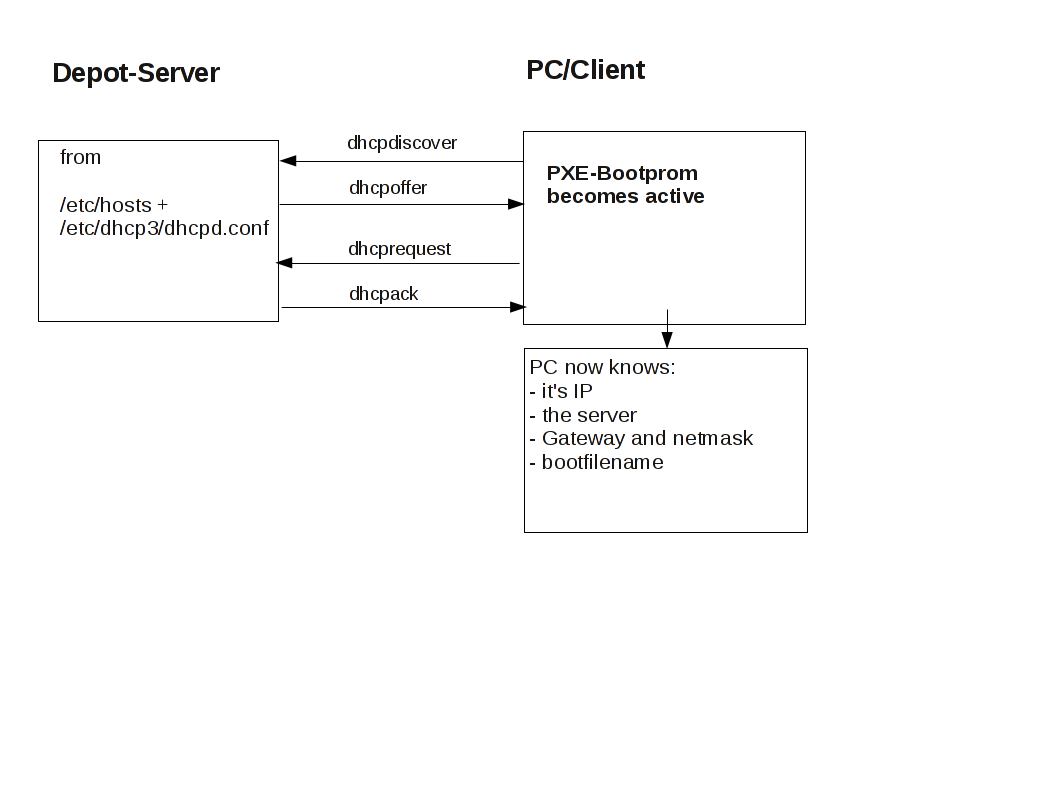
At first the PC only knows its hardware Ethernet address (MAC), consisting of six two-digit HEX characters.
The firmware initiates a DHCPDISCOVER broadcast: “I need an IP address, who is my DHCP-Server?“
The DHCP-Server offers an address (DHCPOFFER).
DHCPREQUEST is the response of the client to the server if the IP address is accepted. (This is not an obsolete step as there could be more than one server in the network.)
The server sends a DHCPACK to acknowledge the request. The information is sent to the client again.
You can watch this process on the display, for the PXE-BOOTPROM displays some firmware information and its CLIENT MAC ADDR. The rotating pipe-symbol is displayed during the request. When an offer was made it is replaced by an \ and you get the transmitted information (CLIENT IP, MASK, DHCP IP, GATEWAY IP). A short while later you should get a response like this: My IP ADDRESS SEEMS TO BE …….
This process makes the PC a regular, fully configured member of the network. The next step is to load the boot file (boot image) given in the configuration information.
The boot image is loaded via trivial file transfer protocol (tftp). The displayed message is „LOADING“. tftp is a rather old and simple protocol to transfer files without authentication. In fact, all data available via tftp is available to everyone in the network. Therefore the tftp access is limited to one directory, which is usually /tftpboot. This directory is specified in inetd (internet daemon, /etc/inetd.conf), which will start the tftp daemon tftpd if requested. The start command as noted in inetd.conf is something like
tftpd -p -u tftp -s /tftpboot
The PXE boot-process is multi-stage:
Stage 1 is to load and start the file submitted as part of the address discovery process (usually /tftpboot/linux/pxelinux.0).
The program pxelinux.0 then looks for configuration and boot information in /tftpboot/linux/pxelinux.cfg. It first looks for a PC specific file with a name based on the hardware ethernet address (MAC) of the network controller with a leading 01. The filename for the controller with the hardware ethernet address 00:0C:29:11:6B:D2 would be 01-00-0c-29-11-6b-d2. If the file is not found, pxelinux.0 will start to shorten the filename (starting at the end) to obtain a match. If this process ends without result, the file default will be loaded. This file only contains the instruction to boot from the local hard disk. In this case the PC won’t install anything and will just start the current OS from hard disk.
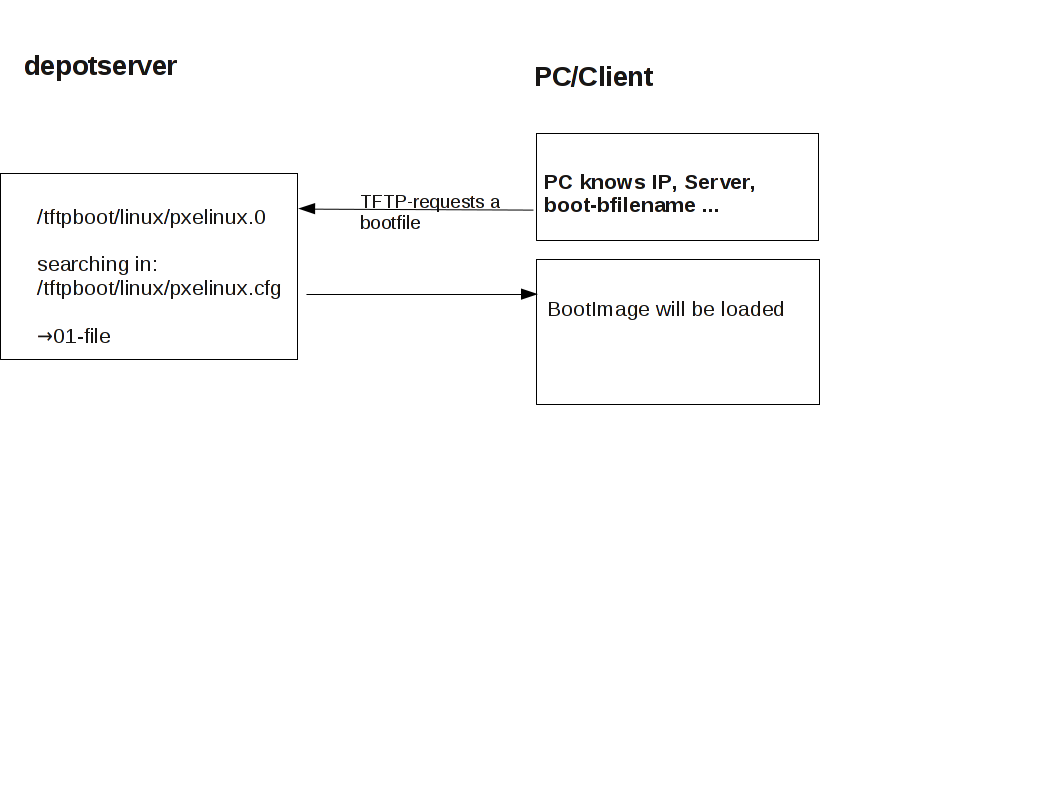
To initiate the re-installation of a certain PC, a loadable file is prepared for the program pxelinux.0. In order to do so, the opsipxeconfd creates a PC custom file in /tftpboot/linux/pxelinux.cfg. Part of this file is the command to load the installation boot image. Also this file contains the client key to decrypt the pcpatch password. This file is created as a named pipe and therefore disappears after being read once. More details about this in the chapter on security of file shares.
Based on the information the pxelinux.0 got from the named pipe, the actual bootimage is loaded from the opsi depot server via tftp. The bootimage is based on a linux kernel (/tftpboot/linux/install) within an appropriate initrd file system (/tftpboot/linux/miniroot.gz) and has a size of approximately 65 MB.
Similar to the tftp boot via PXE-bootprom, the installation boot image can be booted from the opsi bootcd.
This might be recommended under the following conditions:
- the client has no PXE bootprom;
- there is no dhcp;
- there is a dhcp but it isn’t allowed to configure any client data and the hardware addresses of the clients are unknown;
- there is a dhcp but it isn’t configured for this demand.
According to different situations, several information has to be provided for the CD boot image by interactive input. The most simple case is to provide no further information. Eventually the clients hostname can be passed by hn=<hostname>. Using the option ASK_CONF=1 several parameters can be queried. Pressing F1 at the CD prompt shows the syntax.
Please read the chapter Create a new client using the opsi-client-bootcd at the opsi-getting-started manual.
The bootimage again performs a dhcp request and configures the network interface according to the perceived information. Afterwards the configuration data for the client will be loaded via opsi web service.
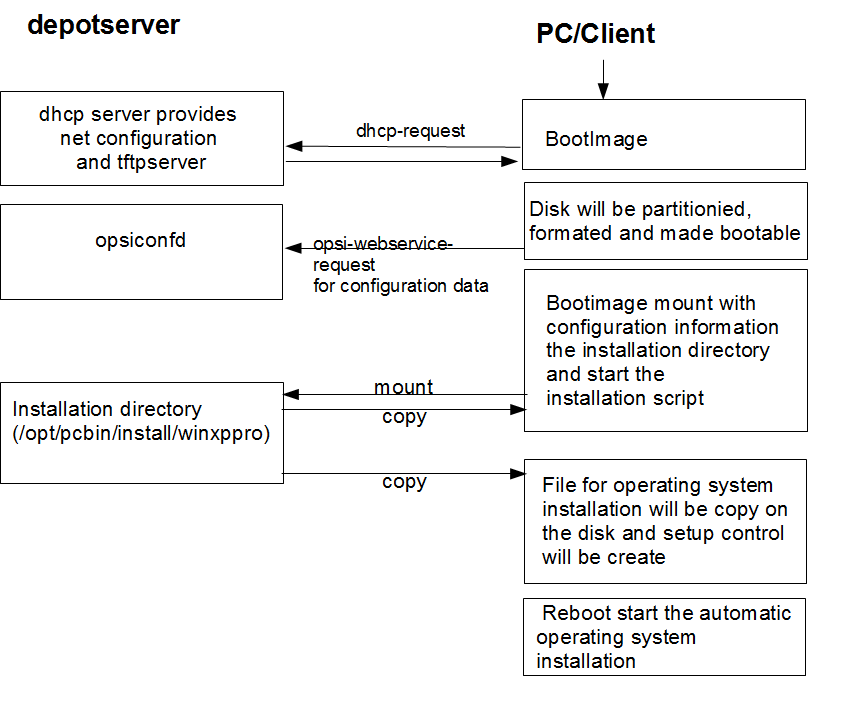
It also holds the information on how to partition the hard disk, what file system to use and which operating system to install. Also it provides the encrypted password to connect the file share.
These information will be combined with some information taken from the dhcp response and then be passed to the installation script for further processing.
Then the password for the user pcpatch will be decrypted with the transferred key to mount the installation share and then call the installation script from the mounted share to start the installation of the operating system. What specific operations the script performs depends on the operating system which is to be installed. Below the steps of a Windows XP installation will be described.
Prepare the disc: On the hard disk the bootimage creates a new partition (of size 6 GB), formats it and installs a bootable ntloader kernel.
Copy the installation file: The files required for OS installation and the setup files for the opsi-client-agent (which is the opsi software distribution pack) will be copied from the server file share (e.g. /var/lib/opsi/depot/winxppro/i386) to the local hard disk.
Maintain the configuration informations: Some of the configuration and control files contain replacement characters, which will be patched before starting the actual installation. With a specified script (patcha-script) the placeholders will be replaced with parameters taken from the information packet, which is built from configuration files and the dhcp-response. For example the file unattend.txt, which is the control file for unattended OS Installation, will be patched with specific information like host IP, client IP, client name, workgroup, default gateway etc..
Prepare Reboot: Bootrecords will be installed which will start the Windows setup program at the next reboot. The patched unattend.txt is passed to the setup as the control file for unattended installation.
Reboot: During the previous boot, the named pipe (which is indicating a request for installation) has been removed by reading it once. So the next PXE boot will load the default netboot response, which executes the command hdboot. The local boot loader will be started and the setup for operating system installation starts.
These steps are controlled by an OS specific python script.
The OS installation is based on the Microsoft unattended setup. Part of this is the standard hardware detection. In addition to the possibilities given during an installation from non-OEM or slipstreamed installation media, drivers and patches (i.e. service packs) can be installed during the initial installation, making the separate installation of drivers obsolete.
One feature of the unattended installation is the possibility to initiate additional installations after the main installation is finished. This mechanism is used to install the opsi-client-agent, which implements the automatized software distribution system. An entry in the registry marks the machine as being still in the reinstallation-mode.
The final reboot leads to starting the opsi-client-agent service for software distribution prior to the first user login. Based on the value of the aforementioned registry key the opsi-client-agent switches into reinstallation-mode. Therefore, regarding the configuration status of each software packet, each packet which is marked as action status ”setup” or installation status ”installed” within the configuration of that client will be installed. After all the designated client software has been installed, the reinstallation process is finished and the internal status is switched back from reinstallation-mode to standard-mode. In standard-mode only software packages that are marked as action status ”setup” will be installed.
As mentioned above the information collected from dhcp and opsi-webservice will be used to patch some configuration files as e.g. unattend.txt. The program used for patching is the script /user/local/bin/patcha.
This script replaces patterns like @flagname() in a file with values taken as flagname=value from a control file (default input is /proc/cmdline). In the files that have to be patched, the search and replace pattern must start with @, might have an optional after the flagname and must have one or more trailing .
So by calling patcha <filename> the file <filename> will be patched with information taken from /proc/cmdline.
Calling patcha without any parameters will show all the flagname=value entries from /proc/cmdline.
A different input file (another_cmdline) can be passed to patcha:
patcha -f another_cmdline
Without any other parameter patcha will show the information taken from another_cmdline. This input file must have cmdline’syntax, which means to be entries like '<flagname>=<value> separated by space.
patcha -f another_cmdline patchfile
This will patch patchfile with substitutions taken from another_cmdline.
Usage: patcha [-h|-v] [-f <params file>] <patch file>

Fill placeholders in file <patch file>
Options:
-v Show version information and exit
-h Show this help
-f <params file> File containig key value pairs
If option not given key value pairs from kernel cmdline are used
patcha patcht nur einen Tag pro Zeile.
Caveat: patch a patches only the first pattern of each line.
Each pattern will be expanded (or reduced) to the length of the value to be replaced with and then replaced. Trailing chars will not be affected.
Examples:
With the input file try.in
cat try.in
tag1=hallohallohallo1 tag2=t2
and the file patch.me to be patched:
cat patch.me
<#@tag1##########################>
<#@tag2##########################>
<#@tag1#>
<#@tag2#>
<#@tag1*##########################>
<#@tag2*##########################>
<#@tag1*#>
<#@tag2*#>
<#@tag1#><#@tag1#####>
<#@tag2*#######><#@tag1#>
the result will be:
./patcha -f try.in patch.me
cat patch.me
<hallohallohallo1>
<t2>
<hallohallohallo1>
<t2>
<hallohallohallo1>
<t2>
<hallohallohallo1>
<t2>
<hallohallohallo1><#@tag1#####>
<t2><#@tag1#>
The information about the Structure of the unattended installation products you will find in the opsi-getting-started manual.
The netboot products for the installation of the operating systems of the NT6 familiy, contain a lot of properties which will be described below.
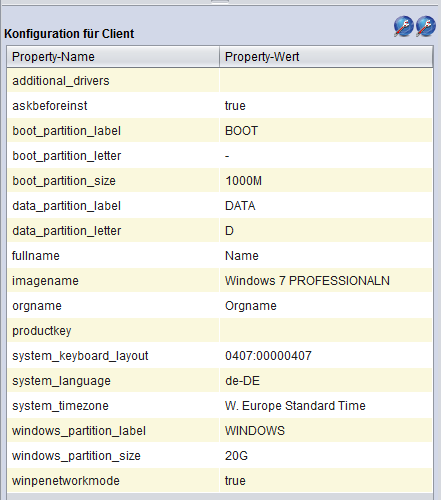
- additional_drivers
-
One or more directories below
<productid>\drivers\drivers\additional. All driver directories below the given directories will be integrated. If there is here a driver for a found device, no other driver will be integrated by the automatic driver integration. - askbeforeinst
- Should there be a confirmation dialog before start installing,
- boot_partition_label
- Label of the boot_partition (Bitlocker partion)
- boot_partition_letter
- Drive letter of the boot_partition (Bitlocker Partion)
- boot_partition_size
- Size of the boot_partition (Bitlocker Partion). 0 = create no partition
- data_partition_label
- Label of the data partion (if created)
- data_partition_letter
- Drive letter of the data partion (if created)
- fullname
- Full name of the license holder, which is given to the setup program
- imagename
- Name of the operating system variant
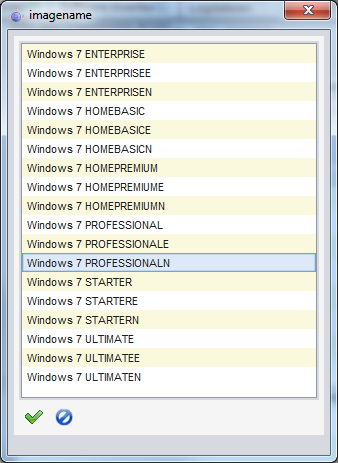
- orgname
- Name of the company or organisation of license holder, which is given to the setup program
- productkey
-
License key for the installation. Is only used if the host parameter
license-management.useis set to false. If it set to True the license key will be get from the license management module. - system_keyboard_layout
- Select keyboard language. (see: http://msdn.microsoft.com/en-us/goglobal/bb895996 )
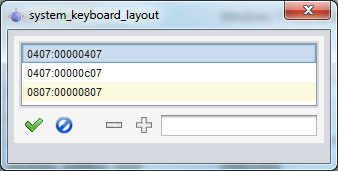
- system_language
- Select system language
- system_timezone
- Select time zone
- windows_partition_label
- Label of the system partion (c:)
- windows_partition_size
- Size of the system partion (c:). The size may be given as percent of the harddisk size or as absolut size (G=Gigabyte). If you choose a other value the 100%, the rest will be used as data_partition.
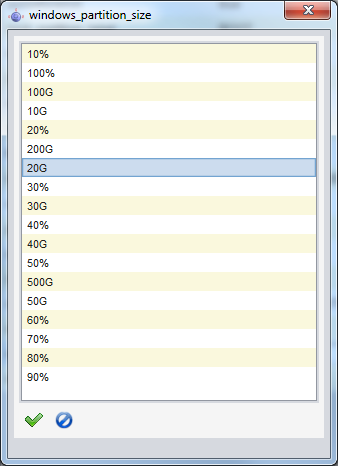
- winpenetworkmode
- If true the PE tries to mount the depot share and start the operating system setup from the share (faster). If false all installation files will be copied to the hard disk and the installtion starts from the local disk (slower).
The products ntfs-write-image and ntfs-restore-image are utilities to save and restore client partition images. Target (and source) for the image file has to be on the opsi depot server and will be transferred per ssh (user pcpatch) as specified as an product property.
The inventory can be ordered with the Localboot products hwaudit and swaudit or with the Netboot product hwinvent.
The hardware inventory is controlled by an opsi configuration file. This means that the information about which data will be compiled are not hardwired into the
corresponding products hwaudit and hwinvent. In fact, the products will be controlled by a configuration file. The configuration file will be called and interpreted
with every dispatch of the Web service. Simultaneously, the configuration file controls the structure of the database, so that a change of this configuration file
changes the database schema.
The configuration file is /etc/opsi/hwaudit/opsihwaudit.conf.
All the inventoried objects are defined and described in this file, like how these objects and their data are instantiated (under Linux and Windows). This file will
also define the associated data structure. To be more specific, this configuration file contains the object-oriented inheritance definitions.
The reason for this is the fact that a lot of objects contain identical data fields (i.e. like Name and Vendor). The general information will be defined
in virtual Hardware base classes. The actual inventory objects are then structural Hardware classes, where many properties could possibly be inherited
from overridden virtual base classes.
The following example may be instructive:
At first, the configuration file defines a virtual Class called "BASIC_INFO". This defines the properties (Values):
- "name"
- "description"
Next comes the virtual Class called "HARDWARE_DEVICE", which inherits all the additional parameters from "BASIC_INFO", and includes the following:
- "vendor"
- "model"
- "serialNumber"
Next follows the first object that is found in the inventory, which is the first structural Class called "COMPUTER_SYSTEM", which inherits of all the additional parameters from "HARDWARE_DEVICE", it is defined (and overwrites properties) as:
- "name"
- "systemType"
- "totalPhysicalMemory"
The class definition will include a description of various parameters and their Values:
Class definition:
-
"Type"
is "STRUCTURAL" or "VIRTUAL" -
"Super"
this class which it will be inheriting. -
"Opsi"
gives the name of the class, which will be used later in opsi as a display name.
-
"Type"
Further more, the class definition can define how the data will be compiled. This information can also be found in the definition of the Values.
For the inventory under Linux:
-
"Linux": "[<command>]<parameter>"
Executes the command <command> on the command line, with the argument <parameter>. -
"Python": "<python code with place holder>"
Executes the given Python code whose output will be placed in the place holder which is between the "#" signs (see example below).
-
"Linux": "[<command>]<parameter>"
For the Inventory under Windows:
-
"WMI": "<wmi select statement>"
executes WMI when called -
"Cmd": "<Python text object with place holder>"
In this case, this is the relative path to the Python executable program, whose output will be placed in the place holder. -
"Registry": "[<registry key>] <value name>"
The value of <value name> will be read from the registry, and given the key name <registry key>.
The registry must be read in an architecture-specific manner. This means, that the 64 bit sector will be read on a 64 bit system.
-
"WMI": "<wmi select statement>"
Value Definition:
-
"Type": "<MySQL database type>"
<MySQL Database type> gives the MySQL database type that will be applied to this value (i.e. a Python string will be a "<MySQL Datenbase type>"="varchar(200)"). -
"Scope": "<scope>"
The field <scope> will be used in the following way:
"g" means: This attribute is the same in every link of these types.
"i" means: This attribute can have different types of values with these links. -
"Opsi": "<id>"
"<id>" is an internal name of the fields. This can be found in the file located at/etc/opsi/hwaudit/locales. -
"WMI": "<id or command>"
<id or command> is either the name of a WMI command that prints the value or a single WMI command. If the WMI command is given in the Class definition (i.e. "select * from Win32_ComputerSystem") , then the results are assigned to the "WMI" variables in the "Values" class definition. If there is no WMI command, then the "WMI" variables in the "Values" section are WMI commands (see example below). -
"Linux": "<id>"
This is part of the class definition, <id> is the name of the displayed value when the Linux command is given. -
"Condition": "<condition>"
<condition> is a condition which must be fulfilled, with which the Value will be determined. So for example if the <condition> is defined as"vendor=[dD]ell*", then the values of "vendor" must contain either Dell or dell.
-
"Type": "<MySQL database type>"
Here is an example of the class "COMPUTER_SYSTEM":
{
   "Class": {
      "Type":   "STRUCTURAL",
      "Super":  [ "HARDWARE_DEVICE" ],
      "Opsi":   "COMPUTER_SYSTEM",
      "WMI":    "select * from Win32_ComputerSystem",
      "Linux":  "[lshw]system"
   },
   "Values": [
      {
         "Type":   "varchar(100)",
         "Scope":  "i",
         "Opsi":   "name",
         "WMI":    "Name",
         "Linux":  "id"
      },
      {
         "Type":   "varchar(50)",
         "Scope":  "i",
         "Opsi":   "systemType",
         "WMI":    "SystemType",
         "Linux":  "configuration/chassis"
      },
      {
         "Type":   "bigint",
         "Scope":  "i",
         "Opsi":   "totalPhysicalMemory",
         "WMI":    "TotalPhysicalMemory",
         "Linux":  "core/memory/size",
         "Unit":   "Byte"
      },
      {
         "Type":   "varchar(50)",
         "Scope":  "i",
         "Opsi":   "dellexpresscode",
         "Condition": "vendor=[dD]ell*",
         "Cmd": "#dellexpresscode\dellexpresscode.exe#.split('=')[1]",
         "Python":  "str(int(#{'COMPUTER_SYSTEM':'serialNumber','CHASSIS':'serialNumber'}#,36))"
      }
   ]
},
Regarding the "WMI" commands, the class definition contains "select * from Win32_ComputerSystem". This command is run by WMI, which has output columns of "Name", "SystemType", and "TotalPhysicalMemory". These values are then assigned to the opsi values of "name", "systemType", and "totalPhysicalMemory".
Especially interesting is here the last value "dellexpresscode":
This is really useful when it questions a Dell-computer, about its condition.
The command line program dellexpresscode.exe was designed for Windows, and tells hwaudit.exe that the dellexpresscode is provided in the directory dellexpresscode\.
Items in between # are place holders for output. So the statement at "dellexpresscode\dellexpresscode.exe" runs dellexpresscode.exe, and
produces output in the form : dellexpresscode=123456789. The value that will be used is the one after the split on the place holder =, which is done in Python using the split() method as such .split('=')[1] .
Under Linux, there will be found a value for serialNumber for the elements (COMPUTER_SYSTEM or CHASSIS), that is then used to assign the Dell Express codes. The call int(,36) converts the output integer to base-36.
The OPSI names of the values will be translated using the files found in /etc/opsi/hwaudit/locales/*.
The file /etc/opsi/hwaudit/locales/en_US may contain translations such as:
COMPUTER_SYSTEM = Computer
COMPUTER_SYSTEM.systemType = Type
The class name COMPUTER_SYSTEM will be translated into "Computer". The Opsi attribute "systemType" of the class COMPUTER_SYSTEM will be translated into "Type" for English. If
one were to look in the file /etc/opsi/hwaudit/locales/de_DE, one would see that the attribute of "COMPUTER_SYSTEM.systemType" will be translated into "Typ" for German.
Finally another suggestion: When a new field is created, it should be placed in these files, even if one does not translate the term explicitly.
This avoids any "Warning" messages.
After any change of the configuration file you should call:
opsi-setup --init-current-config
Also you should make a complete data reload in your opsi-configed by calling the menu: File/Reload all data.
The software inventory is done with the Localboot product swaudit.
In this case, information will be inherited from the uninstall of the Registry, and additional information will be obtained from the Hotfixes and License keys.
The source code for these packets can be found here:
https://svn.opsi.org/listing.php?repname=swaudit
The functionality of a opsi-server may be installed on many different kind of linux distributions.
There are two different roles which a opsi-server can play:
-
opsi-config-server
The opsi-config-server has the central data storage and provides the access to this data via the opsi web service. A opsi-config-server normally has additiona the role opsi-depot-server. -
opsi-depot-server
The opsi-depot-server has no configuration data storage. The opsi-depot-server hold the installation files at a share and provides the PXE/tftpboot services for the netboot products.
The hardware requirements are low. The opsi-server can also run as a virtual instance, e.g. vmware® (www.vmware.com).
Installation and start-up of the opsi-server is described in the opsi getting started manual.
The opsi depot server provides network shares holding the configuration information and the software packets. These shares can be mounted by the clients. For Windows Clients the shares are provided by SAMBA (version 3.x).
To configure your samba according to the needs of opsi (or to repair) call:
opsi-setup --auto-configure-samba
After every change of the samba configuration, you have to reload your samba (/etc/init.d/samba reload).
The opsiconfd is the central opsi daemon (service). It provides an interface for clients to create, manipulate and read data in the backends.
The configuration of opsiconfd is done in /etc/opsi/opsiconfd.conf. The options are commented in the file.
-
[global] max log size:
This option limits the size of logfiles created through the opsiconfd. Due to an historic reasons this is limited to 5MB per logfile. Since opsi 4.0.6 the size can be configured. To disable any size limits the value can be set to 0.
In addition you can use logrotate to rotate and compress logfiles. Please refer to the corresponding manual for configuration possibilities.
-
User opsiconfd
The daemon opsiconfd runs as this user. -
User pcpatch
This user is be used by the opsi-client-agent to mount the depotshare. This user has normally the uid 992. You may set the password for this user by
opsi-admin -d task setPcpatchPassword. -
Group pcpatch
The group pcpatch has write permission on many files and youll need to be in this group in order to build and install opsi products. -
Group opsiadmin
Members of the group opsiadmin are permitted to connect the opsi-webservice and can use for instance the opsi-configed configuration editor. Therefor all opsi administrators should be members of the group pcpatch.
A user can join group opsiadmin by: addgroup <user> opsiadmin.
-
Depotshare with installation files (opsi_depot)
The depot share provides all the software-packets which are installable by the client task opsi-winst. The default directory for the software packets is the directory /var/lib/opsi/depot. In this directory each software packet has its own sub directory named as the software packet. These sub directories contain the packet-specific installation scripts and files. -
The directory to build pacages (opsi_workbench)
At /home/opsiproducts you will find the area to create new packages and from where you should install packages with the opsi-package-manager. -
Share with the configuration files of the file backend (opsi_config)
At /var/lib/opsi you will find the file backend configuration files.
opsi uses some PAM-modules to authenticate the user. With this new release, opsi uses different modules for certain distributions. The following list will give you a small overview about which modules are used:
Default: common-auth
SLES: sshd
CentOS and RedHat: system-auth
RedHat 6: password-auth
You can see in the list above, which different PAM-modules are used. However, it could be the case that a different PAM-module is required, depending on the local configuration. The source code can be modified to account for these changes. To provide more flexibility without changing the sourcecode, it is possible with this release to create a file named: opsi-auth in the directory /etc/pam.d/. If this file exists, opsi will use this configuration automatically instead of the modules listed above.
The following example will show you the new feature: If you run a debian/ubuntu-System and you get a PAM-authentification-error, even though you can connect with the same credentials over ssh on the server, then you can create the file: /etc/pam.d/opsi-auth with following content:
@include sshd
After restarting opsiconfd, opsi will use automatically the sshd-PAM-module for authentication of users.
If you have incidents by using opsi, you should check the following list or rather execute the following commands. Experience has shown that the combination of the commands in this chapter fix the most incidents.
-
Check accessibility and load of opsi-webservice:
Call URL: https://<server-ip>:4447/info with your browser. If you can not connect, continue with next step. If you can connect: check the load of opsi-webservice and check the freespace on disk (scroll down in the info-page). For the generation of load images you need rrdtool with Python-bindings. Please install them if needed. - Check that the daemons are running and restart them:
ps -ef | grep opsiconfd
ps -ef | grep opsipxeconfd
/etc/init.d/opsiconfd restart
/etc/init.d/opsipxeconfd restart
- Initialize the configuration
opsi-setup --init-current-config
- Set the rights for opsi-relevant files and directories:
opsi-setup --set-rights
- Cleanup backend
opsi-setup --cleanup-backend
- Check that samba is running:
ps -ef | grep mbd
It have to run at least one nmbd and one smbd process.
To restart samba:
/etc/init.d/samba restart
or
service nmbd restart
service smbd restart
- Set the pcpatch-password:
opsi-admin -d task setPcpatchPassword
Opsi is a powerful tool for the administration of many clients.
According to that fact, the opsi-server has to be in the focus of security considerations.
If you control the opsi-server, you are in control of all the clients, that are connecting to that opsi-server.
How much time and money you should spend for hardening your opsi-server, depends on your needs regarding security and the operational environment for using opsi. So for example an opsi-server in the cloud is more endangered than an opsi-server in a secured network.
In the following chapter we have collected the most important issues and problems.
At this point we say thank you to all customers and users which informed us about security problems and helped us to improve the security of the opsi system. If you find any security problem, please inform us (info@uib.de) before disclosing the security vulnerability in public.
Information about security relevant updates and tasks are published at
the news area at the opsi forum:
https://forum.opsi.org/viewforum.php?f=10
The opsi software cannot be more secure than the underlying operating system. So please make sure to update your server with the security updates of your Linux distribution. This has to be done not only for the opsi-config-server, but also for all the opsi-depot-server.
It may help you to install programs which inform you by email if there are new updates available.
- Debian, Ubuntu
- apticron
- RHEL, CentOS
- yum-updatesd
There are a lot of possibilities to enhance the security of your Linux server. But this is not the task of this manual.
We would be happy to help you with this task as part of a support contract.
The depot_share which is used by the clients should be read-only. This is important to avoid virus infections of the files at the depot_share by an infected client.
Since opsi 4.0.1 there is a new share opsi_depot which is read-only. In order to use this share, please execute (on all your opsi-servers):
opsi-setup --auto-configure-samba
This command creates the new share. This share points to the directory /var/lib/opsi/depot.
According to your Linux distribution, a symbolic link from this directory to /opt/pcbin/install will be created.
To tell the clients that they now have to use this new share, you should execute at your opsi-config-server the following script:
for depot in $(opsi-admin -dS method host_getIdents unicode "{\"type\":\"OpsiDepotserver\"}"); do
   echo "Depot: $depot"
   depot_remote=$(opsi-admin -dS method host_getObjects [] "{\"id\":\"$depot\"}" | grep "depotRemoteUrl=" | cut -d "=" -f2)
   depot_local=$(opsi-admin -dS method host_getObjects [] "{\"id\":\"$depot\"}" | grep "depotLocalUrl=" | cut -d "=" -f2)
   depot_remote_new=$(echo $depot_remote | sed "s|/opt_pcbin/install|/opsi_depot|")
   depot_local_new=$(echo $depot_local | sed "s|/opt/pcbin/install|/var/lib/opsi/depot|")
   servertype=$(opsi-admin -dS method host_getObjects [] "{\"id\":\"$depot\"}" | grep "type=" | cut -d "=" -f2)
   opsi-admin -d method host_updateObjects "{\"type\":\"$servertype\",\"id\":\"$depot\",\"depotLocalUrl\":\"$depot_local_new\",\"depotRemoteUrl\":\"$depot_remote_new\"}"
doneThe client authenticates itself using the FQDN as username and the opsi-host-key as password.
The opsi-host-key is stored at the client in the file:
%programfiles%\opsi.org\opsi-client-agent\opsiclientd\opsiclientd.conf
which is readable with administrative privileges only.
The opsi-host-key is stored at the server in the used backend (e.g at /etc/opsi/pckeys).
In addition to this authentication, you may tell the opsiconfd to check if the client IP address matches the given FQDN. To activate this check, set at the /etc/opsi/opsiconfd.conf:
verify ip = yes
and reload the opsiconfd:
/etc/init.d/opsiconfd reload
Caution
Do not use this feature if you are not really sure, that your name resolution works properly in both directions for all clients.
Since opsi 4.0.1 there are different possibilities to check the trustworthiness of the contacted server.
Caution
Do not use them in combination. Choose only one way or you will be locked out from your client.
At the first contact to a opsi-server, the client will accept the given SSL certificate and store it at C:\opsi.org\opsiclientd\server-certs.
On any subsequent contact, the client creates a random string and uses the public key of the stored certificate to encrypt this string (and the own access parameters). These encrypted data will be sent to the server.
The server uses the private key of its own SSL certificate to decrypt the data and sends the decrypted random string back to the client.
Now the client checks if the correct string was sent back. If not, the communication to the server will be aborted.
You can prevent this way that somebody directs your clients to a wrong server, e.g. by manipulating the DNS. If you setup a new server, you may migrate the SSL certificate from the old to the new server without problems. And you must not deploy any certification authority (CA).
The disadvantage of this method is, that a man-in-the-middle attack is still possible.
This security method checks the communication between client and opsi-config-server.
Using the opsi WAN extension and as clientconfig.depot.protocol webdav, also the communication to the opsi-depot-server is checked.
the section called “Communication Protocol for accessing an opsi-depot”
To activate this check, set at the opsiclientd.conf in the section [global] the option:
verify_server_cert = true
Run the following command at your opsi-config-server to to create this configuration entry for all clients:
opsi-admin -d method config_createBool opsiclientd.global.verify_server_cert "verify_server_cert" false
Now you can activate this using the opsi-configed at the Server configuration or at the Host parameter of seleted clients by chaning the value from false to true.
Caution
Be very careful with activating "verify_server_cert", for in case of improper configuration your clients will refuse the connection!
This variant works just like SSL certificates are checked in your browser.
The given SSL certificate will be accepted, if it is issued for the exact FQDN (commonName) of the server (or if the DNS verifies that this is the FQDN matching the IP address of the server) and the certificate is issued and signed by the uib gmbh.
Is one of these conditions not true, the communication to the server will be aborted.
This method is more secure than the first one. But you will have to buy the certificates from uib gmbh.
For prizes and conditions have a look at the prize list of uib gmbh:
http://uib.de/en/opsi_support/index.html
Any profits from selling these certificates will be invested in the maintenance of the opsi security.
To activate this security method, set at the opsiclientd.conf in the section [global] the option:
verify_server_cert_by_ca = true
Run the following command at your opsi-config-server to to create this configuration entry for all clients:
opsi-admin -d method config_createBool opsiclientd.global.verify_server_cert_by_ca "verify_server_cert_by_ca" false
Now you can activate this using the opsi-configed at the Server configuration or at the Host parameter of seleted clients by chaning the value from false to true.
Caution
Be very careful with activating "verify_server_cert_by_ca", for in case of improper configuration your clients will refuse the connection!
The opsiclientd provides a web service interface, which allows remote control of the opsiclientd and thus remote control of the client.
(the section called “opsi-client-agent remote control”).
In order to access this interface authentication is required. You may authenticate as a local administrator with a not empty password, or with an empty user name and the opsi-host-key as password.
The idea of an admin network is to ban any administrative access from the standard production network and allow these accesses only from a special admin network.
With opsi all opsi-clients need restricted access to the opsi web service, which allows them to read and change their own data. Administrative access with further privileges is granted to members of the unix group opsiadmin only.
If you configure an admin networks parameter, all administrative accesses are restricted to these network(s).
Setting the option [global] admin networks at the /etc/opsi/opsiconfd.conf will restrict the administrative access to the opsiconfd to connections coming from the specified network address(es).
You may give multiple addresses separated by comma.
Non administrative access may also come from other networks.
The default is:
admin networks = 0.0.0.0/0
and allows administrative access from all networks.
A configuration like e.g.
admin networks = 127.0.0.1/32, 10.1.1.0/24
restricts administrative access to the server itself and to the network 10.1.1.0/24.
With opsi 4 the user pcpatch is used just by the opsi-client-agent to mount the depot shares (and at the moment by the netboot products ntfs-write-image and ntfs-restore-image to read and write the image files via ssh).
The password of the user pcpatch is usually stored and transmitted encrypted. Under special circumstances it might be possible to catch the clear password. To reduce risks arising from that, you should do the following:
Deny for the user pcpatch the access to all other shares than the opsi_depot share. You should do this by adding the following entry to all share definitions (besides the opsi_depot) at the /etc/samba/smb.conf:
invalid users = root pcpatch
Alternative
At the /etc/samba/smb.conf restrict privileges for the user pcpatch to global read only by setting in the [global] section:
read list = pcpatch
As an additional task you should frequently change the password of the user pcpatch. You may set the password to a random string which no one knows (besides opsi). You may do this by calling the following command e.g by a cronjob:
opsi-admin -d task setPcpatchPassword $(< /dev/urandom tr -dc _A-Z-a-z-0-9 | head -c16)
If you do not plan to use the netboot products ntfs-write-image or ntfs-restore-image, you may deny a unix logon for the user pcpatch by setting at the /etc/passwd the shell /bin/false for the user pcpatch.
Your opsi-server should be backuped (like any other important system). This chapter shows what to backup and how.
And of course - how to restore.
You should run the opsi-backup command as root.
You have to install the mysqldump program before you can use the opsi-backup in connection with the mysql backend. Usually this program is part of the mysql client packages.
Create a backup:
opsi-backup create opsi_backup.tar.bz2
Creates a backup of the used backends and all configuration data at the current directory with the name opsi_backup.tar.bz2.
Restore a backup:
opsi-backup restore --backends=all --configuration opsi_backup.tar.bz2
Restores the data from the backup file opsi_backup.tar.bz2, which is searched for in the current directory.
opsi may be devided in five different parts which may be backuped or not. The location where to find this part may vary (by Linux distribution, version and configuration).
The most important part of opsi is the configuration. You will find it at /etc/opsi.
This part will be backed up by opsi-backup.
The data about the managed clients and the products might be stored in different backends. The most important backends are:
Table 1. opsi backends
| Backend | Description |
|---|---|
file-Backend | File based backend (default backend) |
mysql-Backend | MySQL based backend (since opsi 4 for all configuration data) |
dhcp | Special backend which is used in combination with a dhcpd at the opsi-server |
Different backends may be used for different purposes at the same time. So you should have a look at the /etc/opsi/backendManager/dispatch.conf to see which backends you are using.
This part will be backed up by opsi-backup.
At the opsi depot share you will find the installation files of the software to be installed on the clients by opsi. The directories which contain these files (Local boot products and netboot products) are located at /var/lib/opsi/depot.
Older versions of opsi used the directory /opt/pcbin/install for this. If it still is present it may be symlinked against the new location.
Depending on how many operating systems, drivers, software and so on is located here, this part will have a huge extent.
This part will not be backed up by opsi-backup.
So if you like to backup this part, you may use rsnapshot or other backup utilities.
The opsi work bench is the location which is used to create own packages. It is usally located at /home/opsiproducts and exported as the samba share opsi_workbench. Because this directory holds your own work, it should be backed up.
This part will not be backed up by opsi-backup.
So if you like to backup this part, you may use rsnapshot or other backup utilities.
The directory /var/lib/opsi/repository is used to store opsi packages, which are downloaded by the opsi-product-updater or which are installed by the opsi-package-manager when using the -d option.
This part will not be backed up by opsi-backup.
So if you like to backup this part, you may use rsnapshot or other backup utilities.
opsi-backup is a command line program which makes it easy to create and restore opsi data backups.
The basic commands are create, restore and verify.
The option --help displays information about the accepted command line options. Use also <command> --help (e.g. opsi-backup create --help) to get information about command options.
opsi-backup --help
The opsi-backup utility stores the configuration and backend data in nearly the same format as they were found at the server. So you may not restore these data to a server which uses other backends, has other opsi versions or is in any other way different regarding the opsi data structures.
opsi-backup creates always a full backup. There is no support for incremental or differencial backups.
Caution
Please notice that opsi-backup creates no backup of:
* opsi depot share
* opsi work bench *
opsi repository
opsi-backup creates a backup file, which is a compressed tar file. So you may access the data using other standard tools.
Caution
A backup file created by opsi-backup may contain passwords, hot-keys and other security-related data. So be sure to store the backup files at a secure place.
To create a backup call opsi-backup create.
This command (without any additional options) will create a backup of all configuration data and all used backends. The backup file will be stored at the current directory with an automatically generated name.
To get information about the possible options of create call
opsi-backup create --help
opsi-backup create
opsi-backup create --help
usage: opsi-backup create [-h] [--flush-logs]
                          [--backends {file,mysql,dhcp,auto,all}]
                          [--no-configuration] [-c [{gz,bz2,none}]]
                          [destination]

positional arguments:
  destination           Destination of the generated output file. (optional)

optional arguments:
  -h, --help            show this help message and exit
  --flush-logs          Causes mysql to flush table logs to disk before the
                        backup. (recommended)
  --backends {file,mysql,dhcp,auto,all}
                        Select a backend to backup or 'all' for all backends.
                        Can be given multiple times. (Default: auto)
  --no-configuration    Backup opsi configuration.
  -c [{gz,bz2,none}], --compression [{gz,bz2,none}]
                        Sets the compression format for the archive (Default:
                        bz2)
You may give the target directory or the full path to the backup file as option to opsi-backup create. If the given option is a filename, the backup will be created in this file - existing files will be overwritten. If the given option is a directory, the backup file will be crated in this directory with a generated filename using the pattern: <hostname>_<opsi-version>_<date>_<time>
opsi-backup create /mnt/backup/opsi_backup.tar.bz2
opsi-backup create /mnt/backup/
Other create options are:
-
--backends {file,mysql,dhcp,all,auto}
is used to select the backends which shall be included to the backup. You may give this option multiple times.
The option--backends=allincludes all supported backends.
The default is--backends=auto, which means thatopsi-backupreads the configuration file/etc/opsi/backendManager/dispatch.confand backups all supported backends used in this configuration. The supported backends are:mysql,file,dhcp
opsi-backup create --backends=file --backends=mysql
opsi-backup create --backends=all
Tip
If you are using a not supported backend (like ldap), you may use opsi-convert to convert your data to a backend, which is supported by backup.
-
--no-configuration
Excludes the opsi configuration files from the backup.
opsi-backup create --no-configuration
-
-c [{gz,bz2,none}], --compression [{gz,bz2,none}]
Specify the compression method.nonemeans no compression.
The default isbz2.
opsi-backup create -c bz2
-
--flush-log
The backup of the mysql backend uses the mysqldump command. This means that all data known by the database are backed up, no matter if they are on disk or only in the memory yet. This means, that your backup may be more topical than your database files (which is really not a problem).
If you want to make sure, that the database stores all data to the disk before starting the backup, you may use the--flush-logoption. But before you may do this, you have to grant the required RELOAD-privileges to the opsi database user, or your backup will fail. Check: RELOAD.
So use this option only if you really know what you are doing.
opsi-backup create --backends=mysql --flush-log
Example
opsi-backup create --no-configuration --backends=all opsi_backup.tar.bz2
opsi-backup has no features to archive the created backup files. So you have to do it by yourself (e.g. using a file backup tool).
If you call opsi-backup with a target directory as option, please keep in mind that every call creates a new full backup file and no older files will be deleted.
The command opsi-backup verify is used to test the internal integrity of the created backup file.
Special help for the opsi-backup verify command is available by the command option --help.
Example
opsi-backup verify opsi_backup.tar.bz2
opsi-backup verify --help
usage: opsi-backup verify [-h] file [file ...]

required arguments:
  file        The backup archive to verify.

optional arguments:
  -h, --help  shows this help message and then exits
Tip
If you are calling opsi-backup verify at the console, it may be useful to avtivate messages at standardout using -v: opsi-backup -v verify opsi_backup.tar.bz2
To restore data from a backup file, use the command opsi-backup restore.
You have to give the path to the backup file as parameter.
The command opsi-backup restore --help gives information about the options for the command restore.
opsi-backup restore --help
usage: opsi-backup restore [-h] [--backends {file,mysql,dhcp,auto,all}]
                           [--configuration] [-f]
                           file

required arguments:
  file                  The backup archive to restore data from.

optional arguments:
  -h, --help            show this help message and exit
  --backends {file,mysql,dhcp,auto,all}
                        Select a backend to restore or 'all' for all backends.
                        Can be given multiple times.
  --configuration       Restore opsi configuration.
  -f, --force           Ignore sanity checks and try to apply anyway. Use
                        with caution! (Default: false)
opsi-backup restore has the following options:
-
--backends {file,mysql,dhcp,auto,all}
Specifies the backend to restore. This option may be used multiple times.
The option--backends=allspecifies that the data from all backends which are found in the backup file shall be restored.
The default is--backends=auto. This restores the data from the backup file to the system using the actual configuration data from/etc/opsi/backendManager/dispatch.conf.
opsi-backup restore --backends=file --backends=mysql opsi_backup.tar.bz2
opsi-backup restore --backends=all opsi_backup.tar.bz2
Caution
If you changed your backend configuration since you have created the backup, no or not all data will be restored. In this case you have to use the --backends=all option and then to convert the restored data to the now used backend using opsi-convert.
-
--configuration
Specifies that the opsi configuration has to be restored.
This option is not default atrestorecommand.
opsi-backup restore --configuration opsi_backup.tar.bz2
-
-f, --force
To avoid data damageopsi-backupmakes a system compatibility check (opsi Version, OS-Version, Host- and Domain Name) before restoring data and aborts if the actual system differs from the system the backup file was created on. Using this option you may override this check.
opsi-backup restore -f opsi_backup.tar.bz2
Example
opsi-backup restore --configuration --backends=all opsi_backup.tar.bz2
Technical preconditions are opsi 4.0.3 with the following package and product versions:
or opsi 4.0.5 with the following package and product versions:
Table 3. Needed product and package versions
| opsi packet | version |
|---|---|
opsi-linux-bootimage | >= 20140805-1 |
opsi-clonezilla | >= 4.0.5-1 |
Besides of the packet based (unattended) installation, opsi had in the past just a rudimental support for image based installations. With integrating the technique of the Open Source product clonezilla (http://clonezilla.org/) into opsi, now a comprehensive and flexible solution for handling partition and disc images is available.
We have combined the clonezilla scrips with the opsi-linux-bootimage to generate the following benefits:
- integration into the opsi process control
- automated mount of the shares for the image repository
- availability of automated processing
Starting the opsi-clonezilla per default starts in the interactive mode. This interactive mode allows to choose the desired operations and parameters easily. Knowing the commands and their parameters from this makes it easy to create non-interactive run commands from this.
-
Set for the property
imagesharea share as value. This share should have the format//server/share. Please note the use of slashes instead of back slashes. This share should be mountable by the opsi userpcpatchwith the password as known by the opsi-server. This is normally the share opsi_images from the opsi-server. -
Switch the property
runcommandto/opt/drbl/sbin/ocs-liveorocs-liveusing opsi >= 4.0.5. This is the interactive mode of clonezilla. - Start the netboot product.
-
At the first dialog you will be asked, whether anything should be mounted to
/home/partimg. ChooseSkipbecause the mount has already be done by the opsi bootimage.
Figure 66. Skip: The share given by the property imageshare will be mounted by the bootimage to /home/partimg.
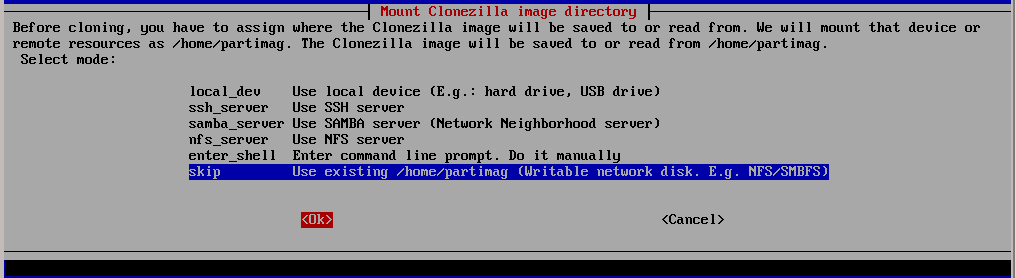
The mounted partition will be displayed:
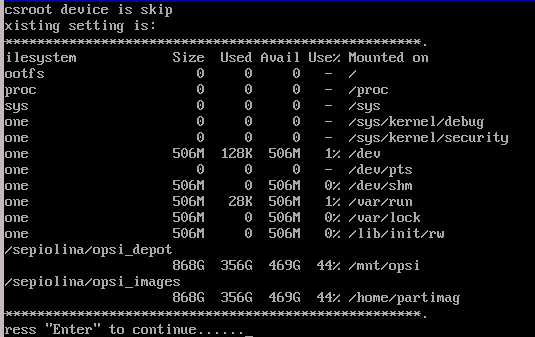
By choosing Expert or Beginner you decide if you want to use all default parameters or have the possibility to modify them.
If you have opsi version less than 4.0.5 it is a good idea to choose Expert in order to be able to change parameters for non-interactive use.
Since opsi 4.0.5 you may also choose the Beginner mode.
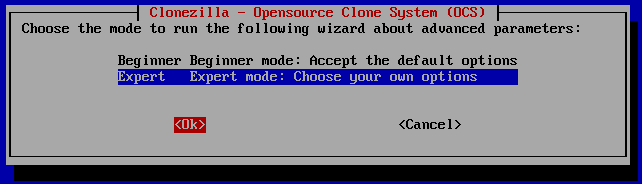
Now you have to choose which basic operation you like to run. In this manual we discuss only the following operations:
- save disk
- save partition
- restore disk
- restore partition
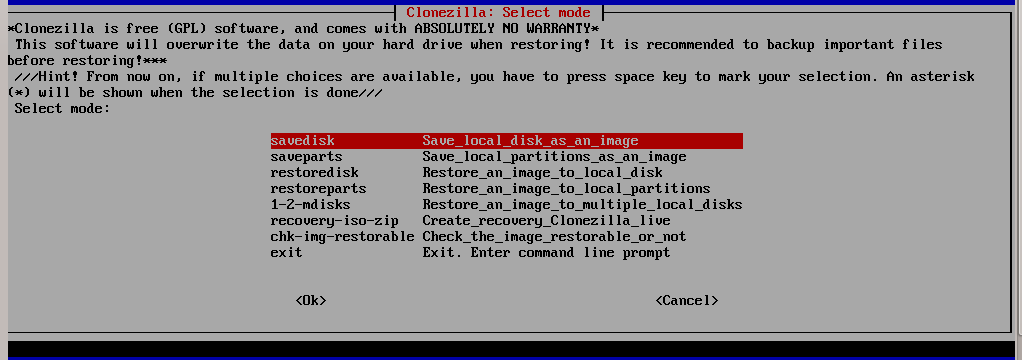
Here we show (as an example for similar operations) the additional dialogs you will get in the savedisk expert mode.
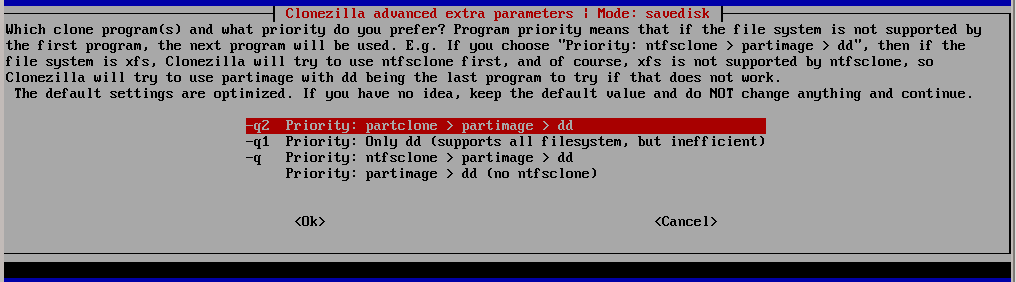
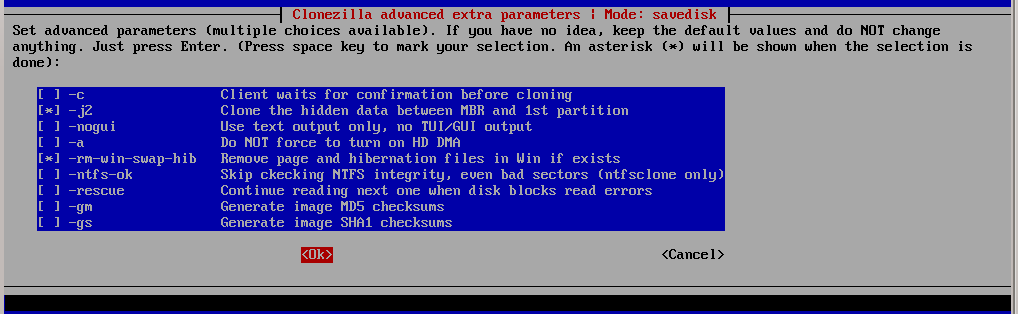
Figure 72. compression method before opsi 4.0.5, which is bootimages ⇐ 20130207 (opsi-clonezilla_2.01-3), select here -z1. With opsi 4.0.5 and above not required anymore.
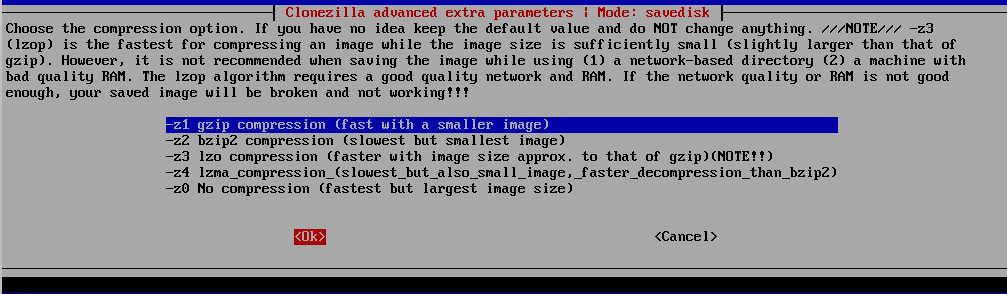
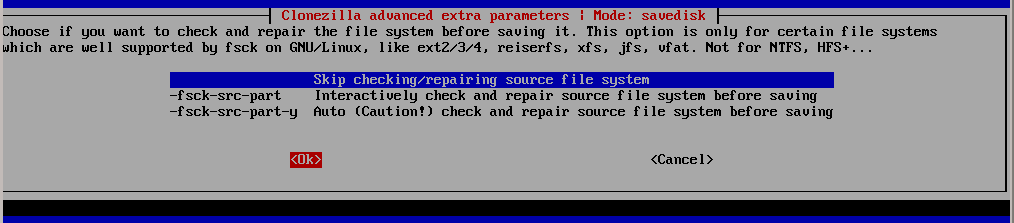

Figure 75. Action after cloning (use the default -p true, the reboot is triggered by the opsi bootimage).
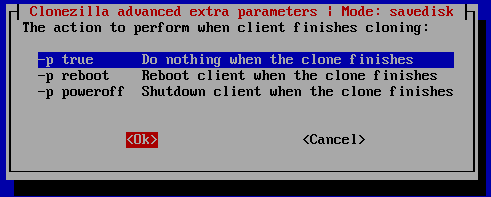
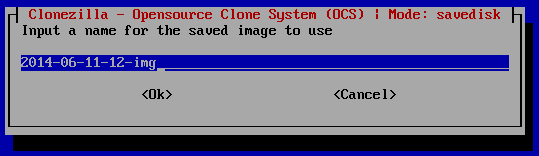


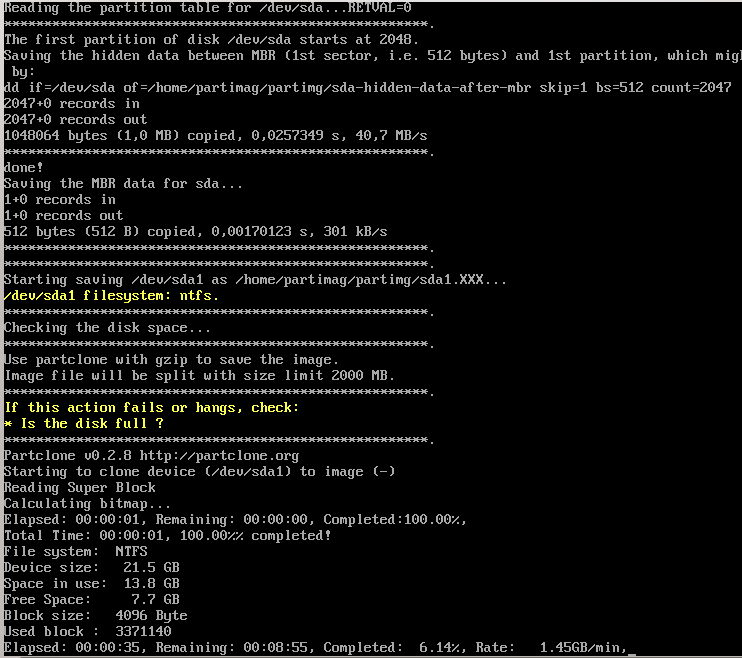
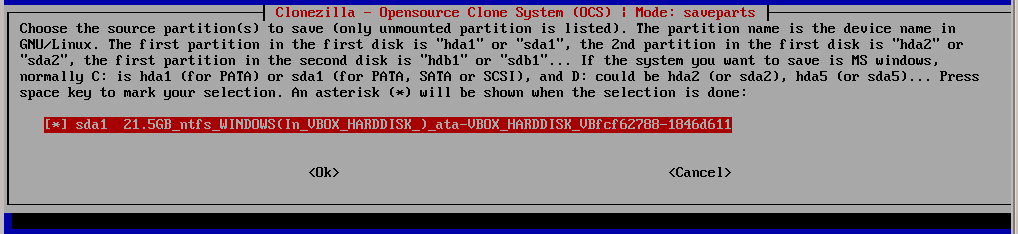

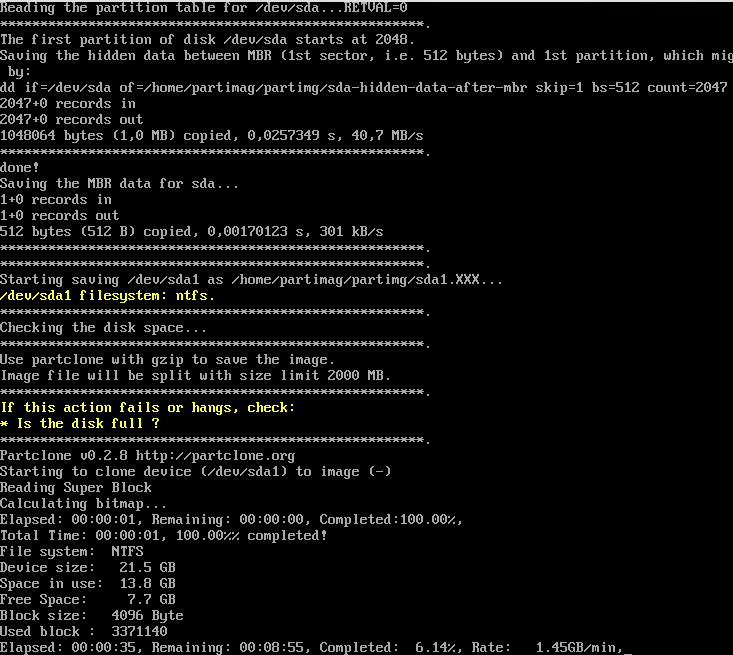
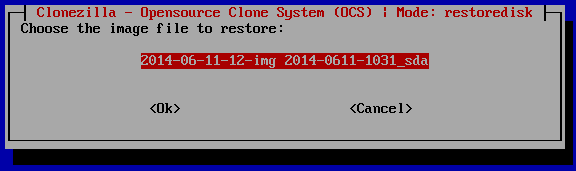


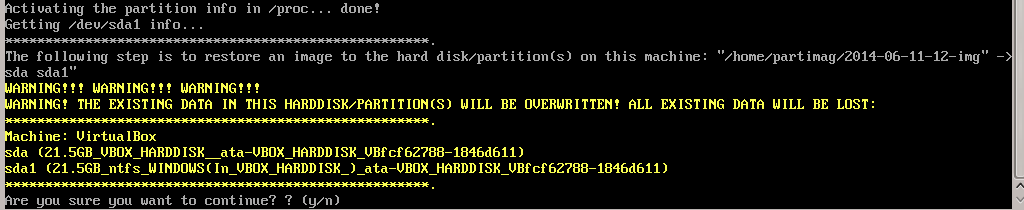
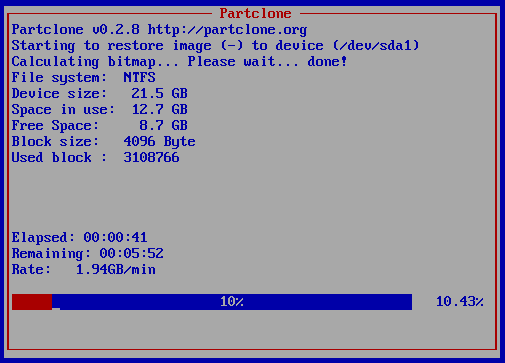
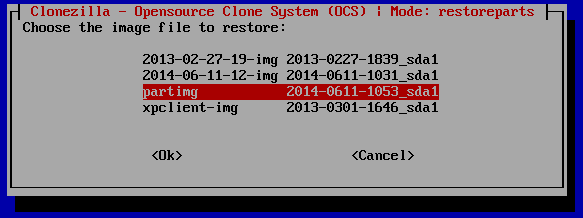
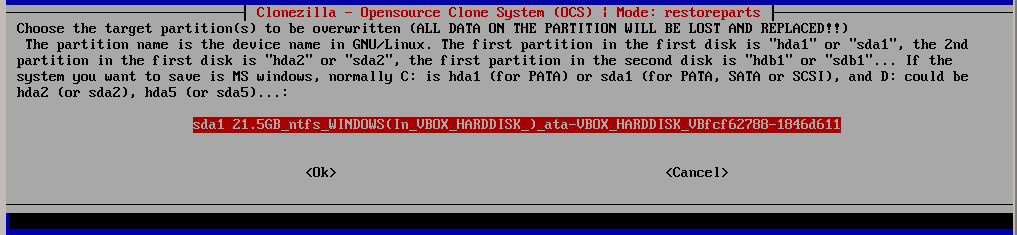
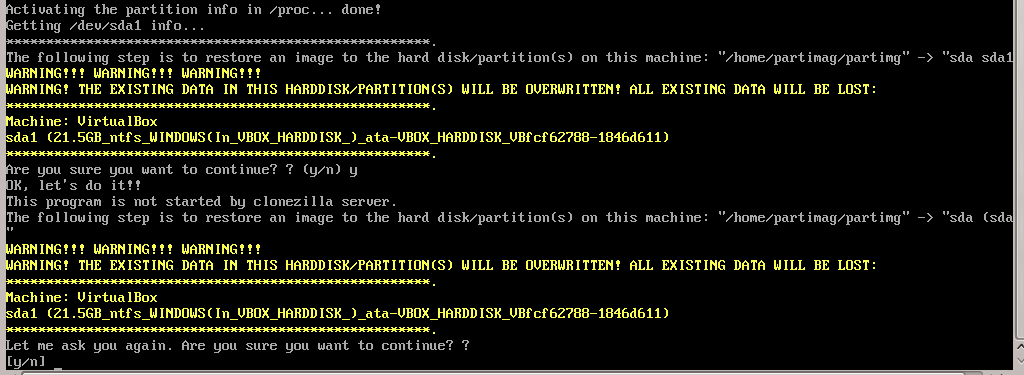
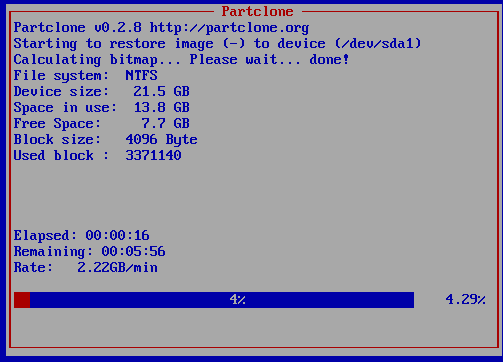
By setting the desired command as the product property runcommand opsi-clonezilla is switched to the non interactive mode.
-
Set the property
imageshareto a share, that can be mounted by the userpcpatchwith the password as known by the opsi-server. The format for the share is//server/share(attention: use forward slashes, not backward slashes). -
Set the property
runcommandto the non interactive command.
Here are some non interactive versions of the examples from above (without -c and with --batch). Since opsi 4.0.5 the parameter -z1 can be omitted. This accelerates the compression with multi processor kernels:
-
/opt/drbl/sbin/ocs-sr --batch -q2 -j2 -rm-win-swap-hib -z1 -i 2000 -p true savedisk 2014-06-11-12-img sda
-
/opt/drbl/sbin/ocs-sr --batch -q2 -j2 -rm-win-swap-hib -z1 -i 2000 -p true saveparts partimg sda1
-
/opt/drbl/sbin/ocs-sr --batch -g auto -e1 auto -e2 -r -j2 -p true restoredisk 2014-06-11-12-img sda
-
/opt/drbl/sbin/ocs-sr --batch -g auto -e1 auto -e2 -r -j2 -k -p true restoreparts partimg sda1
Furthermore in these examples the image names 2014-06-11-12-img or partimg can be replaced by the string imagefile. In this case the string imagefile will be substituted by the value of the property imagefile.
At opsi-clonezilla version 4.0.5-2 with bootimage Version 20140819-1 there are problems while imaging computers that running in UEFI mode.
http://clonezilla.org/clonezilla-live-doc.php
http://allthatnetwork.blogspot.de/2012/10/clonezilla-ocs-sr-options.html
Clonezilla ocs-sr options
Setting the TERM as linux
/opt/drbl/sbin/ocs-sr: -h: invalid option
Usage:
To save or restore image
ocs-sr [OPTION] {savedisk|saveparts|restoredisk|restoreparts} IMAGE_NAME DEVICE
Options for saving:- -fsck-src-part, --fsck-src-part
- Run fsck interactively on the source file system before saving it.
- -fsck-src-part-y, --fsck-src-part-y
- Run fsck automatically on the source file system before saving it. This option will always attempt to fix any detected filesystem corruption automatically. //NOTE// Use this option in caution.
- -gm, --gen-md5sum
- Generate the MD5 checksum for the image. Later you can use -cm|--check-md5sum option to check the image when restoring the image. Note! It might take a lot of time to generate if the image size is large.
- -gs, --gen-sha1sum
- Generate the SHA1 checksum for the image. Later you can use -cs|--check-sha1sum option to check the image when restoring the image. Note! It might take a lot of time to generate if the image size is large.
- -j2, --clone-hidden-data
- Use dd to clone the image of the data between MBR (1st sector, i.e. 512 bytes) and 1st partition, which might be useful for some recovery tool.
- -ntfs-ok, --ntfs-ok
- Assume the NTFS integrity is OK, do NOT check again (for ntfsclone only)
- -rm-win-swap-hib, --rm-win-swap-hib
- Try to remove the MS windows swap file in the source partition.
- -q, --use-ntfsclone
- If the partition to be saved is NTFS, use program ntfsclone instead of partimage (i.e. Priority: ntfsclone > partimage > dd)
- -q1, --force-to-use-dd
- Force to use dd to save partition(s) (inefficient method, very slow, but works for all the file system).
- -q2, --use-partclone
- Use partclone to save partition(s) (i.e. partclone > partimage > dd).
- -rescue, --rescue
- Turn on rescue mode, i.e. try to skip bad sectors.
- -sc, --skip-check-restorable
- By default Clonezilla will check the image if restorable after it is created. This option allows you to skip that.
- -z0, --no-compress
- Don’t compress when saving: very fast but very big image file (NOT compatible with multicast restoring!!!)
- -z1, --gzip-compress
- Compress using gzip when saving: fast and small image file (default)
- -z1p, --smp-gzip-compress
- Compress using parallel gzip program (pigz) when saving: fast and small image file, good for multi-core or multi-CPU machine
- -z2, --bz2-compress
- Compress using bzip2 when saving: slow but smallest image file
- -z2p, --smp-bzip2-compress
- Compress using parallel bzip2 program (pbzip2) when saving: faster and smallest image file, good for multi-core or multi-CPU machine
- -z3, --lzo-compress
- Compress using lzop when saving: similar to the size by gzip, but faster than gzip.
- -z4, --lzma-compress
- Compress using lzma when saving: slow but smallest image file, faster decompression than bzip2.
- -z5, --xz-compress
- Compress using xz when saving: slow but smallest image file, faster decompression than bzip2.
- -z5p, --smp-xz-compress
- Compress using parallel xz when saving: slow but smallest image file, faster decompression than bzip2.
- -z6, --lzip-compress
- Compress using lzip when saving: slow but smallest image file, faster decompression than bzip2.
- -z6p, --smp-lzip-compress
- Compress using parallel lzip when saving: slow but smallest image file, faster decompression than bzip2.
- -z7, --lrzip-compress
- Compress using lrzip when saving.
- -i, --image-size SIZE
- Set the split image file volume size SIZE (MB). When ocs-sr is run with -x, the default SIZE is set as 2000, if without -x, we will not split it.
Three words are reserved for IMAGE_NAME, "ask_user" is used to let user to input a name when saving an image. "autoname" is used to automatically generate the image name based on network card MAC address and time. "autohostname" is used to automatically generate the image name based on hostname.
A word is reserved for DEVICE, "ask_user" could be used to let user to select the source device when saving an image.
Options for restoring:
- -g, --grub-install GRUB_PARTITION
- Install grub in the MBR of the disk containing partition GRUB_PARTITION with root grub directory in the same GRUB_PARTITION when restoration finishs, GRUB_PARTITION can be one of "/dev/hda1", "/dev/hda2"… or "auto" ("auto" will let clonezilla detect the grub root partition automatically). If "auto" is assigned, it will work if grub partition and root partition are not in the same partition.
- -r, --resize-partition
- Resize the partition when restoration finishes, this will try to fix the problem when small partition image is restored to larger partition. Warning!!! Use this carefully… Backup your data first
- -k, --no-fdisk, --no-create-partition
- Do NOT create partition in target harddisk. If this option is set, you must make sure there is an existing partition table in the current restored harddisk. Default is to create the partition table.
- -icrc, --icrc
- Skip Partclone CRC checking.
- -irhr, --irhr
- Skip removing the Linux udev hardware records on the restored GNU/Linux.
- -ius, --ius
- Skip updating syslinux-related files on the restored GNU/Linux.
- -icds, --ignore-chk-dsk-size-pt
- Skip checking destination disk size before creating the partition table on it. By default it will be checked and if the size is smaller than the source disk, quit.
- -k1,
- Create partition table in the target disk proportionally.
- -k2,
- Enter command line prompt to create partition table manually before restoring image.
- -t, --no-restore-mbr
- Do NOT restore the MBR (Mater Boot Record) when restoring image. If this option is set, you must make sure there is an existing MBR in the current restored harddisk. Default is Yes
- -u, --select-img-in-client
- Input the image name in clients
- -e, --load-geometry
- Force to use the saved CHS (cylinders, heads, sectors) when using sfdisk
- -e1, --change-geometry NTFS-BOOT-PARTITION
- Force to change the CHS (cylinders, heads, sectors) value of NTFS boot partitoin after image is restored. NTFS-BOOT-PARTITION can be one of "/dev/hda1", "/dev/hda2"… or "auto" ("auto" will let clonezilla detect the NTFS boot partition automatically)
- -e2, --load-geometry-from-edd
- Force to use the CHS (cylinders, heads, sectors) from EDD (Enhanced Disk Device) when creating partition table by sfdisk
- -y, -y0, --always-restore, --always-restore-default-local
- Let Clonezilla server as restore server, i.e. client will always has restore mode to choose (However default mode in PXE menu is local boot)
- -y1, --always-restore-default-clone
- Let Clonezilla server as restore server, i.e. client will always has restore mode to choose (The default mode in PXE menu is clone, so if client boots, it will enter clone always, i.e. clone forever)
- -j, --create-part-by-sfdisk
- Use sfdisk to create partition table instead of using dd to dump the partition table from saved image (This is default)
- -j0, --create-part-by-dd
- Use dd to dump the partition table from saved image instead of sfdisk. ///Note/// This does NOT work when logical drives exist.
- -j1, --dump-mbr-in-the-end
- Use dd to dump the MBR (total 512 bytes, i.e. 446 bytes (executable code area) + 64 bytes (table of primary partitions) + 2 bytes (MBR signature; # 0xAA55) = 512 bytes) after disk image was restored. This is an insurance for some hard drive has different numbers of cylinder, head and sector between image was saved and restored.
- -j2, --clone-hidden-data
- Use dd to clone the image of the data between MBR (1st sector, i.e. 512 bytes) and 1st partition, which might be useful for some recovery tool.
- -hn0 PREFIX
- Change the hostname of M$ Windows based on the combination of hostname prefix and IP address, i.e. PREFIX-IP
- -hn1 PREFIX
- Change the hostname of M$ Windows based on the combination of hostname prefix and NIC MAC address, i.e. PREFIX-MAC
- --max-time-to-wait TIME
- When not enough clients have connected (but at least one), start anyways when TIME seconds since first client connection have pased. This option is used with --clients-to-wait
- -cm, --check-md5sum
- Check the MD5 checksum for the image. To use this option, you must enable -gm|--gen-md5sum option when the image is saved. Note! It might take a lot of time to check if the image size is large.
- -cs, --check-sha1sum
- Check the SHA1 checksum for the image. To use this option, you must enable -gs|--gen-sha1sum option when the image is saved. Note! It might take a lot of time to check if the image size is large.
- --mcast-port NO
- Assign the udp port number for multicast restore. This is used by clonezilla server. Normally it’s not necessary to manually assign this option.
A word is reserved for IMAGE_NAME, "ask_user" is used to let user to input a name when saving an image.
A word is reserved for DEVICE, "ask_user" could be used to let user to select the source device when saving an image.
General options:
- -l, --language INDEX
-
Set the language to be shown by index number:
[0|en_US.UTF-8]: English,
[1|zh_TW.BIG5]: Traditional Chinese (Big5) - Taiwan,
[2|zh_TW.UTF-8]: Traditional Chinese (UTF-8, Unicode) - Taiwan
[a|ask]: Prompt to ask the language index - -b, -batch, --batch
- (DANGEROUS!) Run program in batch mode, i.e. without any prompt or wait for pressing enter key. //NOTE// You have to use -batch instead of -b when you want to use it in the boot parameters. Otherwise the program init on system will honor -b, too.
- -c, --confirm
- Wait for confirmation before saving or restoring
- -d, --debug-mode
- Enter command mode to debug before saving/restoring
- --debug=LEVEL
- Output the partimage debug log in directory /var/log/ with debug LEVEL (0,1,2… default=0)
- -m, --module MODULE
- Force to load kernel module MODULE, this is useful when some SCSI device is not detected. NOTE! Use only one module, more than one may cause parsing problem.
- -o0, --run-prerun-dir
- Run the script in the direcoty /opt/drbl/share/ocs/postrun before clone is started. The command will be run before MBR is created or saved.
- -o1, -o, --run-postrun-dir
- Run the script in the direcoty /opt/drbl/share/ocs/postrun when clone is finished. The command will be run before that assigned in -p or --postaction.
- -w, --wait-time TIME
- Wait for TIME secs before saving/restoring
- --nogui
- Do not show GUI of partimage, use text only
- -a, --no-force-dma-on
- Do not force to turn on HD DMA
- -mp, --mount-point MOUNT_POINT
- Use NFS to mount MOUNT_POINT as directory ocsroot (ocsroot is assigned in drbl.conf)
- -or, --ocsroot DIR
- Specify DIR (absolute path) as directory ocsroot (i.e. overwrite the ocsroot assigned in drbl.conf)
- -p, --postaction [choose|poweroff|reboot|command|CMD]
- When save/restoration finishs, choose action in the client, poweroff, reboot (default), in command prompt or run CMD
- -ns, --ntfs-progress-in-image-dir
- Save the ntfsclone progress tmp file in the image dir so that if cloning is in DRBL client, the progress can be check in the server (Default in to be put in local /tmp/, which is local tmpfs).
- -um, --user-mode [beginner|expert]
- Specify the mode to use. If not specified, default mode is for a beginner.
- -v, --verbose
- Prints verbose information
- -d0, --dialog
- Use dialog
- -d1, --Xdialog
- Use Xdialog
- -d2, --whiptail
- Use whiptail
- -d3, --gdialog
- Use gdialog
- -d4, --kdialog
- Use kdialog
- -x, --interactive
- Interactive mode to save or restore.
Example:
- To save or restore image in client (Only that DRBL client will join, and its local partitions is NOT mounted). NOTE!!! You should run the command in DRBL client or you have to make sure the target device is NOT busy!.
-
To save all the data in local first IDE harddrive hda as image IMAGE1, use ntfsclone instead of partimage, and lzop compression (NOTE!!! You should run the command in DRBL client or make sure hda is NOT busy/mounted!):
ocs-sr --use-ntfsclone -z3 savedisk IMAGE1 hda -
To save the data in first and second partitions in local first IDE harddrive hda as image IMAGE2, use ntfsclone instead of partimage, and lzop compression (NOTE!!! You should run the command in DRBL client, or make sure hda is NOT busy/mounted!):
ocs-sr --use-ntfsclone -z3 saveparts IMAGE2 "hda1 hda2" -
To restore image IMAGE1 to local hda. grub-install will be run after cloning (image IMAGE1 is already in DRBL server. NOTE!!! You should run the command in DRBL client or make sure hda is NOT busy/mounted!):
ocs-sr -g auto restoredisk IMAGE1 hda -
To restore image first and second partitions from IMAGE2 to local hda1 and hda2. grub-install will be run after cloning (image IMAGE2 is already in DRBL server. NOTE!!! You should run the command in DRBL client or make sure hda is NOT busy/mounted!):
ocs-sr -g auto restoreparts IMAGE2 "hda1 hda2" -
To save disk(s)/partitition(s) as an image or restore an image to disk(s)/partitition(s) interactively, use:
ocs-sr -x
This opsi extension is currently in the co-funding process and is not free. For more details see Section 6, “Activation of non free modules”.
The opsi license management module is designed for managing the software licenses for proprietary software installed on opsi clients.
The main features are:
- Providing the license management functions from within the opsi-configed management interface.
- Automated supplying, assignment, and reservation of license keys.
The following different types of licenses can be managed:
- standard single licenses (a single license key assigned to a single license),
- volume licenses (a single license key for a certain number of installations) or campus licenses (a single license key for an unlimited number of installations)
- client bound licenses (which is a single license valid for a dedicated client only, e.g. OEM licenses),
- concurrent licenses (managed by a license server)
- License keys are released when deinstalling software.
- Licenses can be manually edited, including licenses that were not installed using opsi.
- Reporting functions that use the software inventory to gather data on licenses installed by opsi and non-opsi software, and then match the opsi and non-opsi data.
A separate window in the opsi-configed management GUI is used for the license management.
It is available by pressing the button "licenses" at the top right corner of the opsi-configed management GUI. If the license management module is disabled, #
then a note will be displayed.(see the entry for "license management" in the main menu under /Help/Modules).

The opsi license management module is a co-financed opsi extension module, which is available to the participants of the cofunding project, who have payed a certain amount of the development costs. The module will be available to the community when all the development costs have been recuperated.
A license pool has to be defined for every type of license. The license pools represent the use cases of licenses, and provide the license keys for installing the licensed software on the clients. The license pool is the central element of the opsi license management. Therefore, the first tab of the opsi-configed license management window is the management license pools tab.
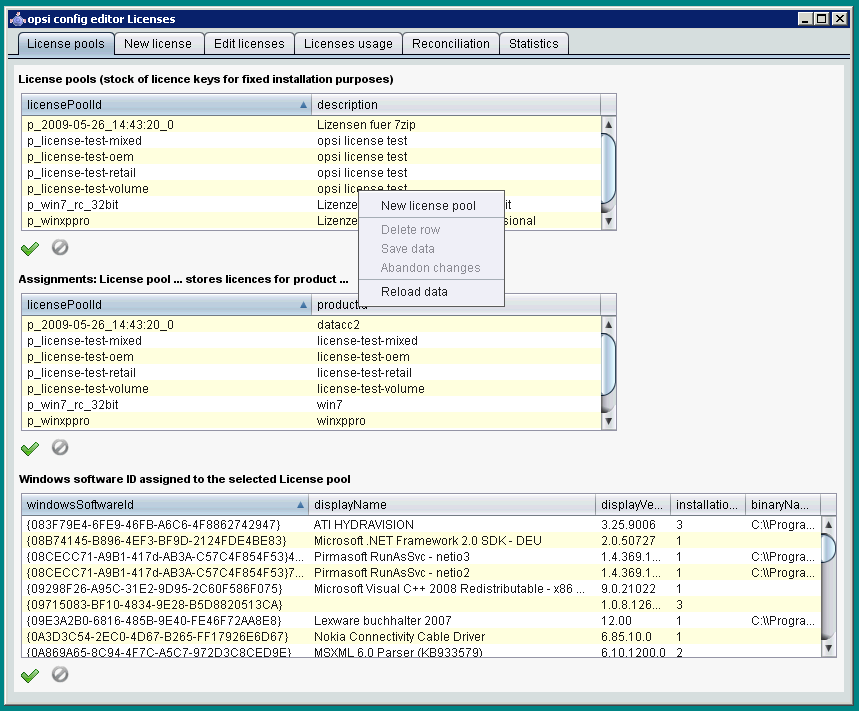
At the top of the license pools window is a table of available license pools.
The input field description can be edited.
More editing functions are available from the context menu (right mouse button). The most important is: creating a {New license-pool}.
When inserting a new line into the table, a (unique) licensePoolId must be entered, e.g. softprod_pool. Please do not use special characters. When saving the new entry, any capitals will be converted to lower case.
The new licensePoolId cannot be changed after it is saved, because it is used as the master key.
The table at the top of the window contains the available license pools. The context menu provides several functions for managing license pools, especially to insert a {New license-pool}. After any changes to the data in the window, the green check checkmark changes to red and the cancel option is enabled. The changes can be saved by clicking the red checkmark, or changes can be cancelled by clicking the cancel option (also available from the context menu).
The standard method to manage licenses is to include the license, from a single license pool, when installing the software (i.e. using the opsi-product installation software to install Acrobat Writer).
A more complicated situation might occur while installing software that requires licenses from several license pools (i.e. "Designer tools" which installs Adobe Photoshop as well as Acrobat Writer).
In this case, the opsi-product requests licenses from several license pools. At the same time, there might be other opsi-products requesting licenses from the same license pools (e.g. the Acrobat Writer license pool). So the relation between opsi-products and license pools can be ambiguous. This can be avoided by using unambiguous policies when building opsi-products.
The second part of the license pool tab manages the relationship between license pools and productIds (from opsi-products).
All tables in the license management module can have their columns sorted by clicking on the column header. Clicking again inverts the order (ascending or descending).
Sorting can be used to display the connections between opsi-products and license pools. Sorting by opsi-product displays all license pools connected to a certain opsi-product, whereas sorting by license pool shows which opsi-products are connected to a license pool.
The context menu provides an option for inserting a new relationship between opsi-product and license pool. An empty row is inserted on top of the table. Clicking into the field licensePoolId or productId displays a dropdown with the available options.
The third section of the license pools tab displays the Windows software IDs connected to the currently selected license pool (in the first section of the tab).
A Windows software ID is an unique key identifying a software packet as detected by opsi software audit. These software IDs are also used by the opsi software inventory module to identify which software is actually installed on the client.
The assignment of software IDs to the current license pool can be changed by setting or removing the selection (ctrl-click or shift-click). From the context menu the display can be toggled between showing all available software IDs detected by the software audit or just showing the software IDs connected to the current license pool.
Displaying the relationship between Software IDs and license pools is useful for comparing the number of actual software installations (detected by the software audit) with the number of legal installations available from the license pool (tab "Statistics", see below).
Setting up a license for being provided by a license pool requires several steps. The second tab New license is for setting up and editing licenses.
On top is the table of available license pools to select the license pool the new license is to be assigned to. So the first step is to select the license pool for the new license.
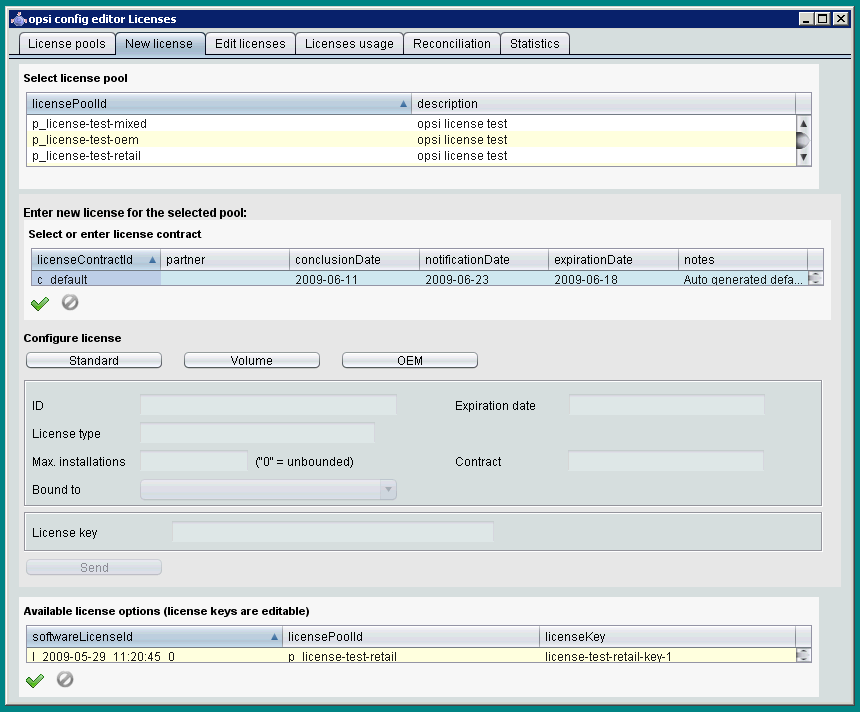
Before continuing with the next steps, some basic concepts and terms of license management have to be introduced:
Licensing means the actual deployment of a permission to use a software by installing the software on a client. This might (but doesn’t have to) include the use of a special license key (license key).
The software license is the permission to install and use a software as defined by the license contract. Within the opsi database a software license is identified by a softwareLicenseId.
There are several types of software licenses (volume license, OEM license, time limited license etc.) which are the different license models. A software license is based on a license contract (license contract), which is defining and documenting the juristic aspects of the license.
A license option defines the option to use a software license for a selected license pool. Within opsi the license option is defined by a combination of softwareLicenseId and licensePoolId. This includes the actual licenseKey (if required).
Finally the license usage documents the use of a license by assigning the license option to a client. This is the legal and implemented licensing of a software defined by the combination of softwareLicenseId, licensePoolId, the unique client name hostId and (if required) the licenseKey.
After selecting the license pool for the new license option, the next step is to register the license contract the license is based on. The section "Select or enter license contract" (from tab "New license") defaults to a standard contract with ID default. The default setting can be used if the license contract is implied by purchasing the software or the contract is documented some other way. Otherwise the contract can be selected from the table or a new contract can be registered from the context menu. The license contract dataset comes with data fields for partner, conclusion date, notification date and expiration date. The entry field notes can hold some additional notes like the location where the contract document is kept. The unique contract ID (licenseContractId) is for identifiying the license contract in the license management database. When entering a new license contract, a new unique ID is constructed based on the current date and time stamp. This ID can be changed before saving the new data set. When saving the data, the opsi service checks whether the ID is unique. In case it is not, a new ID is generated and cannot be changed any more.
The third part of the Tab "New license" is named "Configure license" and is for registering the license model and license data.
Several types of license models are available:
- Standard license
- Volume license
- OEM license
- Concurrent license
Each Option is represented by a button. Clicking a button, the form is filled with data for that type of license model.
The license model Standard license means, that this license is valid for a single installation on an arbitrary client. So the license key (if any) is valid for a single installation only.
A Volume license is valid for a certain number n of installations. In this case the optional license key is used for that number of installations. Setting n = 0 means, that the number of installations is unlimited within the same network (campus license).
In case of an OEM license, the license is valid for a dedicated client only. Clients that come with a vendor pre installed operating system often have this type of license for the pre installed OS and software packets.
The Concurrent license means that a certain number of licenses is available for a variable set of clients. Within opsi this situation is handled like an unlimited Volume license. The number of actual installations in use has to be managed by some external license server.
After clicking a button, the automatic generated data include a generated unique ID (derived from date and time stamp). This ID can be changed as desired.
It depends on the type of license model, which of the other fields can or cannot be changed.
The field "Expiration date" defines the expiration date of the license in a technical sense. (This column of the license is for future use).
The "Send" button sends the data to the opsi service to save them permanently to the opsi data base (if they are consistent and no errors occur).
While proceeding this, data records will be generated for the new software license based on the selected software contract and the new license option assigned to that.
The list of available license options at the bottom of the window will be refreshed with the new license option selected. If necessary, the license key can be changed then.
For ninety percent of the use cases editing the license data with the tabs "License pools" and "New license" will do. But there might be some special cases affording to edit license data more specific and explicit. Therefore the tab "Edit licenses" presents the license data in three tables, representing the internal data structure and allowing to adapt the data for some special cases.
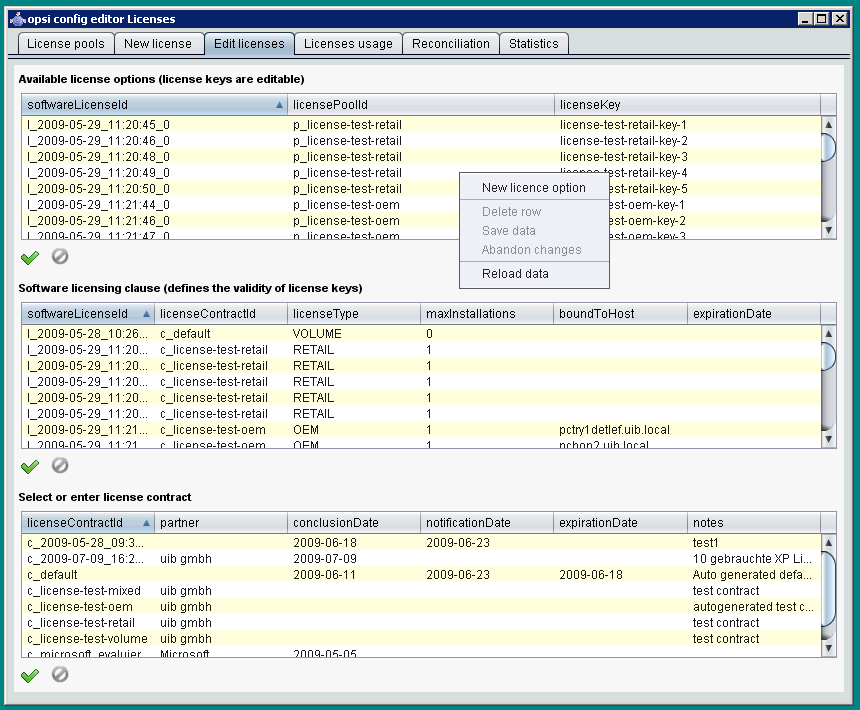
Based on this direct data access, the following chapter shows how to configure a special license, like the Microsoft Vista or Windows 7 professional downgrade option for installing Windows XP.
Downgrade option means, that instead of the software purchased, also the preceding version can be installed. For instance installing Windows XP based on a Windows Vista license. In this case, the license key also can be used for an installation, which it wasn’t meant for in the first place.
In the opsi license model this case can be configured like this:
From the tab "New license" the Vista license is to be registered as usual, resulting in a new license option, which is displayed in the list of license options at the bottom of the window. This new license option is based on a new software license identified by softwareLicenseId.
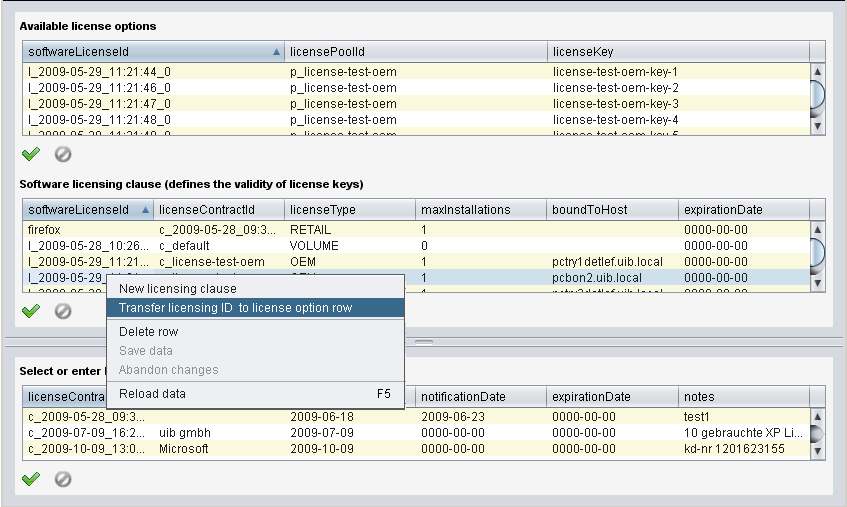
This softwareLicenseId is needed for the further configuration steps. You can keep it in mind or copy it with drag&drop. You can as well look for the ID in the "Available license options" list of the "Edit licenses" tab. The context menu supports copying the ID.
The important step now is to connect this softwareLicenseId to an additional license pool.
Therefore a new record has to be registered from the "Available license options" table of the "Edit licenses" tab. The fields of the new record have to be filled with the softwareLicenseId and the ID of the additional license pool (in this case the pool for Windows XP licenses). For installing Windows XP based on this license, an applicable Windows XP license key already in use by another client has to be added.
After saving the new record, there are two different license options based on the same software license! The opsi service counts the use of either of them as an installation deducting from the maximum installation count. So in case of a downgrade license (with maxInstallations = 1), the opsi service delivers a license key for a Vista installation or for a XP installation, but not for both of them.
Using a license option by installing the software on a client results in the actual licensing (which is the use of the license option).
In the opsi context installations are done script based and automatically, which is the client running the Winst script invokes some calls to the central opsi service.
The following chapters introduce some of these service calls, which are relevant for the license management. For further information about Winst and opsi commands see the documentation on Winst and opsi.
The opsi service call for requesting a license option and retrieving the license key for doing the installation (as transmitted by a Winst script) is
getAndAssignSoftwareLicenseKey
The parameters to be passed are the client hostID (hostID of the client where the software is to be installed) and the ID of the license pool the license is requested from. Instead of the licensePoolId also an opsi-product ID or a Windows Software ID can be passed, if they are connected to a license pool within the opsi license management.
The use of a license option can be released by calling:
deleteSoftwareLicenseUsage
Again the parameters to be passed are the hostID and alternatively the licensePoolId, productID or Windows Software ID. Calling this service releases the license option and returns it to the pool of available license options.
For the complete documentation of opsi service calls see below.
The opsi-winst provides the client related calls as opsi-winst commands.
A opsi-winst script can make a call to the function DemandLicenseKey to get a license key for installing. The parameters to be passed are:
DemandLicenseKey (poolId [, productId [, windowsSoftwareId]])
The return value is the license key (can be empty) as a string:
set $mykey$ = DemandLicenseKey ("pool_office2007")The returned license key can be used by other script command for installing the software.
For releasing a license option and license key (as to be used in a opsi-winst deinstallation script) the command FreeLicense is available with the following syntax:
FreeLicense (poolId [, productId [, windowsSoftwareId]])
The boolean function
opsiLicenseManagementEnabled
can be used to check whether the opsi license management is enabled and can be used for scripting:
if opsiLicenseManagementEnabled
        set $mykey$ = DemandLicenseKey ("pool_office2007")
else
        set $mykey$ = IniVar("productkey")
The service calls can be invoked from the command line tool opsi-admin.
Parameters marked with * are optional.
method createLicenseContract(*licenseContractId, *partner, *conclusionDate, *notificationDate, *expirationDate, *notes)
This method registers a new license contract record with the ID licenseContractId. If no licenseContractId is passed, it will be generated automatically. Using the licenseContractId of an existing contract, this contract can be edited.
The parameters partner (co-contractor) and notes are strings and can be filled with any information desired. The parameters conclusionDate (date of conclusion of the contract), notificationDate (date for a reminder) and expirationDate (expiration date of the contract) are passed in the format YYYY-MM-DD (e.g. 2009-05-18).
The method returns the licenseContractId of the contract.
        set $mykey$ = DemandLicenseKey ("pool_office2007")
else
        set $mykey$ = IniVar("productkey")
With the string returning functions
getLastServiceErrorClass
and
getLastServiceErrorMessage
error states can be detected and handled, e.g. if there is no license available:
if getLastServiceErrorClass = "None"
        comment "no error"
endifWithin the opsi config editor, the licenses registered by the opsi service are listed on the tab "Licenses usage":
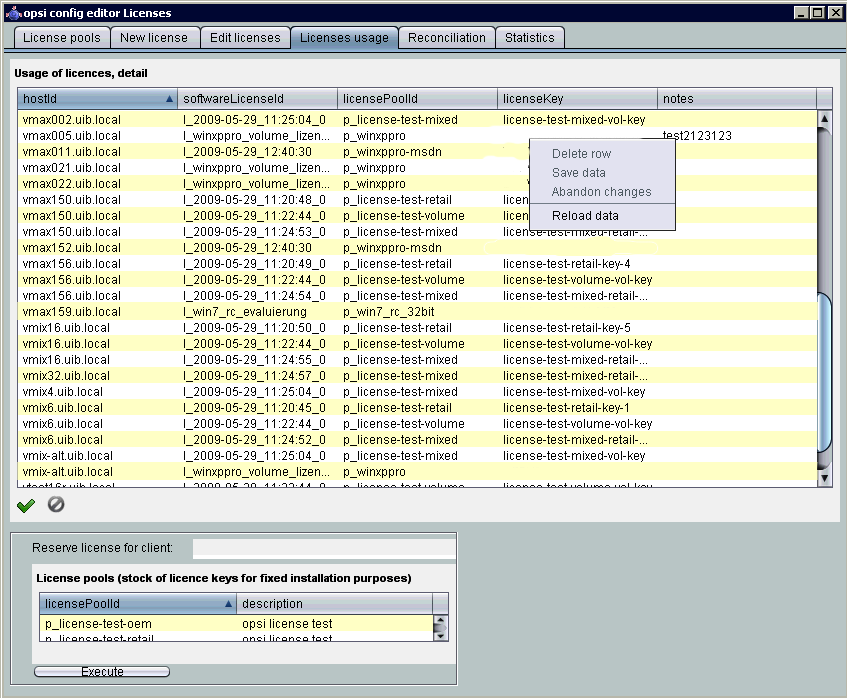
From this tab, licenses also can be managed manually. This can be useful, if a licensed software is not integrated into the opsi deployment, but installed manually on just a few clients.
These are the functions for manual license management in detail:
- "Delete row" (available from the context menu) releases a license option.
- "Reserve license for client" at the bottom of the window is to create a license reservation for a dedicated client.
- By editing the field "licenseKey" from the "Usage of licenses" table, the license key can be changed.
If a software packet is reinstalled, the call to the opsi-winst function DemandLicenseKey will return the same license option and license key as had been used before.
In case this is not favoured, the former license option has to be released by calling the opsi-winst command FreeLicense, or by calling the opsi service call deleteSoftwareLicenseUsage or deleting the license use manually.
So, if not explicitly deleted, the license usages are preserved when reinstalling a client.
For releasing the licenses, they can be deleted from the tab "Licenses usage" or can be deleted by the service call
deleteAllSoftwareLicenseUsages
passing the client host name to delete the license uses from.
The tab "Reconciliation" lists for each client and for each license pool whether a use of this license pool is registered by opsi ("used_by_opsi") and if the software inventory (swaudit) on that client reported a software, that requires a license option from that pool (Swinventory_used).
To evaluate the results from swaudit, the relevant Software IDs (as found in the client registry) have to be associated with the appropriate license pool (tab "License pools").
When data matching with the software inventory, the license management counts not more than one license per client and license pool. So if the license pool office2010 is connected with ten different patterns from software inventory, indicating that office2010 is installed on this client, this is (regarding the licenses usage count) counted as a single installation, although all of the detection patterns might to be found on the client.
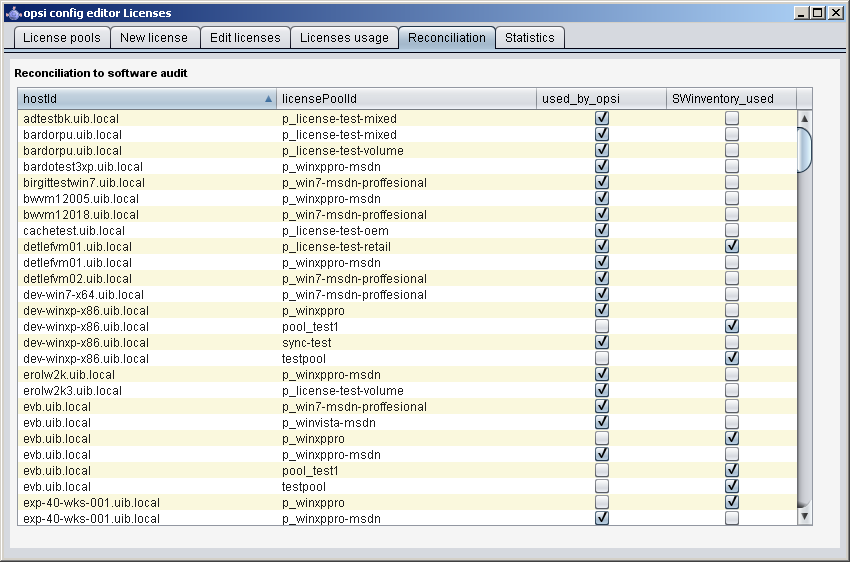
As usual, this table can be copied as Drag & Drop and for instance pasted to a spreadsheet program. If the opsi-configed process has got the required access rights (running standalone and not from the applet), the table also can be printed from the context menu.
By virtue of the config configed.license_inventory_extradisplayfields which can be edited in the host parameter page of the server you may add extra data fields for each client to the table.
The tab "Statistics" displays a summary of the different license pools, showing the total number of license options (license_options) and how many of them are in use (used_by_opsi) or still available (remaining opsi).
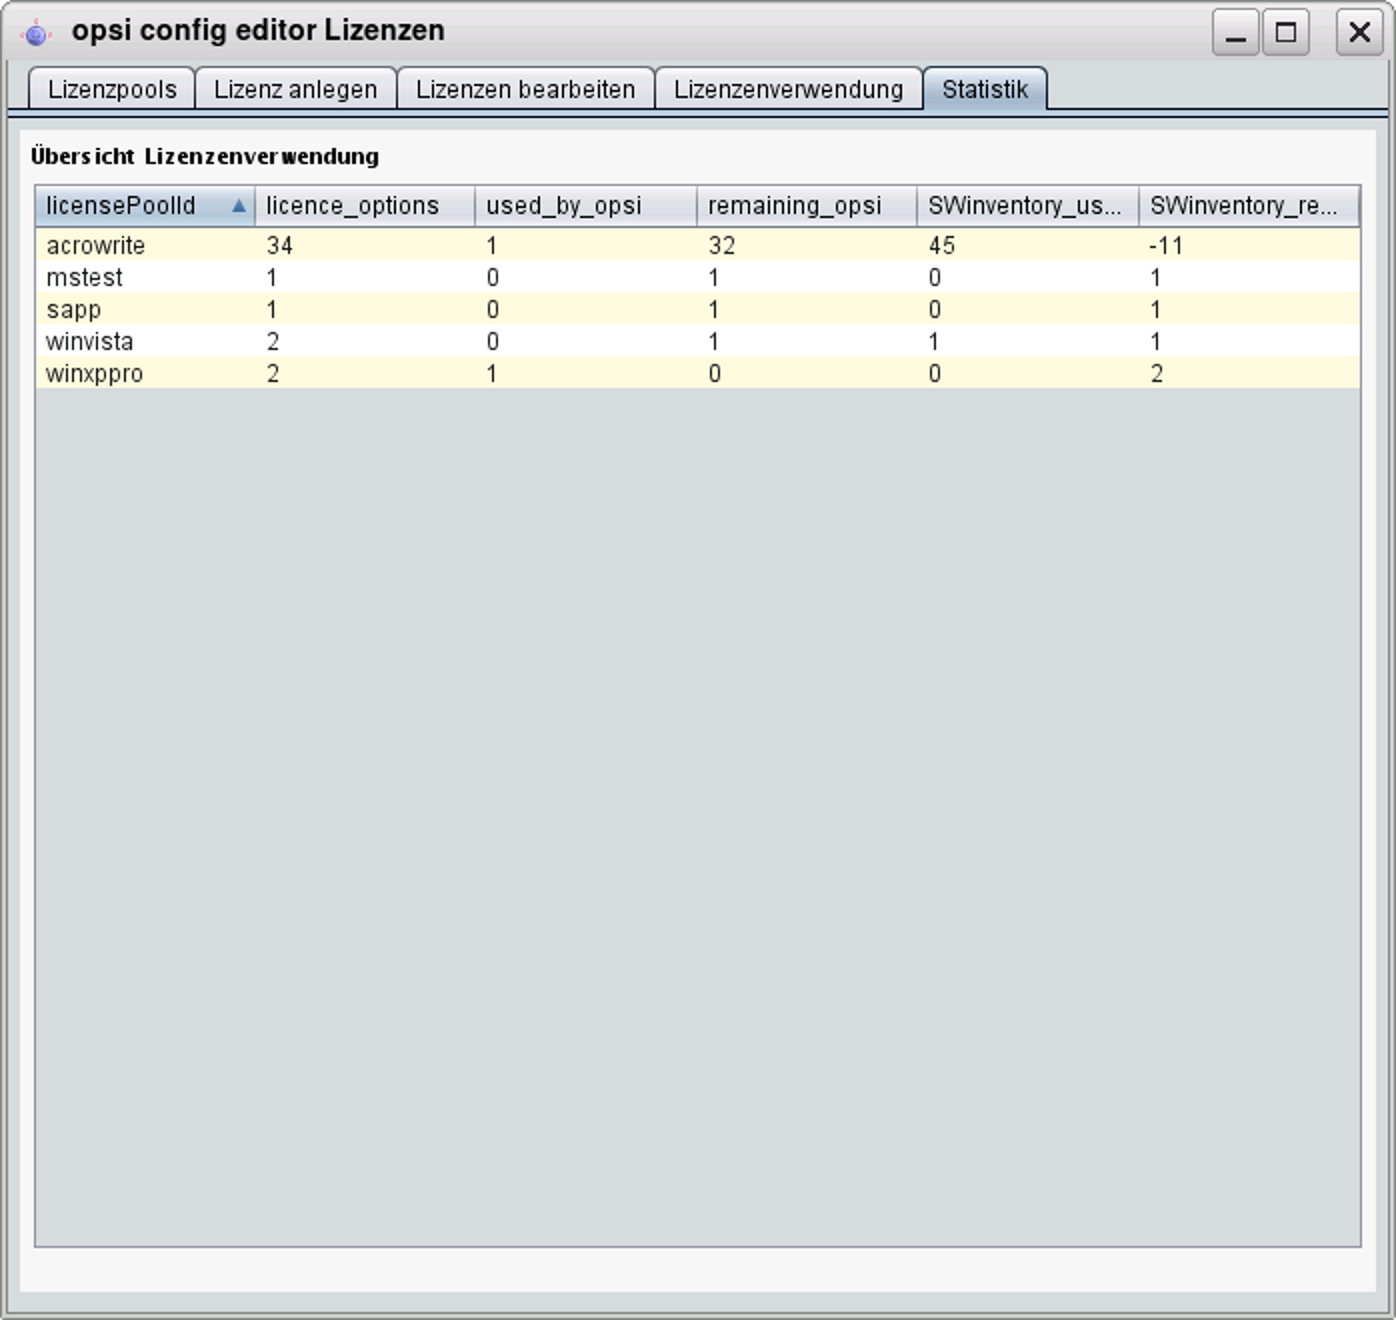
In addition to the number of license uses registered by opsi (used by opsi) and the currently available licenses (remaining…) the ovierview also shows the total number of detected installations, that require a license (SWinventory_used).
The data from the column SWinventory_used are based on the registry scans from the opsi-product swaudit and the assignment of the Windows software IDs (as they are found in the registry) to the license pools (as registered with the opsi license management (tab "License pools", see Section 15.3, “license pools”).
From the context menu the table can be printed (because of restricted access rights not available from the applet), with drag&drop data can be copied to e.g. a spreadsheet.
If a downgrade option has been configured (see the section called “Example downgrade option”), this appears in the overview and statistics like this:
A single downgrade license results in a license option for at least two different license pools, but only one of them can be requested for an installation. So using a downgrade license option decreases the number of available license options (remaining_opsi) in each of the license pools concerned by that downgrade option by 1. So this looks like a single installation reduces the number of available license options by 2, which, in this case, actually is the fact.
The service methods for license management can be called from the command line tool opsi-admin. So they are accessible for scripting, e.g. to read license keys from a file.
Examples can be found in the products license-test-….opsi from http://download.uib.de/opsi4.0/products/license-management/. After installing the packets with opsi-package-manager -i *.opsi, in the directory /var/lib/opsi/depot/<product name> the corresponding scripts: create_license-*.sh can be found.
As an example here the script create_license-mixed.sh
(the current version comes with the download packet).
#!/bin/bash
# This is a test and example script
# (c) uib gmbh licensed under GPL

PRODUCT_ID=license-test-mixed
# read the license key from a file
# myretailkeys.txt has one licensekey per line
MYRETAILKEYS=`cat myretailkeys.txt`
# myoemkeys.txt has one pair: <licensekey> <hostid.domain.tld> per line
MYOEMKEYS=`cat myoemkeys.txt`
# some output
echo "$PRODUCT_ID"

# this is the function to create the oem licenses
#############
createlic ()
{
while [ -n "$1" ]
do
        #echo $1
        AKTKEY=$1
        shift
        #echo $1
        AKTHOST=$1
        shift
        echo "createSoftwareLicense with oem key: ${PRODUCT_ID}-oem-${AKTKEY} for host ${AKTHOST}"
        MYLIC=`opsi-admin -dS method createSoftwareLicense "" "c_$PRODUCT_ID" "OEM" "1" "${AKTHOST}" ""`
        opsi-admin -d method addSoftwareLicenseToLicensePool "$MYLIC" "p_$PRODUCT_ID" "${PRODUCT_ID}-oem-${AKTKEY}"
done
}
#############

# here the script starts

# delete the existing license pool and all connected licenses
# ATTENTION: never (!) do this on a productive system
echo "deleteLicensePool p_$PRODUCT_ID"
opsi-admin -d method deleteLicensePool "p_$PRODUCT_ID" true

# delete the existing license contract
echo "deleteLicenseContract c_$PRODUCT_ID"
opsi-admin -d method deleteLicenseContract "c_$PRODUCT_ID"

# create the new license pool
# the used method has the following syntax:
# createLicensePool(*licensePoolId, *description, *productIds, *windowsSoftwareIds)
echo "createLicensePool p_$PRODUCT_ID"
opsi-admin -d method createLicensePool "p_$PRODUCT_ID" "opsi license test" \'['"'$PRODUCT_ID'"']\' \'['"'$PRODUCT_ID'"']\'

# create the new license contract
# the used method has the following syntax:
# createLicenseContract(*licenseContractId, *partner, *conclusionDate, *notificationDate, *expirationDate, *notes)
echo "createLicenseContract c_$PRODUCT_ID"
opsi-admin -d method createLicenseContract "c_$PRODUCT_ID" "uib gmbh" "" "" "" "test contract"

# create the new license and add the key(s)
# the used methods have the following syntax:
# createSoftwareLicense(*softwareLicenseId, *licenseContractId, *licenseType, *maxInstallations, *boundToHost, *expirationDate)
# addSoftwareLicenseToLicensePool(softwareLicenseId, licensePoolId, *licenseKey)

# create the retail licenses:
for AKTKEY in $MYRETAILKEYS
do
        echo "createSoftwareLicense with retail key: ${PRODUCT_ID}-retail-${AKTKEY}"
        MYLIC=`opsi-admin -dS method createSoftwareLicense "" "c_$PRODUCT_ID" "RETAIL" "1" "" ""`
        opsi-admin -d method addSoftwareLicenseToLicensePool "$MYLIC" "p_$PRODUCT_ID" "${PRODUCT_ID}-retail-${AKTKEY}"
done

# create the oem licenses
createlic $MYOEMKEYS

# create the volume licenses
echo "createSoftwareLicense with volume key: ${PRODUCT_ID}-vol-key"
MYLIC=`opsi-admin -dS method createSoftwareLicense "" "c_$PRODUCT_ID" "VOLUME" "10" "" ""`
opsi-admin -d method addSoftwareLicenseToLicensePool "$MYLIC" "p_$PRODUCT_ID" "${PRODUCT_ID}-vol-key"#In the uib download section at
http://download.uib.de/opsi4.0/products/license-management/
there are four example products available. One for each type of license model, as there are Retail, OEM and Volume license type, as well as a product combining all of them.
These example products use as an example some licenses and release them again. So using them leaves some marks in the software inventory, that might be of influence to reconciliation and statistics.
All of these products contain a shell script to automatically generate license pools, license contracts and license options.
The standard template for opsi-winst scripts opsi-template also contains some examples for using the opsi license management.
The WAN/VPN extension module allows to integrate clients, that are connected via low speed connections. This chapter is about configuring and maintaining the opsi WAN/VPN extension.
This opsi extension is currently in the co-funding process and not free. For more details see Section 6, “Activation of non free modules”.
There are some preconditions to use the WAN/VPN extension module. The feature product groups is required, which is available with opsi 4.0 and above. Also the packets opsi-client-agent and opsi-configed are required, which come with version 4.0.1.
At the moment, the simultaneous use of both "WAN extension" and "installation on shutdown extension" is not supportet. On the same opsi server with different clients, these opsi extensions can be used.
Table 4. Required packets
| opsi-Packet | version |
|---|---|
opsi-client-agent | >=4.0.1-1 |
opsi-winst | >=4.10.8.12 |
python-opsi | >=4.0.1-7 |
opsi-configed | >=4.0.1.6-1 |
opsi software deployment is mainly doing the following steps:
- The opsi-login-blocker at client system startup prevents the users from logging on.
- The opsiclientd service running on the client connects the opsi-config-server.
- If any product actions are set for the client, it mounts a share from the opsi-depot.
- The opsi-winst is starting and also connects to the opsi-config-server.
- The opsi-winst executes the product actions, using the share from the opsi-depot.
- If a reboot is required, it executes and the process starts all over.
- When all the product actions are completed, the log files are transferred to the opsi-config-server and the user logon is unblocked.
Now we will look at the special circumstances of a client, which is located in a remote branch, connected via WAN to the LAN, where the opsi-config-server and opsi-depot-server are:
- During communication with the opsi-config-server small amounts of data are transferred, so there is no noticeable slowdown of the software deployment in a WAN.
- But processing the product actions might consume a very long time, depending on the packet sizes, bandwidth and latency of the WAN connection. There also might occur timeouts during file access.
- Therefore, during the installation is processing, the user has to wait for an unreasonably long time before logon is granted.
As an alternative to providing a dedicated opsi-depot-server in the remote branch network, the remote clients can be connected via WAN/VPN extension module. Using the WAN/VPN extension module, the opsi-client-agent can be configured this way:
- At system startup, if there are no opsi-products cached and ready for installation, the user can logon immediately.
- When there are product actions set for the client, the opsiclientd, which is running on the client, starts downloading the required installation files from the opsi-depot to the local file system. This is done in the background while the user is working. The maximum download bandwidth can be configured and also can be dynamically adapted to the current network traffic status.
- When the synchronization of the opsi-products is completed, a reboot request is triggered.
- The logged on user can accept the reboot request, or the client will be rebooted at some time later on.
- At the next system startup, the cache is found to be filled with the opsi-products to be installed and the installation starts. In this case, the installation will use the downloaded files from the local file system, which increases the speed of installation even compared to a standard LAN installation.
Now we examine the situation of a notebook, which at system startup often cannot connect the opsi-config-server:
- Trying to connect the opsi-config-server at system startup will result in a timeout.
- Connecting the opsi-config-server might be possible when a user logs on and a VPN connection to the corporate network is established.
- Without connection the opsi-config-server no software deployment is available.
This situation also can be solved by using the WAN/VPN extension module.
The opsi-client-agent can be configured the following way:
- At system startup, if there are no opsi-products cached and ready for installation, the user can logon immediately.
- Triggered by network activation or a by timer event, the opsiclientd running on the client tries to connect the opsi-config-server.
If the opsi-config-server is reachable, the opsiclientd starts to:
- synchronize the configurations
-
download the required files from the opsi-depot to the local file system.
In combination with the opsi extension module Dynamic Depot Selection, the download is done from the best fitting opsi-depot.
- When the synchronization of the opsi-products is completed, a reboot request is triggered.
- The logged on user can accept the reboot request or the client will be rebooted at some time later on.
- At the next system startup, the cache is found to be filled with the opsi-products to be installed and the installation starts. In this case, the installation will use the downloaded files from the local file system, which increases the speed of installation even compared to a standard LAN installation. So the opsiclientd takes over the function of both the opsi-config-server and the opsi-depot-server.
- At the next connect to the opsi-config-server the results of the installation process (configuration change, log files …) will be synchronized.
The download mechanism of product synchronization is multiple interruptible and will continue at the point of interruption. So files that are already downloaded will not have to be downloaded again.
The WAN/VPN extension module allows to connect clients, that are outside of the secure corporate network. Therefore additional security mechanisms are required regarding the communication between client and server.
So the opsiclientd now offers the ability to verify the identity of an opsi-server.
Therefore the key pair of the SSL certificate of the opsiconfd is used.
By this mechansim the opsi-config-server as well as the opsi-depot-server can be verified,
assumed the communication is performed via opsiconfd and SSL.
In case of an opsi-depot the file access must be done by the opsiconfd using HTTPS/WEBDAVS.
Access done via CIFS/SMB will not be checked.
Caching of opsi-products is done by the ProductCacheService, which is part of the opsiclientd.
The ProductCacheService synchronizes the local copy of an opsi-product with the current version of the corresponding opsi-products on the opsi-depot.
The location of the local product cache can be configured and defaults to %SystemDrive%\opsi.org\cache\depot.
For transferring the product files, two different protocols are used:
- CIFS/SMB
- HTTP(S)/WEBDAV(S)
In case of using CIFS/SMB, a connection to the depotRemoteUrl will be established as configured with the properties of the opsi-depot. In case of using HTTP(S)/WEBDAV(S), the depotWebdavUrl is connected, which as well is to be configured with the properties of the opsi-depot.
Which protocol is to be used, can be configured client specific by the host parameter clientconfig.depot.protocol.
Available values to be set as clientconfig.depot.protocol are cifs and webdav.
Note
Also the opsi-linux-bootimage is evaluating this setting and uses the specified protocol.
The synchronization process is based on the file <product-id>.files, which is located in the base directory of each opsi-product on the opsi-depot.
This file contains information about the files, directories ans symbolic links used by an opsi-product.
Each line of that file contains such information. Different types of information are separated by a blank.
The first character of a line defines the type of the following entry. Available values are:
-
dfor a directory -
ffor a file -
lfor a symbolic link
Separated by a blank follows the relative path, which is single quoted.
The next entry gives the sizes of the file (which is 0 for directories and symbolic links).
The final entry in case of a file is the MD5-sum of the file, in case of a symbolic link it is the target referred to by the symbolic link.
Example excerpt of a .files file:
d 'utils' 0
f 'utils/patch_config_file.py' 2506 d3007628addf6d9f688eb4c2e219dc18
l 'utils/link_to_patch_config_file.py' 0 '/utils/patch_config_file.py'
The .files file is generated automatically when installing opsi-product-packages (after running the postinst-Script).
Warning
When using the WAN/VPN extension, the files of opsi-products on the opsi-depot should not be changed manually, otherwise the information contained in the .files file would be outdated, causing errors during the synchronization process.
The synchronization of a local copy of an opsi-product processes as follows:
- The .files file of the opsi-product is transferred to the local client.
- Then it is checked, whether there is enough local disk space available to cache the opsi-products. If there isn’t enough disc space available, some old opsi-products will be deleted, which haven’t been used (synchronized) for a long time.
- The local caching directory will be created if it doesn’t exist.
- Referring to the .files file, any old files and directories, which aren’t in use anymore, will be deleted from the local opsi-product cache.
Then the .files file will be processed in the following order.
- missing directories are created.
- missing files are transferred.
- existing files will be checked by size and MD5-sum and be synchronized again if necessary.
The synchronization results in an exact local copy of the opsi-product from the opsi-depot.
Note
On windows systems, no symbolic links will be created. Instead of links there will be copies of the link target.
When the opsi-product has completed successfully,
-
the status of
products_cachedwill turn totrue(and staystruein case of a system restart, see: the section called “Configuration of different events”). -
a
sync completedevent will be triggered.
The opsi-product caching is configured in the section [cache_service] of the opsiclientd.conf.
-
product_cache_max_size(integer): The maximum size of the opsi-product cache in byte. This is important to limit the disk space to be used by opsi-product caching. -
storage_dir(string): the path to the directory, in which the base directorydepotfor the opsi-product caching is to be created.
Further configurations can be done event specific.
Within an event configuration section [event_<event-config-id>] the following options are available:
-
cache_products(boolean): if the value of this option istrue, in case of the event the ProductCacheService will start to cache opsi-products, for which a product action is set. If additionally the value of the optionuse_cached_productsis set totrue, the further processing of this section will be suspended until the caching of opsi-products is completed. -
cache_max_bandwidth(integer): the maximum bandwidth in byte/s to be used for caching. If this value is set to 0 or less, the bandwidth is unlimited. -
cache_dynamic_bandwidth(boolean): if the value of this option is set totrue, the bandwidth will be adapted dynamically. Therefore the network traffic at the network interface to the opsi-depot will be monitored. If any traffic is detected, which is not caused by the opsi-product caching, the bandwidth for the caching will be sharply reduced, to allow other processes to work at (almost) full speed. If the caching works at reduced bandwidth and no more other network activity but the opsi-product caching is detected, the caching process will continue with unlimited bandwidth. The value ofcache_max_bandwidthwill be used to limit the maximum dynamic bandwidth. -
use_cached_products(boolean): if the value of this option is set totrue, the local opsi-product cache will be used for processing product actions. If caching of the opsi-products is not completed, the processing of this event will stop and return an error code.
The caching of configurations is done by the ConfigCacheService, which is part of the opsiclientd.
The ConfigCacheService synchronizes a local client-cache-backend with the config backend of the opsi-config-server.
The opsiclientd provides per WebService an access point to the backend and thereby provides quite the same functionality as the opsiconfd.
The local client-cache-backend is based on SQLite and mainly consists of a local working copy,
a snapshot an a modification tracker, which records all changes of the local working copy.
The base directory of the config cache can be configured and defaults to %SystemDrive%\opsi.org\cache\config.
The snapshot reflects the configuration status on the opsi-config-server at the time of the last synchronization.
At the start of the processing, the local working copy is a copy of the snapshot, but will be modified during processing.
The synchronization of the local changes of the client-cache-backend with the config backend of the opsi-config-server is processed as follows:
The changes of the local working copy registered by the modification-tracker are transferred to the opsi-config-server. Any changes of the configuration on the opsi-config-server since the last synchronization will be detected by comparing to the snapshot. If there are any conflicts deteced, the following rules apply:
- In case of inventory data, the local client data have priority.
- In case of action requests, the value from the opsi-config-server has priority.
- In case of installation status and action result, the client data have priority.
- The software licenses in use are given by the local client. Any unused licences, which have been reserved during replication, will be released again.
- The opsi-config-server has priority for the status of host parameter and product properties.
- The modification tracker will be cleared.
- The logfiles will be transferred.
The config backend replication of the opsi-config-server to the client-cache-backend is processed as follows:
-
The replication only takes place, if any action requests are set on the opsi-config-server. The product action
alwaysdoes not count in this respect. The replication process will start only if the status of action requests is changed since the last replication. - The modification tracker and the local working copy are cleared.
- The configurations required for local processing will be replicated.
- If action requests are set for opsi-products which are marked as to require a license, the required software license will be reserved from a license pool, which is assigned to that opsi-product.
-
Additionally required data, as there are the
auditHardwareConfigand themodules, will be transferred. - The snapshot and the local working copy will be updated, so they have the same content.
A successful replication from server to client results in:
-
The status of
config_cachedis set totrue(and staystruein case of a system restart, see: the section called “Configuration of different events”). -
An event of type
sync completedwill be triggered.
The configuration of the config caching is mainly done event specific:
Within an event configuration section [event_<event-config-id>], the following options are available:
-
sync_config_to_server(boolean): if the value of this option is set totrue, the ConfigCacheService in case of that event starts to transfer the changes registered by the modification tracker to the opsi-config-server. The process will wait for that task to complete. -
sync_config_from_server(boolean): if this value is set totrue, the ConfigCacheService starts with the replication. If additionally the value of the optionuse_cached_configis set totrue, the processing of this event is suspended until the replication is completed. -
use_cached_config(boolean): if the value of this option is set totrue, the client-cache-backend will be used for processing the product actions. If the synchronization is not completed, the processing of this event will be stopped and return an error code. -
post_sync_config_to_server(boolean): has the same functionality assync_config_to_server, but will be evaluated after the product actions have been completed. -
post_sync_config_from_server(boolean): has the same functionality assync_config_from_server, but will be evaluated after the product actions have been completed.
The opsi-client-agent-package comes with a opsiclientd.conf prepared for the WAN/VPN extension.
For activating the WAN/VPN extension, just enabling of some events and disabling of some others is required.
The configuration of the opsi-client-agent also can be done from the web service (see: the section called “Configuration via web service (Host Parameter)”),
so it is recommended to create the following host parameter:
-
opsiclientd.event_gui_startup.active(boolean, default:true) -
opsiclientd.event_gui_startup{user_logged_in}.active(boolean, default:true) -
opsiclientd.event_net_connection.active(boolean, default:false) -
opsiclientd.event_timer.active(boolean, default:false)
By these host parameter, events can be enabled or disabled client specific. The host parameter can be created using the opsi-configed or opsi-admin.
For creating the host parameter by opsi-admin, the following commands have to be executed on the opsi-config-server:
opsi-admin -d method config_createBool opsiclientd.event_gui_startup.active "gui_startup active" true
opsi-admin -d method config_createBool opsiclientd.event_gui_startup{user_logged_in}.active "gui_startup{user_logged_in} active" true
opsi-admin -d method config_createBool opsiclientd.event_net_connection.active "event_net_connection active" false
opsi-admin -d method config_createBool opsiclientd.event_timer.active "event_timer active" false
The default values are as they come with the special opsiclientd.conf.
Caution
If you do not set the defaults like described above and skip directly to the commands below you set all your clients into WAN mode !
For a WAN/VPN client, which shall do caching of configurations and opsi-products, the host parameter have to be configured as follows:
-
opsiclientd.event_gui_startup.active:false -
opsiclientd.event_gui_startup{user_logged_in}.active:false -
opsiclientd.event_net_connection.active:true -
opsiclientd.event_timer.active:true
The client specific host parameter can be set by opsi-configed or opsi-admin.
To set the host parameter by opsi-admin, the following commands have to be executed on the opsi-config-server:
(in this example the client has the opsi-host-Id vpnclient.domain.de):
opsi-admin -d method configState_create opsiclientd.event_gui_startup.active vpnclient.domain.de false
opsi-admin -d method configState_create opsiclientd.event_gui_startup{user_logged_in}.active vpnclient.domain.de false
opsi-admin -d method configState_create opsiclientd.event_net_connection.active vpnclient.domain.de true
opsi-admin -d method configState_create opsiclientd.event_timer.active vpnclient.domain.de true
This configuration will process as follows:
- At system start of the client there will be no connection established to the opsi-config-server.
- When the activation of a network interface is detected, a connection to the opsi-config-server will be established (if possible) and the synchronization starts as background task.
-
A
timer-Event will be established, which tries at regular intervals to trigger the synchonization process.
The caching of opsi-products can be done via the protocols HTTPS/WEBDAVS or CIFS/SMB.
When using webdav, access to the opsi-depot is performed by the opsiconfd.
advantages:
- easy firewall configuration, for it requires just port 4447.
- verify of the SSL-certificate of the opsi-depot available.
disadvantage:
- the opsiconfd generates more traffic on the opsi-depot.
By using cifs, access to the opsi-depot is done via SAMBA.
advantage:
- the SAMBA-server shows a good performance, is resource-conserving and well scaleable.
disadvantages:
- the firewall configuration is more complicated, access to the SAMBA ports is required.
- no verify of the SSL-certificate of the opsi-depot is available.
An instruction for configuring the protocols is to be found in the chapter the section called “Communication Protocol for accessing an opsi-depot”.
Figure 101. processing of an installation with WAN extension as displayed in the opsiclientd infopage
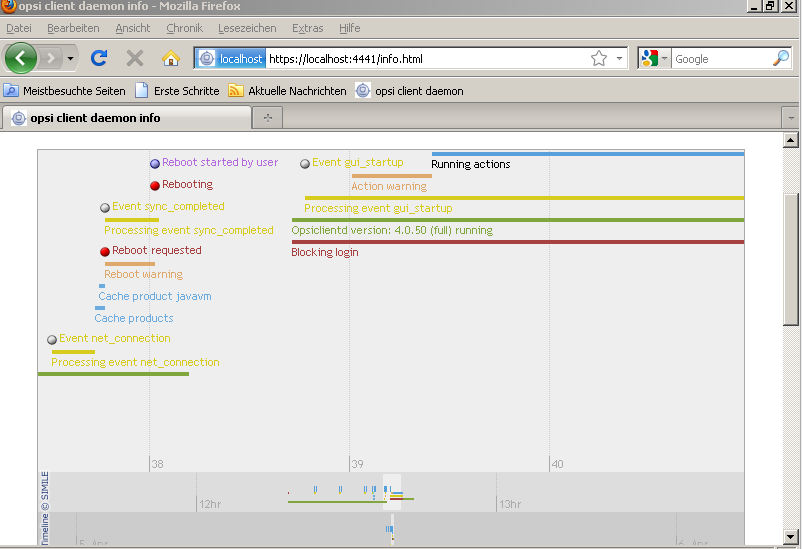
To activate the verifying of SSL certificates, in the opsiclientd.conf within the section [global], the option verify_server_cert is to be set to true.
This, during connection to an opsiconfd, results in verifying the opsi-server by using the SSL certificate.
The server certificates will be stored in the directory %SystemDrive%\opsi.org\opsiclientd\server-certs.
The name of the certificate is combined from the server address (IP or name) and the extension .pem.
If at connection time no stored certificate is to be found, no checking will be done.
Tip
To publish a changed certificate, the old certificate stored on the clients has to be deleted.
This can be done by the RPC-method deleteServerCerts, which is available from the control interface of the opsiclientd.
Supporting multiple depot shares in opsi aims at the following targets:
- central configuration data storage and configuration management
- providing the software depots on local servers
- automated deployment of software packages from the central server to the local depots
Accordingly, it is implemented:
- All configuration data is stored on the central opsi-config-server.
- All clients connect to this opsi-config-server in order to request their configuration data. The configuration data comprise the information on method and target of the opsi-depot-server connection.
- All installable software is stored on opsi-depot-servers.
-
The opsi-depot-servers have as well an
opsipxeconfdrunning by which they provide boot-images to clients via PXE/tftp. -
opsi-package-manager
A program to (de-)install opsi packages on one ore more opsi-depot-servers. - The opsi packages are copied via webdav protocol to the opsi-depot-servers and are installed from the opsiconfd via a web service call.
- opsi-configed supports the management of multiple depots.
- Clients connected to different depots can be managed in one bundle if the involved depots are synchronized (have all product packages in identical versions).
The following schema gives a more detailed view on the communication between the components of a opsi multi depot share environment.
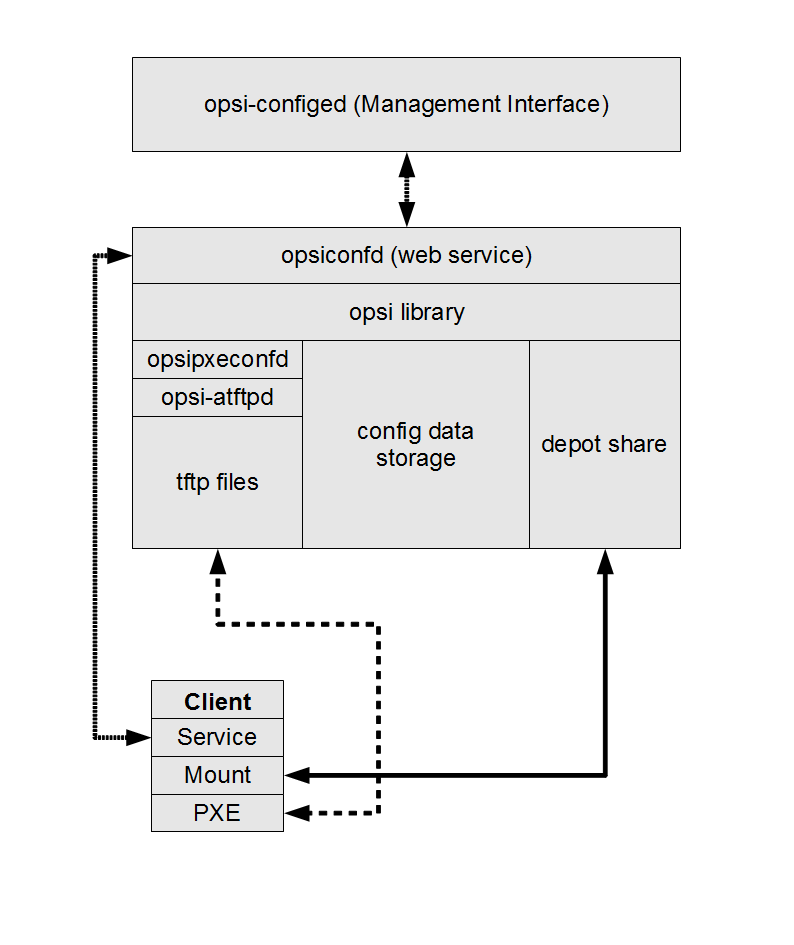
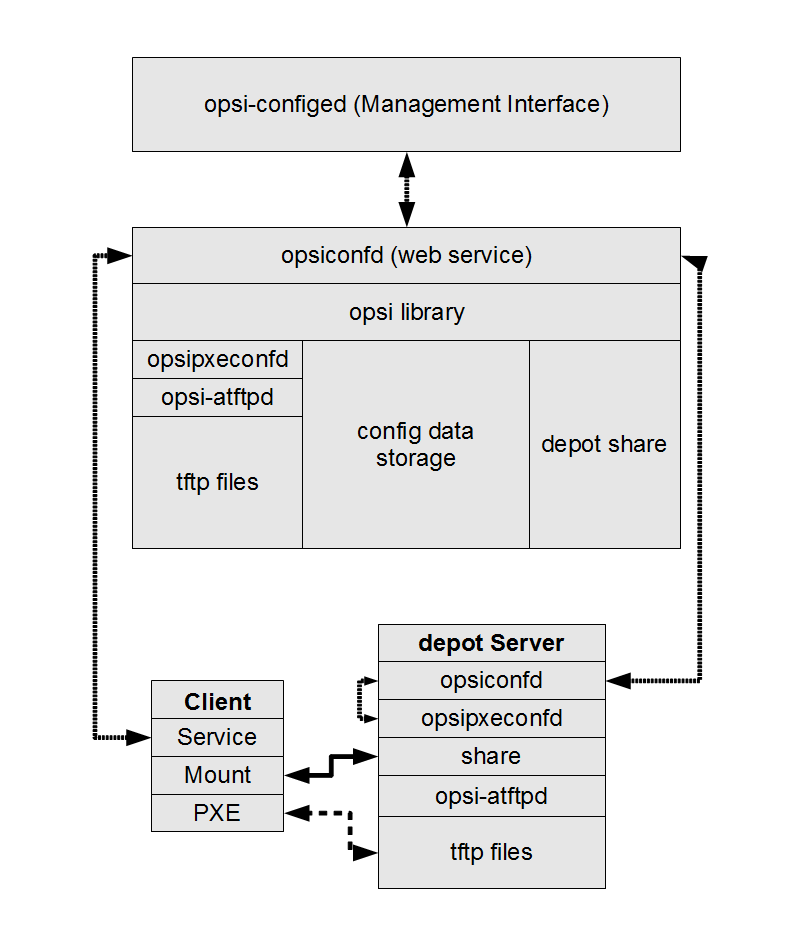
In order to create a opsi-depot-server you have to install a standard opsi-server. This opsi-server can be configured to act as opsi-depot-server by calling the script opsi-setup --register-depot as user root at that server which should be become the opsi-depot-server. Because this script does not only reconfigure the local server, but also registers this server as opsi-depot-server with the central opsi-config-server, username and password of a member of the opsiadmin group have to be supplied here.
Example:
svmdepotde.svm.local will be reconfigured as opsi-depot-server and registered at the opsi-config-server sepiella.svm.local:
svmdepotde:~# opsi-setup --register-depot
Now you will be prompted for the opsi-config-server you want to connect to in order to make the server you are working on to a opsi-depot-server at the selected opsi-config-server. To do this you have to give user name and password of a member of the group opsiadmin at the opsi-config-server.
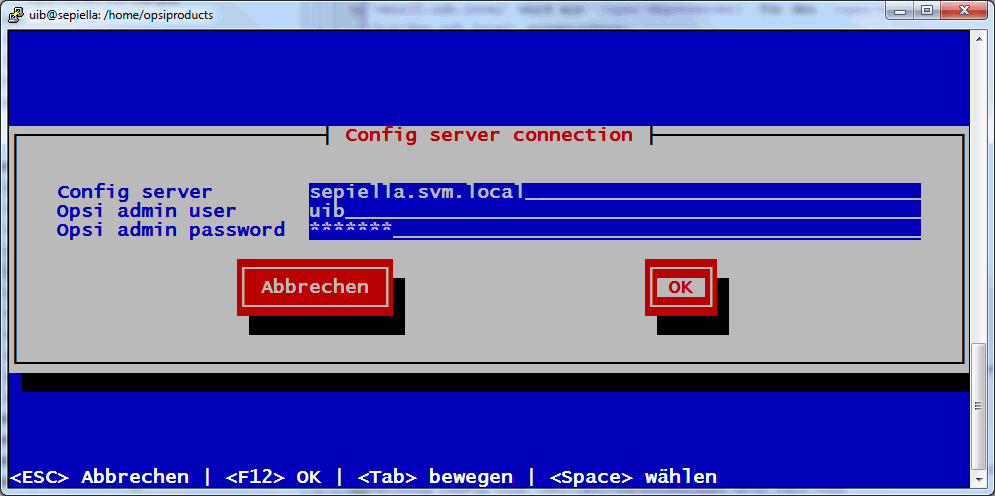
Now the opsi-depot-server settings will be displayed and may be changed.
Normally you do not have to change anything.
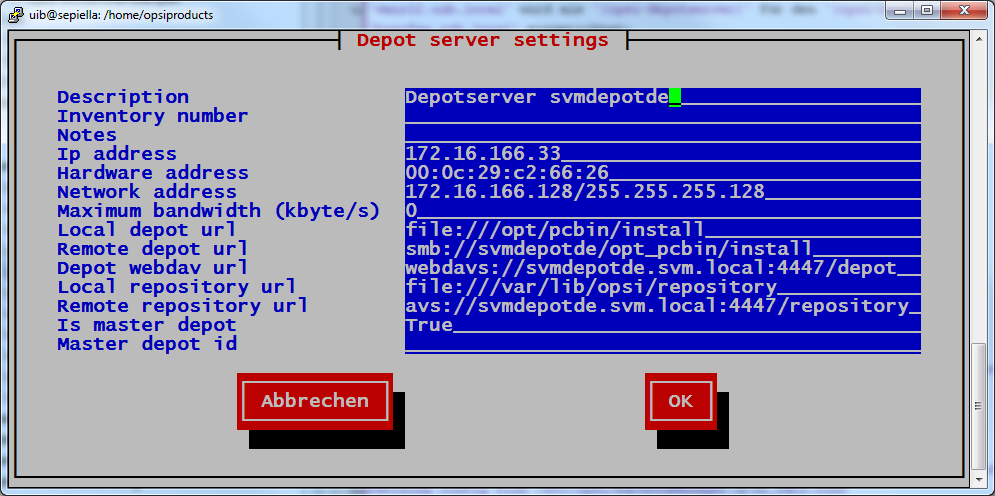
After the data input is completed the configuration process will start:
[5] [Apr 06 12:32:19] Getting current system config (opsi-setup|70)
[5] [Apr 06 12:32:19] System information: (opsi-setup|117)
[5] [Apr 06 12:32:19]    distributor  : Debian (opsi-setup|118)
[5] [Apr 06 12:32:19]    distribution : Debian GNU/Linux 5.0.8 (lenny) (opsi-setup|119)
[5] [Apr 06 12:32:19]    ip address   : 172.16.166.33 (opsi-setup|120)
[5] [Apr 06 12:32:19]    netmask      : 255.255.255.0 (opsi-setup|121)
[5] [Apr 06 12:32:19]    subnet       : 172.16.166.0 (opsi-setup|122)
[5] [Apr 06 12:32:19]    broadcast    : 172.16.166.255 (opsi-setup|123)
[5] [Apr 06 12:32:19]    fqdn         : svmdepotde.svm.local (opsi-setup|124)
[5] [Apr 06 12:32:19]    hostname     : svmdepotde (opsi-setup|125)
[5] [Apr 06 12:32:19]    domain       : svm.local (opsi-setup|126)
[5] [Apr 06 12:32:19]    win domain   : OPSI (opsi-setup|127)
[5] [Apr 06 12:46:03] Creating depot 'svmdepotde.svm.local' (opsi-setup|2342)
[5] [Apr 06 12:46:03] Getting depot 'svmdepotde.svm.local' (opsi-setup|2345)
[5] [Apr 06 12:46:03] Testing connection to config server as user 'svmdepotde.svm.local' (opsi-setup|2354)
[5] [Apr 06 12:46:04] Successfully connected to config server as user 'svmdepotde.svm.local' (opsi-setup|2359)
[5] [Apr 06 12:46:04] Updating backend config '/etc/opsi/backends/jsonrpc.conf' (opsi-setup|2361)
[5] [Apr 06 12:46:04] Backend config '/etc/opsi/backends/jsonrpc.conf' updated (opsi-setup|2373)
[5] [Apr 06 12:46:04] Updating dispatch config '/etc/opsi/backendManager/dispatch.conf' (opsi-setup|2375)
[5] [Apr 06 12:46:04] Dispatch config '/etc/opsi/backendManager/dispatch.conf' updated (opsi-setup|2388)
[5] [Apr 06 12:46:04] Setting rights (opsi-setup|410)
[5] [Apr 06 12:46:06] Setting rights on directory '/tftpboot/linux' (opsi-setup|482)
[5] [Apr 06 12:46:06] Setting rights on directory '/home/opsiproducts' (opsi-setup|482)
[5] [Apr 06 12:46:06] Setting rights on directory '/var/log/opsi' (opsi-setup|482)
[5] [Apr 06 12:46:06] Setting rights on directory '/etc/opsi' (opsi-setup|482)
[5] [Apr 06 12:46:06] Setting rights on directory '/var/lib/opsi' (opsi-setup|482)
[5] [Apr 06 12:46:06] Setting rights on directory '/var/lib/opsi/depot' (opsi-setup|482)
[5] [Apr 06 12:46:27] Restarting services (opsi-setup|2392)
[5] [Apr 06 12:46:35] Configuring client user pcpatch (opsi-setup|347)
[5] [Apr 06 12:46:35]    Creating RSA private key for user pcpatch in '/var/lib/opsi/.ssh/id_rsa' (opsi-setup|361)
[5] [Apr 06 12:46:35] Setting rights (opsi-setup|410)
[5] [Apr 06 12:46:38] Setting rights on directory '/var/lib/opsi/.ssh' (opsi-setup|482)
see also:
Section 4.4, “Tool: opsi-package-manager: (de-)installs opsi-packages”
Section 4.5, “Tool: opsi-product-updater”
In or to manage opsi-packages with different opsi-depot-server the opsi-packet-manager got the option -d ( or --depot). With this option you can give the target opsi-depot-server for the installation. Using the keyword ALL the opsi package will be copied to /var/lib/opsi/repository on all known opsi-depot-servers and then installed via a web service call.
If you don’t give the option -d, the opsi package will be only installed on the local server (without upload to /var/lib/opsi/repository).
Example:
Install the package softprod_1.0-5.opsi on all known opsi-depot-servers:
opsi-package-manager -d ALL -i softprod_1.0-5.opsi
In order to get information’s about what are the differences between depots you may call opsi-packet-manager with the option -D (or --differences).
Example:
Show the differences between all known depots regarding the product mshotfix
opsi-package-manager -D -d ALL mshotfix
mshotfix
    vmix12.uib.local :  200804-1
    vmix13.uib.local :  200804-1
bonifax.uib.local: 200805-2With the standard opsi multi depot support, the clients are assigned to a designated depot. This is now extended with the option, that for download speed-up, each client can dynamically detect a suitable depot to download software packets from.
For most cases an assignment according to the IP address might be the easiest and suitable solution. For other network topologies, e.g. a star topology VPN network, this might not be sufficient.
Therefore a mechanism is required for the client to detect dynamically, which depot to connect for download of software packets. The specific assignment algorithm and implementation depends on the network topology and other special customer requirements. So it is best to have this adaptable and configurable.
To offer the option, that the client can detect the suitable depot according to the current network conditions, it must be ensured, that the alternative depots are synchronized, which means they offer the same software packets. In practice the depots will not be synchronized at all times. So the list of alternative depots offered to a client is limited to those depots, which are synchronized with the clients master depot. The master depot of a client is the depot, which the client is assigned to. So the master depot defines, which software version is to be installed on the client.
The opsi concept for this is as follows:
The opsi config-server provides a client script, which can be requested and executed by the client. This script determines, which depot is to be used according to the current conditions. The interfaces to the client script are specified as: the interface to get the list of available servers and the current client configuration (IP address, netmask, gateway) and to return the result of the selection procedure. Furthermore there are interfaces for logging and user information about the processing progress.
So the actual implementation within the script can easily be adapted to the requirements of the particular opsi environment.
Regarding to this concept the single steps of a client connect are as follows:
- The client connects to the opsi opsi-configserver via web service.
- The opsi-configserver passes to the client the list of software packets to be installed.
- The opsi-configserver transmits to the client the script for detecting the best depot and the list of available depots.
- The client executes the script and determines the best depot.
- The client connects the chosen depot to get the required software packets.
- The client installation status is reported to the opsi-configserver.
This option requires opsi version >= 4.0.
This opsi extension is free now.
It finished the co-funding process in March 2013.
For more details see Section 6, “Activation of non free modules”.
Also at a minimum the following packet versions are required:
opsi-client-agent 4.0-11
python-opsi 4.0.0.18-1
opsi-configed 4.0.1.5-1
The script for the dynamic depot assignment is expected on the server as:
/etc/opsi/backendManager/extend.d/70_dynamic_depot.conf
To activate the dynamic depot assignment for a client, the following host parameter has to be set:
clientconfig.depot.dynamic = true
This can be done with the opsi-configed from the tab host parameter.
Alternatively this can be done at the command line with the opsi-admin (in this case <client-id> is the FQDN, e.g. client1.uib.local):
opsi-admin -d method configState_create \
clientconfig.depot.dynamic <client-id> [True]
The result can be checked by calling:
opsi-admin -d method configState_getObjects \
[] '{"configId":"clientconfig.depot.dynamic","objectId":"<client-id>"}'The properties of a depot are partly queried while registering an opsi-server as a depot by executing the command: opsi-setup --register-depot (see Section 17.2, “Creating a (slave) depot-servers”).
The properties of a depot can be edited. This can be done from the management interface as well as from the command line.

The depot properties can be called by the button Properties of depots from the management interface (the buttons are in the upper right corner).
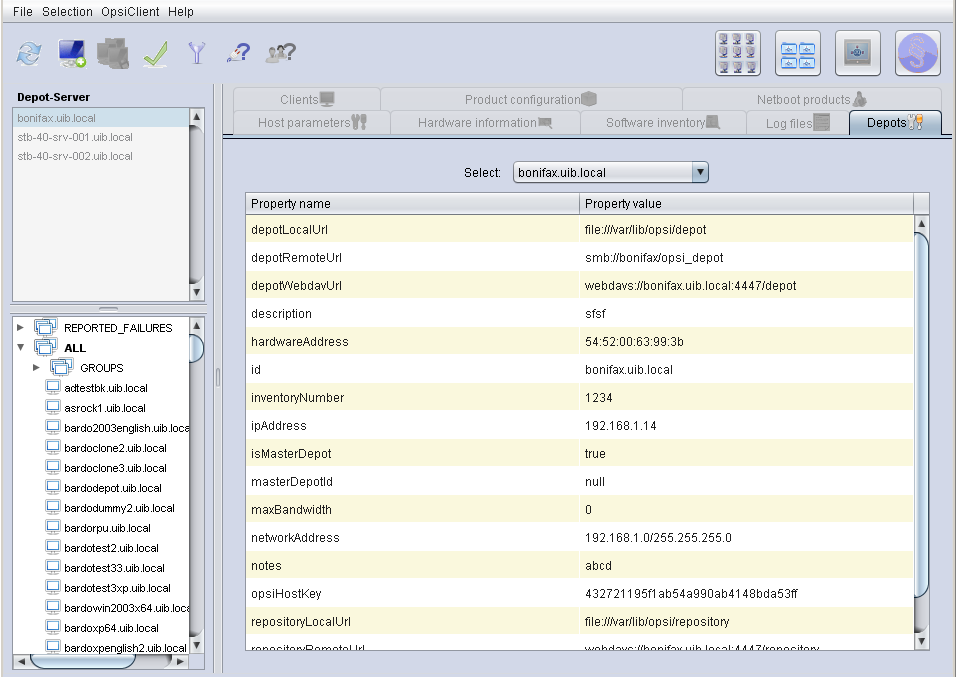
From the command line the depot properties can be shown by the method host_getObjects. Here e.g. for the depot dep1.uib.local.
opsi-admin -d method host_getObjects [] '{"id":"dep1.uib.local"}'This call results in the following output:
[
          {
          "masterDepotId" : "masterdepot.uib.local",
          "ident" : "dep1.uib.local",
          "networkAddress" : "192.168.101.0/255.255.255.0",
          "description" : "Depot 1 Master Depot",
          "inventoryNumber" : "",
          "ipAddress" : "192.168.105.1",
          "repositoryRemoteUrl" : "webdavs://dep1.uib.local:4447/repository",
          "depotLocalUrl" : "file:///var/lib/opsi/depot",
          "isMasterDepot" : true,
          "notes" : "",
          "hardwareAddress" : "52:54:00:37:c6:8b",
          "maxBandwidth" : 0,
          "repositoryLocalUrl" : "file:///var/lib/opsi/repository",
          "opsiHostKey" : "6a13da751fe76b9298f4ede127280809",
          "type" : "OpsiDepotserver",
          "id" : "dep1.uib.local",
          "depotWebdavUrl" : "webdavs://dep1.uib.local:4447/depot",
          "depotRemoteUrl" : "smb://dep1/opsi_depot"
          }
]
To edit the depot properties on the command line, the output can be redirected to a file:
opsi-admin -d method host_getObjects [] '{"id":"dep1.uib.local"}' \
> /tmp/depot_config.json
The resulting file (/tmp/depot_config.json) can now be edited and then written back with the following command:
opsi-admin -d method host_createObjects < /tmp/depot_config.json
The depot properties, which are relevant for the dynamic depot assignment, are as follows:
-
isMasterDepot
Must betruefor assigning a client to that depot. networkAddress
Network address for that depot. The network address can be specified in two different notations:- network/netmask, example: 192.168.101.0/255.255.255.0
- network/maskbits, example: 192.168.101.0/24
Whether the networkAddress is actually evaluated for the depot assignment depends on the script algorithm. The default algorithm, as provided by uib, uses that parameter.
The opsi tools for synchronizing the depots are:
-
opsi-package-manager -
opsi-productupdater
The opsi-package-manager, when installing an opsi packet, can be configured by the parameter -d ALL to install the packet not only on the current server, but also on all known depots. Example:
opsi-package-manager -i opsi-template_1.0-20.opsi -d ALL
By using the parameter -D the opsi-package-manager can be instructed to list the differences between depots. In this case the option -d must specify a list of depots or refer to all known depots by -d ALL. Example:
opsi-package-manager -D -d ALL
The opsi-package-manager also is the tool for a push synchronization.
Whereas the tool opsi-product-updater is meant for pull synchronization.
The opsi-product-updater on the depot servers can be configured as a cronjob.
Therefore in the configuration file of the opsi-product-updater (/etc/opsi/opsi-product-updater.conf) set in the section [repository_uib] active = false, and in the section [repository_master] active = true.
Also, in the same section, set opsiDepotId to the depot ID (FQDN) to synchronize with.
The opsi-product-updater then synchronizes with the specified depot all the packets in the directory /var/lib/opsi/repository.
Caution
When a packet is installed on an opsi server with the command opsi-package-manager -i, the packet is not installed to the repository directory.
To get the packet to the repository directory, the name of the depot can be specified by the -d option. Alternatively the upload of the packet to the repository directory can be done by opsi-package-manager -u <packet name>.
Please refer to the documentation of the tools opsi-package-manager and opsi-product-updater in the opsi manual.
If the dynamic depot assignment is activated for a client by the host parameter clientconfig.depot.dynamic, the client retrieves the script via web service and executes it.
The script to be used for dynamic assignment is:
/etc/opsi/backendManager/extend.d/70_dynamic_depot.conf
Following parameters are passed to the function selectDepot, which is defined in the script:
clientConfig
Information about the current client configuration (hash).
The clientConfig hash keys are currently:- "clientId": opsi host ID of the client (FQDN)
- "ipAddress": IP address of the network interface to the opsi-config-server
- "netmask" : netmask of the network interface
- "defaultGateway": default gateway
-
masterDepot
Information regarding the master depot (opsi-depot-server-object). The master depot is the depot which the client is assigned to from the management interface. The attributes of the passed opsi-depot-server-object match the attributes as given byhost_getObjects(see Section 18.4, “Editing the depot properties”). -
alternativeDepots
Information about the alternative depots (list of opsi-depot-server-objects). The list of alternative depots lists the depots, which are, regarding the required software packets, identical to the master depot.
Based on this information, the assignment algorithm can pick a depot from the provided depot list and return the opsi-depot-server-object of the chosen depot as the result of the function. If the assignment algorithm does not find a suitable depot from the list (or if the provided list is empty), the return result should be the master depot object.
The template script checks the network addresses of the given depots and picks the depot which is in the same network as the client.
The template script offers example functions for depot detection.
The function depotSelectionAlgorithmByNetworkAddress checks the network addresses of the depots and selects the depot which is in the same network as the client.
The function depotSelectionAlgorithmByLatency sends ICMP „echo-request“-packets (ping) to the depots and selects the depot with the lowest latency.
The function depotSelectionAlgorithmByMasterDepotAndLatency aims for the use in environments with more than one master depots that can have zero-to-many slave depots themselves. It will determine the depot with the lowest latency based on the same check as depotSelectionAlgorithmByLatency from a list containing the master depot of the current client and its slave depots.
The function getDepotSelectionAlgorithm is called by the client and returns the algorithm for depot selection.
The template script uses as default the function depotSelectionAlgorithmByNetworkAddress.
# -*- coding: utf-8 -*-

global depotSelectionAlgorithmByNetworkAddress
depotSelectionAlgorithmByNetworkAddress = \
'''
def selectDepot(clientConfig, masterDepot, alternativeDepots=[]):
        selectedDepot = masterDepot
        logger.info(u"Choosing depot from list of depots:")
        logger.info(u"   Master depot: %s" % masterDepot)
        for alternativeDepot in alternativeDepots:
                logger.info(u"   Alternative depot: %s" % alternativeDepot)
        if alternativeDepots:
                import socket, struct
                # Calculate bitmask of host's ipaddress
                n = clientConfig['ipAddress'].split('.')
                for i in range(4):
                        n[i] = forceInt(n[i])
                ip = (n[0] << 24) + (n[1] << 16) + (n[2] << 8) + n[3]

                depots = [ masterDepot ]
                depots.extend(alternativeDepots)
                for depot in depots:
                        if not depot.networkAddress:
                                logger.warning(u"Network address of depot '%s' not known" % depot)
                                continue
                        (network, netmask) = depot.networkAddress.split(u'/')
                        while (network.count('.') < 3):
                                network = network + u'.0'
                        if (netmask.find('.') == -1):
                                netmask = forceUnicode(socket.inet_ntoa(struct.pack('>I',0xffffffff ^ (1 << 32 - forceInt(netmask)) - 1)))
                        while (netmask.count('.') < 3):
                                netmask = netmask + u'.0'

                        logger.debug(u"Testing if ip %s is part of network %s/%s" % (clientConfig['ipAddress'], network, netmask))

                        n = network.split('.')
                        for i in range(4):
                                n[i] = int(n[i])
                        network = (n[0] << 24) + (n[1] << 16) + (n[2] << 8) + n[3]
                        n = netmask.split('.')
                        for i in range(4):
                                n[i] = int(n[i])
                        netmask = (n[0] << 24) + (n[1] << 16) + (n[2] << 8) + n[3]

                        wildcard = netmask ^ 0xFFFFFFFFL
                        if (wildcard | ip == wildcard | network):
                                logger.notice(u"Choosing depot with networkAddress %s for ip %s" % (depot.networkAddress, clientConfig['ipAddress']))
                                selectedDepot = depot
                                break
                        else:
                                logger.info(u"IP %s does not match networkAddress %s of depot %s" % (clientConfig['ipAddress'], depot.networkAddress, depot))
        return selectedDepot
'''

global depotSelectionAlgorithmByLatency
depotSelectionAlgorithmByLatency = \
'''
def selectDepot(clientConfig, masterDepot, alternativeDepots=[]):
        selectedDepot = masterDepot
        logger.info(u"Choosing depot from list of depots:")
        logger.info(u"   Master depot: %s" % masterDepot)
        for alternativeDepot in alternativeDepots:
                logger.info(u"   Alternative depot: %s" % alternativeDepot)
        if alternativeDepots:
                from OPSI.Util.Ping import ping
                from OPSI.Util.HTTP import urlsplit
                depots = [ masterDepot ]
                depots.extend(alternativeDepots)
                latency = {}
                for depot in depots:
                        if not depot.repositoryRemoteUrl:
                                continue
                        try:
                                (scheme, host, port, baseurl, username, password) = urlsplit(depot.repositoryRemoteUrl)
                                latency[depot] = ping(host)
                                logger.info(u"Latency of depot %s: %0.3f ms" % (depot, latency[depot]*1000))
                        except Exception, e:
                                logger.warning(e)
                if latency:
                        minValue = 1000
                        for (depot, value) in latency.items():
                                if (value < minValue):
                                        minValue = value
                                        selectedDepot = depot
                        logger.notice(u"Choosing depot %s with minimum latency %0.3f ms" % (selectedDepot, minValue*1000))
        return selectedDepot
'''

global depotSelectionAlgorithmByMasterDepotAndLatency
depotSelectionAlgorithmByMasterDepotAndLatency = \
'''
def selectDepot(clientConfig, masterDepot, alternativeDepots=[]):
        def getLatencyInformation(depots):
                from OPSI.Util.Ping import ping
                from OPSI.Util.HTTP import urlsplit

                latency = {}
                for depot in depots:
                        if not depot.repositoryRemoteUrl:
                                continue

                        try:
                                (scheme, host, port, baseurl, username, password) = urlsplit(depot.repositoryRemoteUrl)
                                latency[depot] = ping(host)

                                if latency[depot]:
                                        logger.info(u"Latency of depot %s: %0.3f ms" % (depot, latency[depot]*1000))
                                else:
                                        logger.info(u"Latency of depot %s: N/A" % depot)
                        except Exception, e:
                                logger.warning(e)
                return latency

        def getDepotWithLowestLatency(latency):
                selectedDepot = None
                if latency:
                        minValue = 1000
                        for (depot, value) in latency.items():
                                if not value:
                                        continue
                                if (value < minValue):
                                        minValue = value
                                        selectedDepot = depot
                        logger.notice(u"Choosing depot %s with minimum latency %0.3f ms" % (selectedDepot, minValue*1000))

                return selectedDepot

        logger.info(u"Choosing depot from list of depots:")
        logger.info(u"   Master depot: %s" % masterDepot)
        for alternativeDepot in alternativeDepots:
                logger.info(u"   Alternative depot: %s" % alternativeDepot)

        if alternativeDepots:
                from collections import defaultdict

                # Mapping of depots to its master.
                # key: Master depot
                # value: All slave depots + master
                depotsByMaster = defaultdict(list)

                allDepots = [masterDepot] + alternativeDepots

                for depot in allDepots:
                        if depot.masterDepotId:
                                depotsByMaster[depot.masterDepotId].append(depot)
                        else:
                                depotsByMaster[depot.id].append(depot)

                depotsWithLatency = getLatencyInformation(depotsByMaster[masterDepot.id])
                depotWithLowestLatency = getDepotWithLowestLatency(depotsWithLatency)

                logger.info('Depot with lowest latency: {0}'.format(depotWithLowestLatency))
                if not depotWithLowestLatency:
                        logger.info('No depot with lowest latency. Falling back to master depot.')
                        depotWithLowestLatency = masterDepot

                return depotWithLowestLatency

        return masterDepot
'''

def getDepotSelectionAlgorithm(self):
        #return depotSelectionAlgorithmByMasterDepotAndLatency
        #return depotSelectionAlgorithmByLatency
return depotSelectionAlgorithmByNetworkAddressIf the dynamic depot assignment is activated, there are some logs from the depot assignment in opsiclientd.log.
In this shortened example log, the server bonifax.uib.local is config server and master depot for the client pctrydetlef.uib.local. As a master server the server has the network address 192.168.1.0/255.255.255.0. As an alternative depot the server stb-40-srv-001.uib.local is available with the network address 192.168.2.0/255.255.255.0.
The client pctry4detlef.uib.local has the IP address 192.168.2.109, which is in the network of the alternative depot.
(...)
[6] [Dec 02 18:25:27] [ opsiclientd                   ] Connection established to: 192.168.1.14   (HTTP.pyo|421)
[5] [Dec 02 18:25:28] [ event processing gui_startup  ]    [ 1] product opsi-client-agent:   setup   (EventProcessing.pyo|446)
[5] [Dec 02 18:25:28] [ event processing gui_startup  ] Start processing action requests   (EventProcessing.pyo|453)
[5] [Dec 02 18:25:28] [ event processing gui_startup  ] Selecting depot for products [u'opsi-client-agent']   (Config.pyo|314)
[5] [Dec 02 18:25:28] [ event processing gui_startup  ] Selecting depot for products [u'opsi-client-agent']   (__init__.pyo|36)
(...)
[6] [Dec 02 18:25:28] [ event processing gui_startup  ] Dynamic depot selection enabled   (__init__.pyo|78)
(...)
[6] [Dec 02 18:25:28] [ event processing gui_startup  ] Master depot for products [u'opsi-client-agent'] is bonifax.uib.local   (__init__.pyo|106)
[6] [Dec 02 18:25:28] [ event processing gui_startup  ] Got alternative depots for products: [u'opsi-client-agent']   (__init__.pyo|110)
[6] [Dec 02 18:25:28] [ event processing gui_startup  ] 1. alternative depot is stb-40-srv-001.uib.local   (__init__.pyo|112)
(...)
[6] [Dec 02 18:25:28] [ event processing gui_startup  ] Verifying modules file signature   (__init__.pyo|129)
[5] [Dec 02 18:25:28] [ event processing gui_startup  ] Modules file signature verified (customer: uib GmbH)   (__init__.pyo|143)
(...)
[6] [Dec 02 18:25:28] [ event processing gui_startup  ] Choosing depot from list of depots:   (<string>|4)
[6] [Dec 02 18:25:28] [ event processing gui_startup  ]    Master depot: <OpsiConfigserver id 'bonifax.uib.local'>   (<string>|5)
[6] [Dec 02 18:25:28] [ event processing gui_startup  ]    Alternative depot: <OpsiDepotserver id 'stb-40-srv-001.uib.local'>   (<string>|7)
[5] [Dec 02 18:25:28] [ event processing gui_startup  ] Choosing depot with networkAddress 192.168.2.0/255.255.255.0 for ip 192.168.2.109   (<string>|40)
[5] [Dec 02 18:25:28] [ event processing gui_startup  ] Selected depot is: <OpsiDepotserver id 'stb-40-srv-001.uib.local'>   (__init__.pyo|171)
(...)
[5] [Dec 02 18:25:28] [ event processing gui_startup  ] Mounting depot share smb://stb-40-srv-001/opsi_depot   (EventProcessing.pyo|415)
(...)
With the module "Software-on-Demand" opsi administrators may give their users access to install a range of software-products. These software products may be selected and installed user-driven without the administrator needing to do anything. This documentation shows how the module "Software-on-Demand" works, describes it’s functions and how to configure it.
There are some preconditions for using the extension. The product-groups are needed, available with opsi 4.0. Furthermore the opsi-client-agent and the opsi-configed at version 4.0.1 are needed.
Table 5. Required Packages
| opsi-Package | Version |
|---|---|
opsi-client-agent | >=4.0.1-3 |
opsi-winst | >=4.10.8.12 |
python-opsi | >=4.0.1-7 |
opsi-depotserver | >=4.0.1-2 |
opsi-configed | >=4.0.1.6-1 |
The Software-on-Demand module is tested and declared as stable for the following browsers:
- Internet Explorer 8
- Mozilla Firefox 3.6.15
The configuration of this extension is based on product-groups and config-variables. The used config-variables are:
- software-on-demand.active
- software-on-demand.product-group-ids
- software-on-demand.show-details
These config-variables are created with installing the opsi-depotserver-package.
Caution
Please notice the minimum requirements of the opsi-depotserver-package.
(see also chapter: Prerequisites)
If the config-variables are not available, they can be added via opsi-setup:
opsi-setup --init-current-config
The most comfortable way to create and manage product-groups is using the opsi-configed.
There you have to change to the tab product configuration.
Tip
Since version 4.0.1.6 of the opsi-configed you can change to product configuration without choosing a client.
The product-group menu is above the product list.
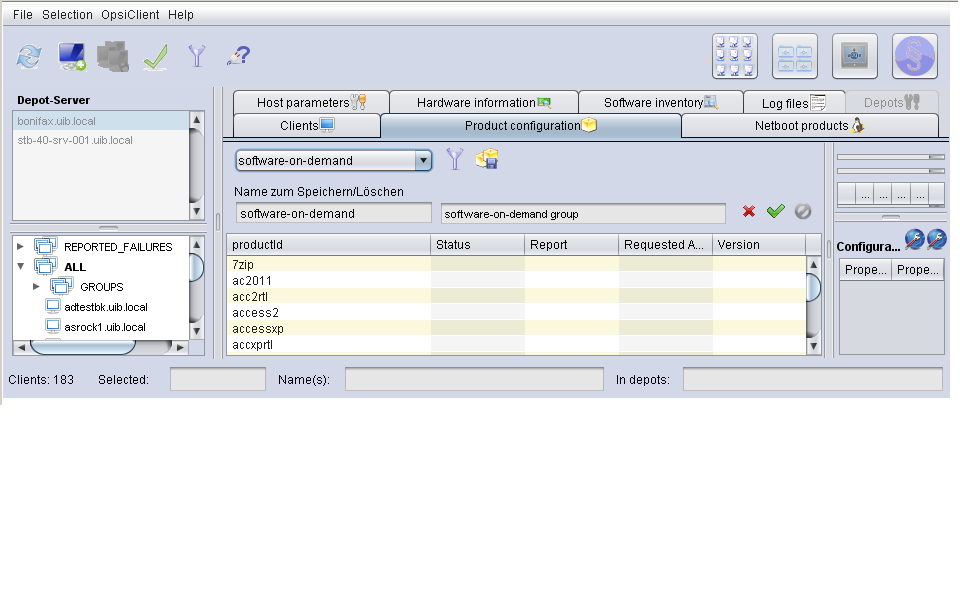
With the drop down menu you can choose a product-group to edit it.
If you have chosen a group, the corresponding products will be highlighted.
With a second icon, filter can be activated or deactivated.
When a filter was activated, only the products of the activated product-group are seen.
Product-groups can be edited after activating the icon with the yellow packets (show editor / hide editor) next to the icon with the filter.
In this view, a new group and it’s description can be added. Save the editing by activating the red check icon.
If some more products should be added to a group, select them and press the red check icon. (Press the <ctrl> button and select the products).
The module can be configured, as mentioned above, with the config-variables described in the following table:
Table 6. overview of the config-variables of the module Software-on-Demand
| Configuration | Description | Values |
|---|---|---|
software-on-demand.active | activates or deactivates the modul. | true/false |
software-on-demand.product-group-ids | Product-groups with software-products, that can be used for Software-on-Demand. | List of produkt-groups |
software-on-demand.show-details | Show further information to the user. | true/false |
There are two ways to use these configuration objects. For the whole system or for each client. The following 2 chapters will explain both ways.
The configuration here is the default system wide for every client.
The configuration can be edited in the opsi-configed. Push the Button Server Configuration and change to the tab Host Parameter
Another possibility is to change the server-configuration with the following command:
opsi-setup --edit-config-defaults
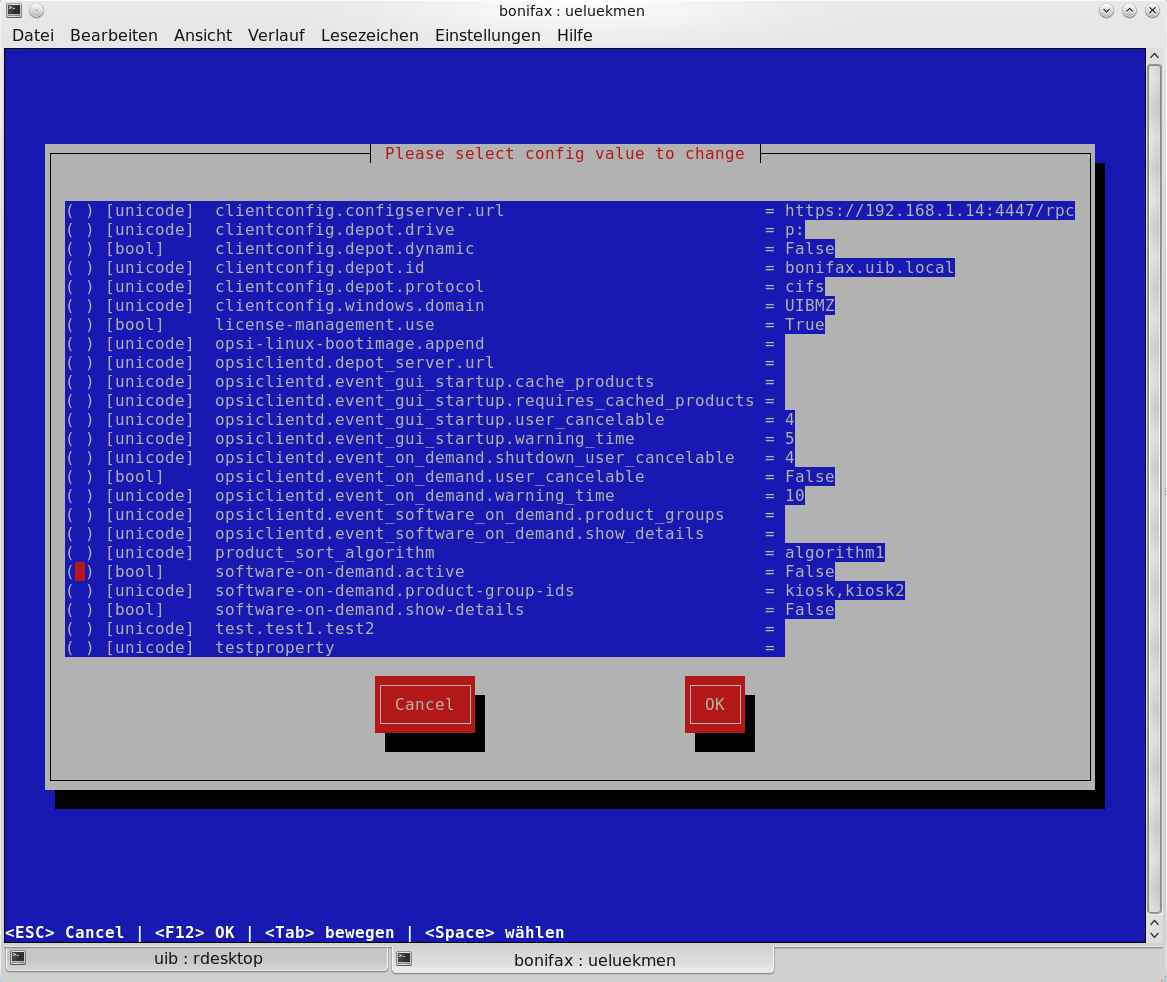
Tip
Administration is also possible with the opsi-python-API or with opsi-admin
The configuration for a single client - or client specific configuration - is useful if, for example, only some of the clients should have access to the Software-on-Demand extension. Or if you want to make several product groups available to some clients.
The configuration of the client specific host parameters can be edited in different ways:
The most comfortable way to edit the configuration is via opsi-configed. Choose one or several clients (even all clients of a client group if you want to) and then navigate to the tab "Host parameters".
This editing overrides the system wide defaults.
There are two ways for the users to start the software-installation:
- with the next system start
- immediately
If the user chooses "with the next system start", the product state will be set to "setup."
If the choice is "immediately", the opsiclientd creates an event software on demand. This event can be configured in the file opsiclientd.conf as any other event.
The look of the software-on-demand module can be customized to the companies corporate identity. Therefore the file opsiclientd.css has to be customized. It lies under:
c:\program files\opsi.org\opsi-client-agent\opsiclientd\static_html
It can be edited and then reloaded. The changes have to be copied to the server to remain with new opsi-client-agent installations.
Copy the CSS-file and perhaps a file with the companies logo to the server directory:
/var/lib/opsi/depot/opsi-client-agent/files/opsi/dist/opsiclientd/static_html
To avoid errors, we recommend to set rights after changing the configuration.
opsi-setup --set-rights /var/lib/opsi/depot/opsi-client-agent
Caution
The customization will not automatically be saved at the moment. If you install opsi-client-agent again you will loose the changes. Don’t forget to save the files, before upgrading the system.
The software-on-demand module contains a web application, based on the opsiclientd. This can be reached by every client via browser URL https://localhost:4441/swondemand.
If the host-parameter software-on-demand.active is "true" an entry in the start-menue will be added during the installation of the opsi-client-agent.
A shortcut in the start-menu will be created in
Start -> Program Files -> opsi.org -> software-on-demand, that calls the URL above.
It can be configured, with software-on-demand.show-details whether more or less details are shown.
With authentication a connect via network is possible.
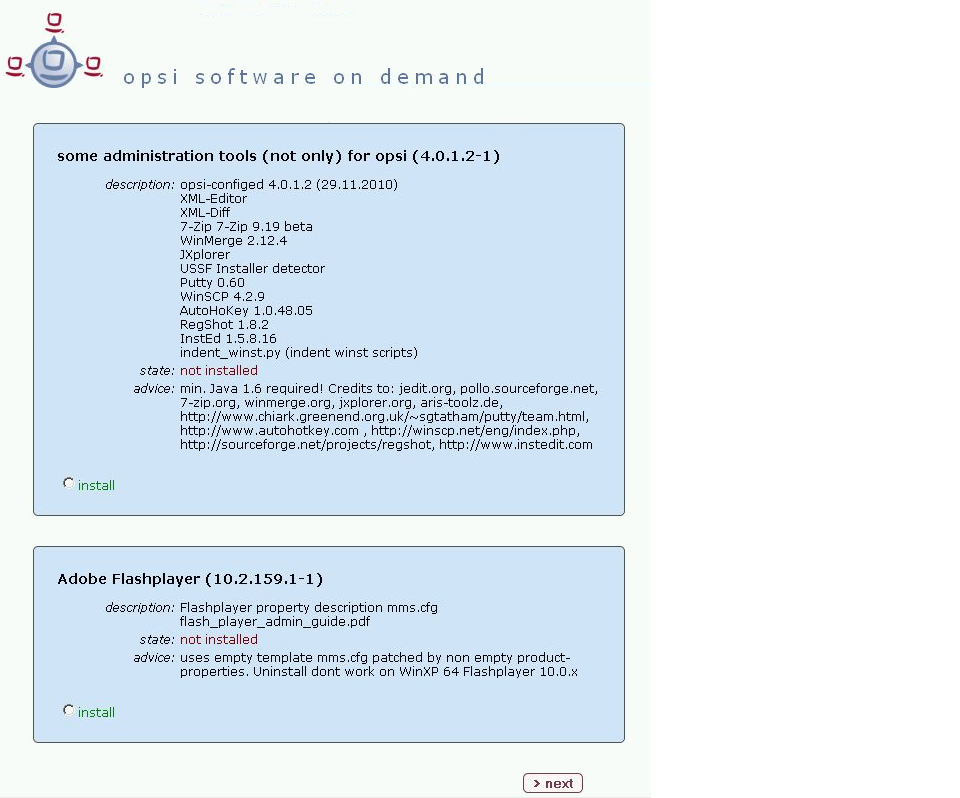
The user can choose some software from the list by activating the check box. If the software has been already installed, the choice is to install or to uninstall the software first. Other software, that has opsi driven dependencies to the chosen program will not be uninstalled. Choose "continue" to go to the next page.
If the parameter software-on-demand.show-details is set to "true" the software-packages with opsi driven dependencies will be shown at this place, too.
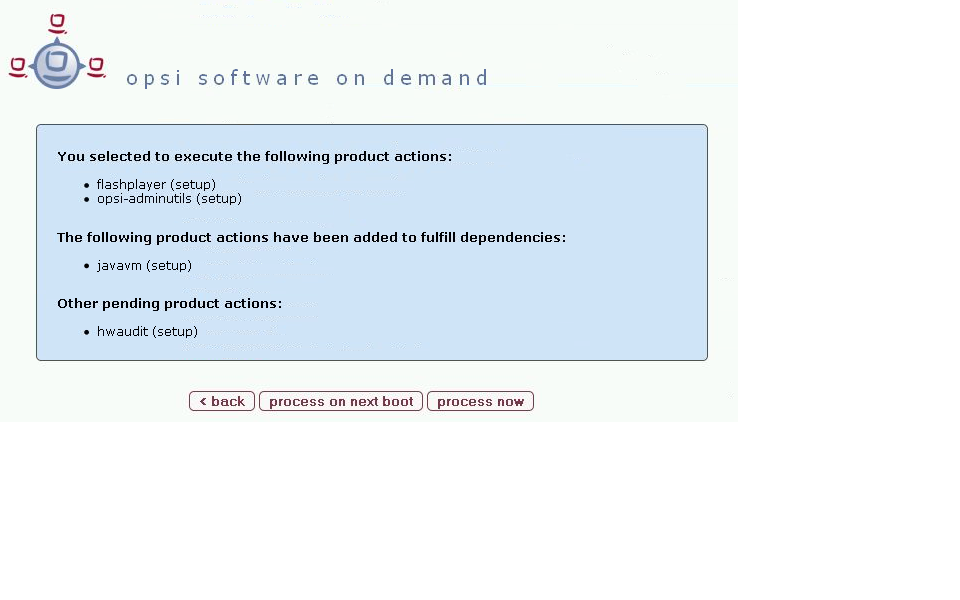
There are three possibilities to continue at this time. If you choose the button "back", the choice can be changed. With "process on next boot" the changes are sent to the opsi-service and appear with the next system boot. With "process now" the installation will proceed immediately.
There are some specialties for the software-on-demand module:
software-dependencies will be set automatically
-
If there are some software-dependencies to other software (e.g. javaVM) outside the on-demand-group, it will be set to setup automatically
-
If there are some software-dependencies to other software (e.g. javaVM) outside the on-demand-group, it will be set to setup automatically
- Any software that has the status "setup" will be displayed in the overview-page.
This extension was a co-funding project but is released as free since 29 Apr 2015.
see also Section 6, “Activation of non free modules”
and
http://uib.de/en/opsi_cofunding/index.html
http://www.opsi.org/en/statistics
Technical preconditions are opsi 4.0.1 with the following package and product versions:
Table 7. Needed product and package versions
| opsi product | Version |
|---|---|
opsi-client-agent | >=4.0.1-23 |
opsi-winst | >=4.11.2.1 |
python-opsi | >=4.0.1.31-1 |
Table 8. Needed product and package versions to run it without activation file
| opsi product | Version |
|---|---|
opsi-client-agent | >=4.0.5.4-2 |
opsi-winst | >=4.11.4.17-1 |
The opsi-winst has some special commands to manipulate profiles. These commands act at the local stored profiles. If you are using Roaming Profiles this feature of the opsi-winst does not help you because all modifications at the profiles will be overwritten by the server stored profile while login.
The opsi extension for User Profile Management gives you the possibility to do the needed profile manipulation after the login of the user, at the correct profile. This is done by starting the opsi-winst after the user login again and run some special userLoginScripts.
If you can’t do the profile manipulation while installing the software on the machine, you have to separate the machine part of the software installation from the profile part. This can be done inside of a script and also by putting the profile part into a separate script. Many admins still use the second idea by integrating profile parts into a domain login script.
According to the method you use the profile part of your opsi products are part of the opsi installation scripts for installation and deinstallation or they are separated for example as part of the domain login scripts.
The goal of this opsi extension is to provide the possibility to integrate both variants of scripts easily.
The core concepts of this opsi extension are:
-
Executing special userLoginScripts scripts at the user login
At the user login the opsiclientd uses the event_user_login to startup the opsi-winst in a special login script mode. In this special mode the opsi-winst executes only the userLoginScripts which are assigned to the opsi products. -
Executing these scripts with administrative privileges inside the context of the logged in user
Domain login scripts may be used to execute profile parts. But they run only with user privileges. opsi userLoginScripts run with administrative privileges. They run with these high privileges in the user context, so that is easy to manipulate file and registry parts of the profile using the same commands you may use in a domain login script. -
Executing these scripts inside of the opsi service context
The opsi userLoginScripts run inside the opsi service context, so that they know all details about at which opsi product name, version and package version they are just working. They have the complete access to product properties and other information that can be requested by opsi service calls.
Restrictions:
- The opsi userLoginScripts will be always executed online and not from a local cache. Even if your client runs with the opsi WAN extension.
Command line parameter
/allloginscripts
If you are calling opsi-winst in the opsi service context with the additional parameter /allloginscripts this will lead to the following actions:- All products which have a userLoginScript will be detected. Only for these products will be the userLoginScripts executed.
-
The logged in user will be identified. All global constants to user specific directories like
%CurrentAppdataDir%will be directed to the directories of the logged-in user. Also the registry operations (Registrysections andGetRegistryString) which going toHKCUwill be executed in a way that they read or write to the current_user hive of the logged-in user.
-
Command line parameter
/silent
The command line parameter/silentswitches off the opsi-winst standard window in order to not disturb the user. Function
GetScriptMode
In order to detect if a script runs as userLoginScript or for example as installation script, the functionGetScriptModegives you two possible values:-
Machine
The script is not executed as userLoginScript (but e.g. as setup or uninstall script). -
Login
The script is executed as userLoginScript.
-
Machine
New primary section
ProfileActions
This section may be used to the place for calling user profile manipulations. Here a syntax may be used, which make it possible to use this section as a part of a installation script and as a userLoginScript as well. Therefore this primary section will be interpreted in different ways according to the fact if it is called at Machine mode or at Login mode (as userLoginScript):-
Login
If a script is running as userLoginScript and there is a sectionProfileActionsin the script, the script interpretation will start at theProfleActionssection (and not at theActionssection, which will be ignored). -
Machine
If a script is running as normal istallation script, you may call the sectionProfileActionsas a sub section. But in difference to a normal sub section it has some special rules: For every called Registry section the modifier /AllNtUserDats is implicit set. gesetzt. For every called Files section the modifier /AllNtUserProfiles is implicit set.
Since Version 4.11.3.2 : For every called Patches section the modifier /AllNtUserProfiles is implicit set.
-
Login
Registry sections
-
Registry sections which should work on the HKCU or HKEY_CURRENT_USER hive in the
openkeycommand, will be executed in login script mode (Login) in a way, that all changes will be made in the registry hive of the logged-in user. The same applies to the functionsGetRegistryStringValue*. -
Registry sections which are called at the normal mode (Machine) with the modifier /AllNtUserDats, may now contain HKCU resp.. HKEY_CURRENT_USER at the
openkeycommand. This gives you the possibility to use the same registry sections in both modes.
-
Registry sections which should work on the HKCU or HKEY_CURRENT_USER hive in the
-
Winbatch sections with
/RunAsLoggedOnUser
Even if theopsi-winstis started by the Login event, it is running in the SYSTEM context and not in the context of the user that just made the login. In order to start a process in the context of the user you should use a winbatch section with the option/RunAsLoggedOnUser. -
Avoid unnecessary script execution:
With the new script commandsaveVersionToProfileyou save product name, version and package version to the logged-in users profile. These information can be retrieved by the new string functionreadVersionFromProfile, so that you may see if this script was executed at this profile before. To make the handling easier there is also a new Boolean functionscriptWasExecutedBefore. This function checks if there is a version stamp in the profile (like you may do with thereadVersionFromProfilecommand) and set a new stamp to the profile (like you may do with thesaveVersionToProfilecommand). So you may just use this single command in aifstatement.
The new string list functiongetProductMapgives you a hash with all information about the installation states and report to the actual product. So you may see if this product is installed or was uninstalled. -
Logging
The logs of the userLoginScripts are written to
c:\opsi.org\log\<login user name>_login.log
This log file will be transmitted to the server. At the server they will be stored at/var/log/opsi/userlogin/<clientid>.log.
This log file is handled in append mode. This means new logs will appended to a existing log file of this client. To avoid to large log files, the size of the log files are limited by the server to a maximal size of 5 MB.
You may display these log files at the opsi management interface (opsi-configed) at the tab Log files in the sub tab userlogin.
We are starting with examples that are build in a way that they also may used in a domain login script.
A very simple generic example:
[Actions]
requiredWinstVersion >= "4.11.3.2"
Message "Example Profile Patch ...."

Files_profile_copy
Registry_currentuser_set
Patches_profile_ini "%userprofiledir%\opsi-winst-test.ini"

[Files_profile_copy]
copy "%Scriptpath%\profiles\*.*" "%CurrentAppdataDir%\ACME"

[Registry_currentuser_set]
openkey [HKCU\Software\ACME]
set "show_greeting_window" = "no"

[Patches_profile_ini]
add [secdummy] dummy1=add1
A example for firefox configuration:
[Actions]
Message "Firefox Profile Patch ...."

DefVar $akt_profile_ini$
DefVar $rel_prefs_path$

comment "check for existing profile ..."
Set $akt_profile_ini$ = "%CurrentAppdataDir%\Mozilla\Firefox\profiles.ini"
if FileExists($akt_profile_ini$)
        Set $rel_prefs_path$ = GetValueFromInifile($akt_profile_ini$,"Profile0","Path","")
        if FileExists("%CurrentAppdataDir%\Mozilla\Firefox\\"+$rel_prefs_path$)
                comment "We found the profile and will now patch it ....."
        endif
else
        comment "no firefox profile found for user"
endif
At the next example (which simply extends the first example) we show how you may delete things from the profile in the case that this product has been uninstalled. According to what we get from the function getProductMap different parts of the script will be executed.
[Actions]
requiredWinstVersion >= "4.11.3.2"
Message "Example Profile Patch ...."

if getValue("installationstate", getProductMap) = "installed"
        comment "Product is installed"
        Files_profile_copy
        Registry_currentuser_set
        Patches_profile_ini "%userprofiledir%\opsi-winst-test.ini"
endif

if getValue("lastactionrequest", getProductMap) = "uninstall"
        comment "Product was uninstalled"
        Files_profile_del
        Registry_currentuser_del
endif

[Files_profile_copy]
copy "%Scriptpath%\profiles\*.*" "%CurrentAppdataDir%\ACME"

[Registry_currentuser_set]
openkey [HKCU\Software\ACME]
set "show_greeting_window" = "no"

[Files_profile_del]
del -s -f "%CurrentAppdataDir%\ACME"
del "%userprofiledir%\opsi-winst-test.ini"

[Patches_profile_ini]
add [secdummy] dummy1=add1

[Registry_currentuser_del]
deletekey [HKCU\Software\ACME]
Now a example which shows how standard installation scripts (setup32.ins and delsub32.ins) may used also as userLoginScripts to avoid unneeded code doubling.
setup32.ins:
[Actions]
requiredWinstVersion >= "4.11.3.2"

DefVar $MsiId$
DefVar $UninstallProgram$
DefVar $ProductId$
DefVar $InstallDir$

; ----------------------------------------------------------------
; - Please edit the following values                             -
; ----------------------------------------------------------------
Set $ProductId$       = "ACME"
Set $InstallDir$      = "%ProgramFiles32Dir%\ACME"
; ----------------------------------------------------------------
if GetScriptMode = "Machine"
        comment "Show product picture"
        ShowBitmap "%ScriptPath%\\" + $ProductId$ + ".png" $ProductId$

        if FileExists("%ScriptPath%\delsub32.ins")
                comment "Start uninstall sub section"
                Sub "%ScriptPath%\delsub32.ins"
        endif

        Message "Installing " + $ProductId$ + " ..."

        comment "Start setup program"
        Winbatch_install

        comment "Patch the local Profiles ..."
        Registry_currentuser_set /AllNtUserDats
        Files_profile_copy /AllNtUserProfiles
        Patches_profile_ini "%userprofiledir%\opsi-winst-test.ini" /AllNtUserProfiles
endif

if GetScriptMode = "Login"
        comment "login part"
        Files_profile_copy
        Registry_currentuser_set
        Patches_profile_ini "%userprofiledir%\opsi-winst-test.ini"
endif


[Winbatch_install]
"%ScriptPath%\setup.exe" /sp- /silent /norestart

[Files_profile_copy]
copy "%Scriptpath%\profiles\*.*" "%CurrentProfileDir%\Appdata\ACME"

[Registry_currentuser_set]
openkey [HKCU\Software\ACME]
set "show_greeting_window" = "no"

[Patches_profile_ini]
add [secdummy] dummy1=add1
delsub32.ins:
Message "Uninstalling " + $ProductId$ + " ..."

if GetScriptMode = "Machine"
        comment "The machine part ..."
        Set $UninstallProgram$ = $InstallDir$ + "\uninstall.exe"
        if FileExists($UninstallProgram$)
                comment "Uninstall program found, starting uninstall"
                Winbatch_uninstall
        endif
        ; does also work since 4.11.2.1
        Registry_currentuser_del /AllNtUserDats
        Files_profile_del /AllNtUserProfiles
endif

if GetScriptMode = "Login"
        comment "The profile part ..."
        Files_profile_del
        Registry_currentuser_del
endif

[Winbatch_uninstall]
"$UninstallProgram$" /silent /norestart

[Files_profile_del]
del -s -f "%CurrentAppdataDir%\ACME"
del "%userprofiledir%\opsi-winst-test.ini"

[Registry_currentuser_del]
deletekey [HKCU\Software\ACME]
Now a variant which is variant of the example before. It makes use of the new primary section ProfileAction. This makes the script shorter and it may be still used as installation script and as userLoginScript as well.
[Actions]
requiredWinstVersion >= "4.11.3.2"

DefVar $ProductId$
DefVar $InstallDir$

Set $ProductId$       = "ACME"
Set $InstallDir$      = "%ProgramFiles32Dir%\ACME"

comment "Show product picture"
ShowBitmap "%ScriptPath%\\" + $ProductId$ + ".png" $ProductId$

Message "Installing " + $ProductId$ + " ..."

comment "Start setup program"
Winbatch_install

comment "Patch the local Profiles ..."
ProfileActions

[ProfileActions]
comment "login part"
Files_profile_copy
Registry_currentuser_set
Patches_profile_ini "%userprofiledir%\opsi-winst-test.ini"

[Winbatch_install]
"%ScriptPath%\setup.exe" /sp- /silent /norestart

[Files_profile_copy]
copy "%Scriptpath%\profiles\*.*" "%CurrentProfileDir%\Appdata\ACME"

[Registry_currentuser_set]
openkey [HKCU\Software\ACME]
set "show_greeting_window" = "no"

[Patches_profile_ini]
add [secdummy] dummy1=add1
Now a variant which reminds, if this script (for this product, in this version and this package version) was executed before for this profile.
[Actions]
requiredWinstVersion >= "4.11.3.2"
Message "Example Profile Patch ...."

comment "Did we run this script before ? - and set version stamp in profile"
if not (scriptWasExecutedBefore)
        comment "loginscript was not run yet "
        Files_profile_copy
        Registry_currentuser_set
        Patches_profile_ini "%userprofiledir%\opsi-winst-test.ini"
endif

[Files_profile_copy]
copy "%Scriptpath%\profiles\*.*" "%CurrentAppdataDir%\ACME"

[Registry_currentuser_set]
openkey [HKCU\Software\ACME]
set "show_greeting_window" = "no"

[Patches_profile_ini]
add [secdummy] dummy1=add1In order to use the opsi User Profile Management extension, you have to activate the event_user_login at the opsiclientd configuration.
If the opsi-client-agent at the client is up to date, the (opsi-winst) should be started with the additional parameter /allloginscripts.
You may activate the event_user_login at the command line with the following command:
opsi-admin -d method config_createBool opsiclientd.event_user_login.active "user_login active" true
As additional action_processor (opsi-winst) parameter you may use /silent, which suppress the display of the opsi-winst window.
opsi-admin -d method config_createUnicode opsiclientd.event_user_login.action_processor_command "user_login action_processor" "%action_processor.command% /sessionid %service_session% /allloginscripts /silent" "%action_processor.command% /sessionid %service_session% /allloginscripts /silent"
These configurations you will also see (and modify) at the opsi management interface (opsi-configed) at the tab Host parameters at the client or server configuration-
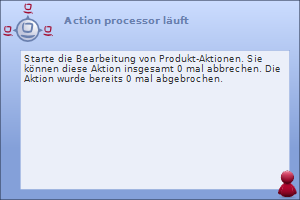
Beside client management is monitoring one the central functions in a modern IT service management. With opsi you got a client management tool. For monitoring tasks there are other well known open source solutions. So we build for the monitoring tasks in opsi not an own monitoring tool but an interface to existing solutions. With this opsi extension we provide a connector to Nagios.
In the following chapters the design and configuration of the opsi-Nagios-Connector is explained.
The opsi-Nagios-Connector isn’t strictly bound to Nagios. It is developed for the use with Nagios and Icinga. It should also work with other Nagios derivatives but this is whether tested nor supported.
The scope of this manual is the design and configuration of the opsi-Nagios-Connector. It is not a Nagios manual. You will need a running Nagios installation and the knowledge how to run Nagios.
This extension is at the moment a co-funding project which means that until the complete development costs are payed by co-funders, they are only allowed to use by the co-funders or for evaluation purposes. If we have earned the development cost we will give these modules for everybody for free.
see also
http://uib.de/en/opsi_cofunding/index.html
http://www.opsi.org/en/statistics
So as precondition to use this extension you need as first an activation file.
For evaluation purpose you will get a temporary activation file if you ask for it in a mail at info@uib.de.
For more details see Section 6, “Activation of non free modules”.
Technical preconditions are opsi 4.0.2 with the following package and product versions:
Table 9. Needed product and package versions
| opsi package | Version |
|---|---|
opsi-client-agent | >=4.0.2-1 |
opsiconfd | >=4.0.2.1-1 |
python-opsi | >=4.0.2.1-1 |
As precondition you need a Nagios installation in the version 3.x or a Icinga Installation in the version 1.6 or higher.
For graphical output of performance data a pnp4nagios installation is required.
Further information you will find at:
www.nagios.org
www.icinga.org
www.pnp4nagios.org
The opsi-Nagios-Connector contains of two core components. At first we will discuss these core components.
The heart of the opsi-Nagios-Connector are extended features of the opsi web service. These web service extension make it possible to run checks via web service on the opsi server. So the Nagios server calls checks via web service which are executed on the opsi-server and the results come back to the Nagios server via opsi web service. The advantage of this solution is that there is nearly nothing to do on the monitored opsi server.
The focus of the opsi web service extension lies on opsi specific checks like e.g. rollout monitoring. For the normal server monitoring you should use still standard check methods.
An other part of the opsi-Nagios-Connector is an extension of the opsi-client-agent.
In a opsi environment on every managed client runs a opsi-client-agent. With this extension you may use the opsi-client-agent as Nagios agent as well. But in fact not all features of a standard Nagios agent like NSClient++ are implemented at the opsi-client-agent. You may use the opsi-client-agent to run command line programs and send back the output.
If you not use all functions like NSCA but rather some standard checks per plugin on the client or a set of own plugins on the clients you can use the opsi-client-agent.
If you need more features for the client monitoring you should rollout a standard agent like NSClient++ via opsi.
The advantage of using the opsi-client-agent as Nagios agent is, that you don’t need an additional agent on the client and that you don’t need any access data for the clients at the monitoring server. These data is not needed because all check run via the opsi server. This makes the configuration a lot more easier.
The following chapter explains the goals and configurations of the opsi-checks.
Monitoring administrators know the difference between active and passive checks.
With the opsi-Nagios-Connector we get a new difference: direct and indirect.
-
direct:
The check which collects information about a client runs on that client, get the information direct from the client and sends the information back. -
indirect:
The check which collects information about a client runs on the opsi server and get the information from the opsi configuration data which is stored in the opsi backend. So - this information may be different from the actual situation of the client.
A good example for an indirect check is the check-opsi-client-status. This check gives you for a given client information about pending action request and reported failures of the opsi software deployment.. So this are information about the client from the opsi servers point of view. Therefore this check runs on the opsi server and is an indirect check. A check which runs on the client is a direct check.
For a correct distribution and configuration of the checks you have to analyze your opsi installation.
According to the flexibility of opsi many various opsi configurations are possible. So here we can only explain some typical situations. Of course we will get help for special situations by our comercial support.
only one opsi server:
The opsi stand alone installation is the situation that you will find at the most opsi environments. At this installation the opsi config server functionality is at the same server like the (one and only) opsi depot server functionality.
This means to you, that you may ignore if a check has to be run on the config server or the depot server.
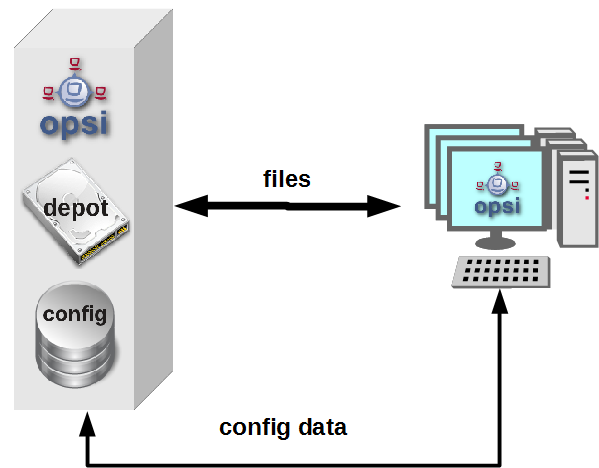
opsi with multiple depotservers:
If you have a central management of a multi location opsi environment (one config server, multiple depot servers) the situation is more complicated. So you have to understand the situation:
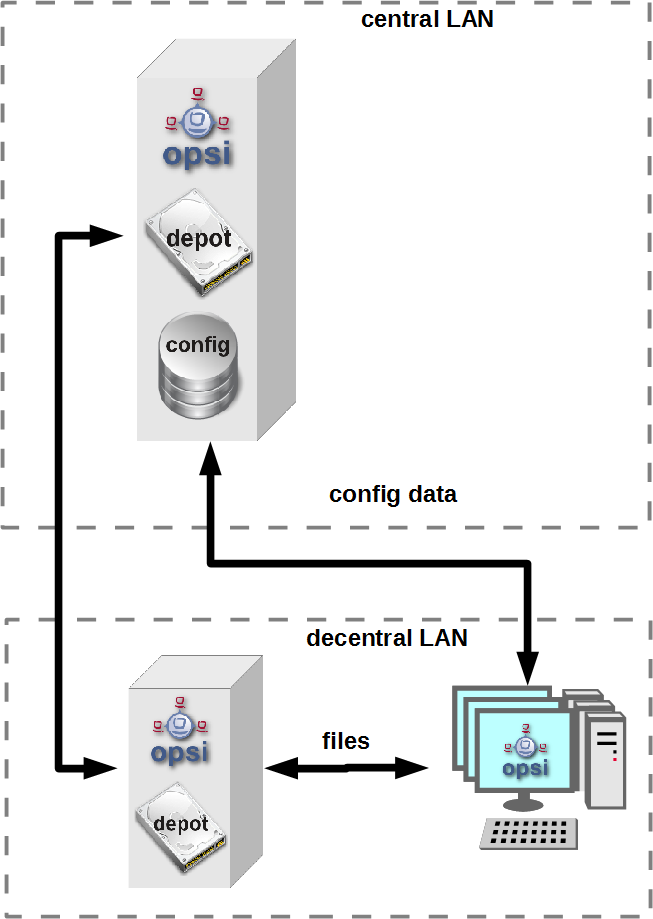
As the figure points out there is only one server which have data storage for the configuration data - the data backend. This is the opsi config server. The opsi depot server has no own data storage but a redirected backend. This means that if you ask a depot server for any configuration data, this question will be redirected to the config server. And this leads to the consequence that every check which runs against the opsi data backend will at least run on the config server. So you should address checks that run against the backend always to the config server. Even in the situation if you are collecting information about clients which are assigned to a depot which is different from the config server and the check is logically part of the check of this depot server.
If you running direct checks you normally also address the config server. You may address the depot server if the clients can’t be reached by the opsi config server via port 4441. In this case it is a good idea to address the depot server.

At the nagios server there is only one opsi-check-plugin which provides a wide range of different checks. According to the number of features there is also a big number of command line options. So - just list all these options won’t help you much. Instead the option will be explained in the context of documentation of the possible checks.
How ever to get a listing of all options you may call check_opsi with the parameters --help or -h.
The following general options are needed for every check:
Table 10. General Options
Option | Description | Example |
-H,--host | opsi server which should run the check | configserver.domain.local |
-P,--port | opsi webservice port | 4447 (Default) |
-u,--username | opsi monitoring user | monitoring |
-p,--password | opsi monitoring password | monitoring123 |
-t,--task | opsi check method (case sensitive) |
The following chapter describes how to call the opsi-check-plugin is called on the command line. How you have to configure these calls at your Nagios server is described at the chapter configuration.
In order to install the opsi-check-plugin on your Nagios server you should add the opsi repository to your server and install the package opsi-nagios-plugins.
For example at Debian or Ubuntu with the following commands:
apt-get install opsi-nagios-plugins
On RedHat/Centos Servers please use the follwing command:
yum install opsi-nagios-plugins
And last but not least for openSUSE/SLES Installations:
zypper install opsi-nagios-plugins
The plugin it self is written in python and should ran at any distribution.
The package bases on the package nagios-plugins-basic respectivly nagios-plugins and installs the plugin to /usr/lib/nagios/plugins.
According to the flexibility of the check_plugin there is no automatic configuration.
This check monitors the opsi web service process (opsiconfd). This check returns also performance data. You should run this check on every opsi server because every opsi server have a opsiconfd process.
check_opsi.py -H configserver.domain.local -P 4447 -u monitoring -p monitoring123 -t checkOpsiWebservice
This check return normally OK.
You will get other return values in the following situations:
Critical:
- If the opsiconfd is in trouble and can’t reply correctly.
- If the opsiconfd consumes more than 80% of the cpu.
- If you have a rate of RPC errors of more than 20%.
Warning:
- If the opsiconfd consumes more than 60% (but less than 80%) of the cpu.
- If you have a rate of RPC errors of more than 10% but less than 20%
-
Unknown:
The opsi web service could not be reached.
NOTICE: The percentage value of the cpu consumption belongs always to one cpu because the opsiconfd only may use one cpu. (This may change with the opsi multi processing extension)
For the display of performance data there is a template for pnp4nagios which displays the data in a combined way.
Here is not described how to install pnp4nagios. We assume that pnp4nagios is installed and configured correctly. The way you have to use to configure our template may differ from the below described way according to your pnp4nagios installation (which may use different path).
Standard templates display for every performance data an own diagram. To create a combined display you have to go the following steps:
Step 1:
create at /etc/pnp4nagios/check_commands a file named check_opsiwebservice.cfg and insert the following content:
CUSTOM_TEMPLATE = 0
DATATYPE = ABSOLUTE,ABSOLUTE,ABSOLUTE,ABSOLUTE,DERIVE,GAUGE,GAUGE,GAUGE
Setp 2:
change to the directory /usr/share/pnp4nagios/html/templates and place there a file check_opsiwebservice.php which you check out from svn.opsi.org:
cd /usr/share/pnp4nagios/html/templates
svn co https://svn.opsi.org/opsi-pnp4nagios-template/trunk/check_opsiwebservice.php
Please check that your php file is named exactly like the command_name which is defined at the /etc/nagios3/conf.d/opsi/opsicommands.cfg. If the names don’t match, a standard template will be used instead our combined template.
After installing this template you should delete the RRD data bases which belong to this check (if there any existing). You will find these data bases at /var/pnp4nagios/perfdata/<host>/ where you should (only) delete the opsi-webservice.rrd and opsi-webservice.xml files.
If you have configured everything correctly you should now able to see diagrams like the following screenshot.
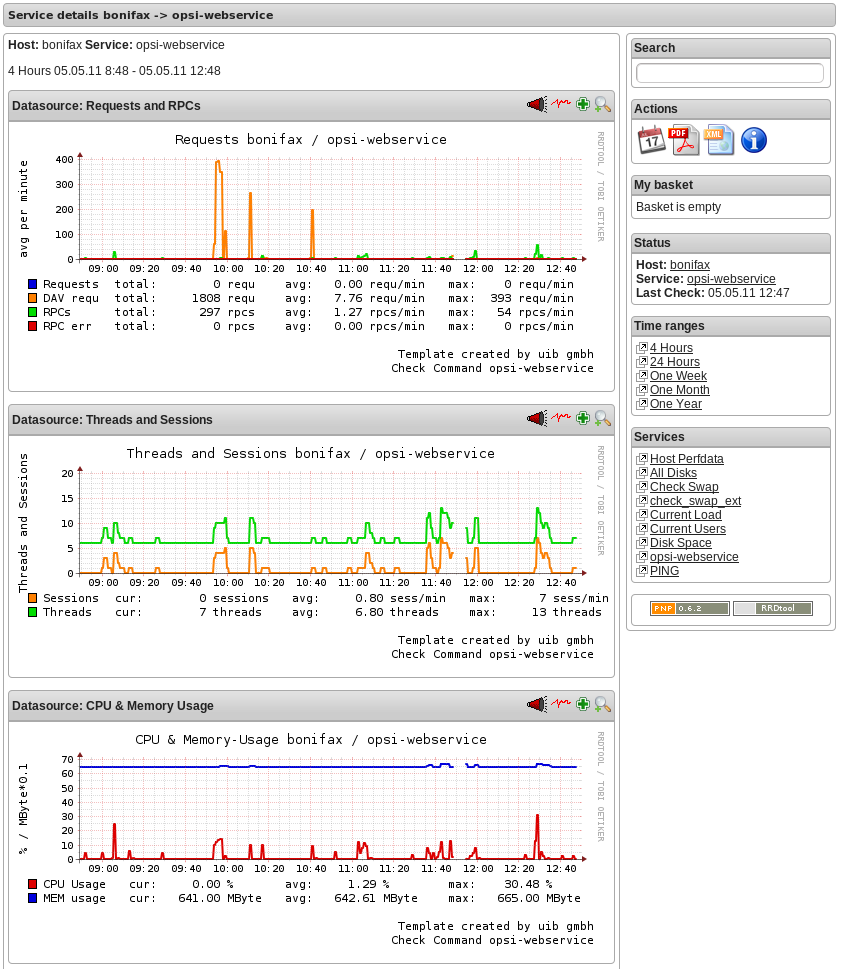
This check monitors the usage of the resources (directories) which are used by opsi. The following table shows the resource names and the corresponding directories:
Table 11. opsi resources
Resource name | Path |
/ | /usr/share/opsiconfd/static |
configed | /usr/lib/configed |
depot | /var/lib/opsi/depot |
repository | /var/lib/opsi/repository |
Please note that this check monitors only opsi relevant data and do replace a general disk usage check for the server.
The following command retrieves all resources at one time:
check_opsi -H configserver.domain.local -P 4447 -u monitoring -p monitoring123 -t checkOpsiDiskUsage
In addition to this standard variant you may restrict the check to the resource depot:
check_opsi -H configserver.domain.local -P 4447 -u monitoring -p monitoring123 -t checkOpsiDiskUsage -r depot
The default result value of this check is OK and the free space of the resources. The free space is given in Gigabyte. The default values for the Warning and Critical results are:
- WARNING: If at least one resource have 5GB or less free space.
- CRITICAL: If at least one resource have 1GB or less free space.
This are the default thresholds. They may changed by giving other values for Warning with the -W or --warning options and for Critical wit the -C or --critical option. With these options you can give the thresholds as Gigabyte (G) and as percent (%) as well. The produced output uses the same unit which is used to define the thresholds.
Finally an example:
check_opsi -H configserver.domain.local -P 4447 -u monitoring -p monitoring123 -t checkOpsiDiskUsage -r depot --warning 10% --critical 5%
One of the targets of the opsi Nagios connector is the software roll out monitoring by viewing to single clients. This is one of the checks which is designed for this job. More exactly: the software roll out and last seen situation of a certain client is checked.
The result of the following checks is determined by two different states:
The roll out state of one or more software products:
The software roll out state results to:- OK if the software is installed at the in the same product and package version which is available at the server and no action request is set.
- Warning if the software is installed in version that is different to the servers version or if any action request is set.
- Critical if there is a failed reported by the last action.
The time since last seen:
The time since last seen results to:- OK if the client has bee seen less or equal then 30 days before.
- Warning if the client has bee seen more then 30 days before.
This check may used in different variants, here is the simplest one, which includes all software packages:
check_opsi -H configserver.domain.local -P 4447 -u monitoring -p monitoring123 -t checkClientStatus -c opsiclient.domain.local
As variant it is possible to exclude products from the check. For example:
check_opsi -H configserver.domain.local -P 4447 -u monitoring -p monitoring123 -t checkClientStatus -c opsiclient.domain.local -x firefox
In the example above the product firefox was excluded from the check. So this check would not switch to critical because the last action on firefox reported a failure.
An other target of the opsi Nagios connector is the software roll out monitoring by viewing to single product or a group of products.
The result of the following checks is determined by the following states:
The software roll out state results to: * OK if the software is installed at the in the same product and package version which is available at the server and no action request is set. * Warning if the software is installed in version that is different to the servers version or if any action request is set. * Critical if there is a failed reported by the last action.
This checks has many variants and is so very flexible. The bast way to explain these variants are examples.
The simplest variant check one product on all clients. Here you have to give the product as the opsi productId.
check_opsi -H configserver.domain.local -P 4447 -u monitoring -p monitoring123 -t checkProductStatus -e firefox
In a simple one server opsi environment, this check is all you need to check the state of the product firefox on every client.
You will get the information how many clients are in Warning and in Critical states.
To get the information which clients exactly have the problems, you should call the check in the verbose mode:
check_opsi -H configserver.domain.local -P 4447 -u monitoring -p monitoring123 -t checkProductStatus -e firefox -v
An other variant is, that you may exclude a client from the check.
//// produkt muss angegebn werden ?! ////
check_opsi -H configserver.domain.local -P 4447 -u monitoring -p monitoring123 -t checkProductStatus -e firefox -x client.domain.local
In a opsi environment with multiple depot servers you have to use additional options to check also the clients that are not assigned to the config servers depot. If you have multiple depots, you may give the depots name as parameter:
check_opsi -H configserver.domain.local -P 4447 -u monitoring -p monitoring123 -t checkProductStatus -e firefox -d depotserver.domain.local
The reason is that the version of the software packages may differ between your depots. So every client has to be checked against the versions at the depot where they are assigned to. An advantage is that can place the display of the results to the depot server.
You may give instead of the depot servers name the keyword all which means all known depot servers. But this normally make only sense if you have only one or two depots. You may also give a comma separated list of depot servers.
An other way to define the checks is to give the name of a opsi groups. So you may check the software roll out state of all products in a given opsi product group. If you have for example a product group accounting you may use the following call:
check_opsi -H configserver.domain.local -P 4447 -u monitoring -p monitoring123 -t checkProductStatus -g accounting
Now you will check all products that are Members of the opsi product group accounting by this single check. Important is to see, that the resolution of the opsi group is done while the check at the opsi server. So you may change the opsi group at the opsi Management interface and so you will change the products that will checked without any changes at the Nagios server.
Note
Sub groups (groups in groups) will not be resolved.
In the same way it is possible to define the clients that should be checked by giving the name of a opsi client group.
An example for a client group productiveclients:
check_opsi -H configserver.domain.local -P 4447 -u monitoring -p monitoring123 -t checkProductStatus -g accounting -G productiveclients
This would check all products of the product group accounting at all clients of the client group productiveclients.
Note
Sub groups (groups in groups) will not be resolved.
Note
You may also give a comma separated list of opsi groups.
If you are using multiple opsi depots the monitoring of synchronicity is important. Even if your depots are for good reasons not completely synchronize they should be synchrony as much as possible to avoid problems by moving a client from one depot to another.
This check monitors if your depots are synchronize according to product ids, product versions and package versions.
This check returns:
-
OK
If all is in sync. -
Warning
If there is any difference
You should run this check always on the config server because all the data come from the backend of the config server.
Here are some examples.
The base variant:
check_opsi -H configserver.domain.local -P 4447 -u monitoring -p monitoring123 -t checkOpsiDepotSyncStatus
This base variant is equivalent to the following call:
check_opsi -H configserver.domain.local -P 4447 -u monitoring -p monitoring123 -t checkOpsiDepotSyncStatus -d all
So if you don’t give the depots which are have to be checked, all known depots will be checked. If you have a lot of depots the interpretation of the result is complicated, so it is a good idea to define a lot of single checks where the depots are given as comma separated list:
check_opsi -H configserver.domain.local -P 4447 -u monitoring -p monitoring123 -t checkOpsiDepotSyncStatus -d configserver.domain.local,depotserver.domain.local
With this check you compare all products, that are installed on both depots. Any product which is installed only on one of the depot is ignored and will not effect the result.
If you want to include products which are not installed on all checked depots, you have to use the strictmode switch:
check_opsi -H configserver.domain.local -P 4447 -u monitoring -p monitoring123 -t checkOpsiDepotSyncStatus -d configserver.domain.local,depotserver.domain.local --strictmode
Now also differences about missing products will be seen.
If you like to exclude a product from the check (perhaps because this product should be in different versions on different depots) you may do this by using the -x option. Here you may also use a comma separated list:
check_opsi -H configserver.domain.local -P 4447 -u monitoring -p monitoring123 -t checkOpsiDepotSyncStatus -d configserver.domain.local,depotserver.domain.local --strictmode -x firefox,thunderbird
This check will not warn if the products firefox or thunderbird or not in sync.
Instead of excluding products you may give an explicit list of products that has to been checked:
check_opsi -H configserver.domain.local -P 4447 -u monitoring -p monitoring123 -t checkOpsiDepotSyncStatus -d configserver.domain.local,depotserver.domain.local --strictmode -e firefox,thunderbird
In this case only firefox and thunderbird will be checked. We recommend to use this check variant with strictmode to see if one of the products is missing.
./check_opsi.py -H configserver.domain.local -P 4447 -u monitoring -p monitoring123 -t checkOpsiDepotSync
This check gives you an easy possibility to integrate checks that collects the data direct on the client with a minimum of configuration work.
So this check tells the opsiclientd which is running at the opsi client to run a command, fetch the output and send it back.
This extension is not intended to be a complete replacement of a full featured Windows Nagios agent. It is only a light weight alternative.
The plugins which the opsiclientd may call must be compatible to the Nagios plug-in development guidelines. (More details at: http://nagiosplug.sourceforge.net/developer-guidelines.html ).
In order to run such a plugin on the client, it has to be installed at the client. This problem you will solve by deploying it as an opsi package. The path where the plugin is installed at client doesn’t matter because you have to give the complete path at check definition. We recommend to install all plugins in one directory to ease the maintenance of the plugins at the client.
For security reasons you should make sure that non privileged users have no write access to the plugins, because they will be executed from the opsiclientd with system privileges.
There are lot of ready to use plugins at the internet. One important address to look is:
http://exchange.nagios.org/
In the following we assume that your plugins are installed at C:\opsi.org\nagiosplugins\ and we will find ther the plugin check_win_disk.exe out of the package nagioscol from
http://sourceforge.net/projects/nagiosplugincol/
check_opsi -H configserver.domain.local -P 4447 -u monitoring -p monitoring123 -t checkPluginOnClient --plugin "C:\\opsi.org\\nagiosplugincol\\check_win_disk.exe C:" -c client.domain.local
This call checks the client client.domain.local. At the client the plugin check_win_disk.exe is called with the parameter C:. This means, that the hard drive with the letter C should be checked. The output and the result value of the plugin will be fetched by the opsiclientd and will be given back to the Nagios server (via the opsi server) in a for Nagios correct format.
Another special feature is to hold the last check results, even if the client is not reachable.
This feature was implemented according to the fact that desktop clients not always are running like servers, but the most time in their life are usually switched off. Normally Nagios will show for switched off clients the result Unknown. In fact the most problems on the monitored clients will not disappear by just switching them off and on again. So the information that a client had a problem before it was switched off may be an essential information for the system administrator. (You may try to solve this problem by using Timeperiods at the Nagios configuration, but we think that this is not flexible enough and leads to a permanent configuration work). So this opsi extension give you the possibility to give back the last real check results if the client is not reachable right now.
In order to use this feature, you have to use the Nagios macros $SERVICESTATEID$ and $SERVICEOUTPUT$. $SERVICESTATEID$ gives the last result value and should be passed to the -s Option. $SERVICEOUTPUT$ gives the last output line and should be passed to the -o Option. So check can give these last values instead of Unknown if the client is not reachable.
check_opsi -H configserver.domain.local -P 4447 -u monitoring -p monitoring123 -t checkPluginOnClient --plugin "C:\\opsi.org\\nagiosplugincol\\check_win_disk.exe C:" -c client.domain.local -s $SERVICESTATEID$ -o $SERVICEOUTPUT$
This chapter focuses on the configuration that have to been made for a working interface between the opsi and the Nagios server. Just see this as a recommendation, there will be a lot of other ways to do the job.
This description uses a Nagios server as monitoring server. On a Icinga server it should work very similar but you have to change some path entries. It should also work on other Nagios derivatives but this is not tested.
Tip
The configurationfiles from these Chapter are in opsi-nagios-connector-utils svn-Repository. To get these example configurationfiles you can connect over a browser to following url:
https://svn.opsi.org/listing.php?repname=opsi-nagios-connector-utils
or you can make a direct checkout from repository with following command:
svn co https://svn.opsi.org/opsi-nagios-connector-utils
In monitoring environments you will often find that the access is just restricted by IP numbers. Because of the lack of security of this solution we decided to work with a real user / password security in this opsi extension.
Using the opsi standard group opsiadmin would give the Nagios more rights than needed. So you have to create an own opsi user for the opsi-Nagios-Connector.
In the following example a user named monitoring with the password monitoring123 is created for opsi:
opsi-admin -d method user_setCredentials monitoring monitoring123
The created user monitoring will be stored with its encrypted password at the /etc/opsi/passwd and is not a user which may be used to login at a shell. In fact it is no real Unix user.
You have to create this user only on your config server, even if you have multiple depots.
At your Nagios server you should mask the user and password by making an entry at the /etc/nagios3/resource.cfg. This should look for example like this:
$USER2$=monitoring
$USER3$=monitoring123
The number behind $USER may vary. If this configuration was not used before, there should be only $USER1$ be used. According to what you are using here, you might have to change the other examples in this manual.
To make the maintenance of the Nagios configuration easier, we recommend to put all opsi nagios connector related configuration files in one separated place.
So just create below /etc/nagios3/conf.d a new directory named opsi for these configurations.
The configuration files we will place in this directory are:
-
Nagios Template:
opsitemplates.cfg -
Hostgroups:
opsihostgroups.cfg -
Server Hosts:
<full name of the server>.cfg -
Commands:
opsicommands.cfg -
Contacts:
opsicontacts.cfg -
Services:
opsiservices.cfg
All the client configuration files we recommend to put in sub directory of this place. Therefore you create below /etc/nagios3/conf.d/opsi another directory named clients.
Using templates is a standard functionality of Nagios which will not explained here. The main advantage is that it makes the single configuration files smaller and easier to read (and write).
Inside of the templates we use some Nagios custom variables for often used values. According to the fact, that the most checks have to run on the opsi config server, we will define the name and port of the config server as such a custom variable:
_configserver           configserver.domain.local
_configserverurl        4447
You will find this below in the template definitions.
These custom variables may later on be referenced by the Nagios macros: $_HOSTCONFIGSERVER$ and $_HOSTCONFIGSERVERPORT$. (These macros have leading HOST in their name, because they are defined inside of a host definition).
For more details on variable and macro take look at your Nagios documentation.
Now the first file we create in /etc/nagios3/conf.d/opsi is the template definition file opsitemplates.cfg.
This file may hold different templates. Every template is created according to the following patter (which contains comments for better understanding):
define host{
        name                    opsihost-tmp    ; The name of this host template
        notifications_enabled           1       ; Host notifications are enabled
        event_handler_enabled           1       ; Host event handler is enabled
        flap_detection_enabled          1       ; Flap detection is enabled
        failure_prediction_enabled      1       ; Failure prediction is enabled
        process_perf_data               0       ; Process performance data
        retain_status_information       1       ; Retain status information across program restarts
        retain_nonstatus_information    1       ; Retain non-status information across program restarts
                max_check_attempts              10
                notification_interval           0
                notification_period             24x7
                notification_options            d,u,r
                contact_groups                  admins
        register                        0       ; DONT REGISTER THIS DEFINITION - ITS NOT A REAL HOST, JUST A TEMPLATE!
        icon_image                      opsi/opsi-client.png
        }
NOTE:
* The optional option icon_image may put it to an image with relative path below: /usr/share/nagios3/htdocs/images/logos/.
* Optional you may give an own contact_group, which have to be defined as contact object, for example in the file opsicontacts.cfg.
Now we recommend to create templates for the following objects
- opsi server
- opsi client
- opsi service
- and 2 templates for pnp4nagios (host-pnp / srv-pnp)
Let’s start with the example of the opsi server template:
define host{
        name                            opsi-server-tmpl
        notifications_enabled           1
        event_handler_enabled           1
        flap_detection_enabled          1
        failure_prediction_enabled      1
        process_perf_data               1
        retain_status_information       1
        retain_nonstatus_information    1
                check_command                   check-host-alive
                max_check_attempts              10
                notification_interval           0
                notification_period             24x7
                notification_options            d,u,r
                contact_groups                  admins,opsiadmins
        _configserver                   configserver.domain.local
        _configserverport               4447
        register                        0
        icon_image                      opsi/opsi-client.png
        }
You just have to change configserver.domain.local to your config server name. Also you may change the contact_groups to your needs.
The next part of the file opsitemplates.cfg is the template for the clients:
define host{
        name                            opsi-client-tmpl
        notifications_enabled           1
        event_handler_enabled           1
        flap_detection_enabled          1
        failure_prediction_enabled      1
        process_perf_data               1
        retain_status_information       1
        retain_nonstatus_information    1
                max_check_attempts              10
                notification_interval           0
                notification_period             24x7
                notification_options            d,u,r
                contact_groups                  admins,opsiadmins
        _configserver                   configserver.domain.local
        _configserverport               4447
        register                        0
        icon_image                      opsi/opsi-client.png
        }
The Option "check command check-host-alive" should be not set here because the clients are not always running. In effect the clients will be displayed as pending instead of offline.
You just have to change configserver.domain.local to your config server name. Also you may change the contact_groups to your needs.
The next part of the file opsitemplates.cfg is the template for the opsi-services:
define service{
        name                            opsi-service-tmpl
        active_checks_enabled           1
        passive_checks_enabled          1
        parallelize_check               1
        obsess_over_service             1
        check_freshness                 0
        notifications_enabled           1
        event_handler_enabled           1
        flap_detection_enabled          1
        failure_prediction_enabled      1
        process_perf_data               1
        retain_status_information       1
        retain_nonstatus_information    1
                notification_interval           0
                is_volatile                     0
                check_period                    24x7
                normal_check_interval           5
                retry_check_interval            1
                max_check_attempts              4
                notification_period             24x7
                notification_options            w,u,c,r
                contact_groups                  admins,opsiadmins
        register                        0
        }
If you are using pnp4nagios for the graphic display of performance data you will need two other templates in the file opsitemplates.cfg:
define host {
   name       host-pnp
   action_url /pnp4nagios/index.php/graph?host=$HOSTNAME$&srv=_HOST_
   register   0
}

define service {
   name       srv-pnp
   action_url /pnp4nagios/index.php/graph?host=$HOSTNAME$&srv=$SERVICEDESC$
   register   0
}The nest step is to define the hostgroups. This helps to structure the display of the results as well as the service definitions.
So create a file named opsihostgroups.cfg wit the following content:
define hostgroup {
        hostgroup_name  opsi-clients
        alias           OPSI-Clients
}

define hostgroup {
        hostgroup_name  opsi-server
        alias           OPSI-Server
        members         configserver.domain.local, depotserver.domain.local
}
Do not forget to edit the member line.
The next step is to create for every opsi server you are running an own configuration file. This file should be named based on the pattern <full name of the server>.cfg. For example configserver.domain.local.cfg.
(You may also create one file (e.g. opsihost.cfg with all server definitions).
The content should look like this:
define host{
        use                             opsi-server-tmpl
        host_name               configserver.domain.local
        hostgroups              opsi-server
        alias                           opsi Configserver
        address                 configserver.domain.local
        }

define host{
        use                             opsi-server-tmpl
        host_name               depotserver.domain.local
        hostgroups              opsi-server
        alias                           opsi Depotserver
        address                 depotserver.domain.local
        }
Explanation of the entries: * use references to the used template. * hostgroups tells us to which hostgroup this server belongs.
The opsi client configurations should be placed in an own sub directory. They should be defined like this:
define host{
        use                             opsi-client-tmpl
        host_name               client.domain.local
        hostgroups              opsi-clients
        alias                           opsi client
        address                 client.domain.local
        _depotid                        depotserver.domain.local
        }
This client configuration uses again a custom variable: _depotid. This custom variable may be referenced by the macro $_HOSTDEPOTID$.
The usage is optional. If a client may be not connected by the opsi configuration server directly, you will here write down from which depot server the client can be contacted.
To make it easier to create the configuration files for your large number of opsi clients, you may run the following script on your opsi configuration server:
#!/usr/bin/env python

from OPSI.Backend.BackendManager import *

template = '''
define host {
        use             opsi-client-tmpl
        host_name       %hostId%
        hostgroups      opsi-clients
        alias           %hostId%
        address         %hostId%
        }
'''

backend = BackendManager(
             dispatchConfigFile = u'/etc/opsi/backendManager/dispatch.conf',
             backendConfigDir   = u'/etc/opsi/backends',
             extensionConfigDir = u'/etc/opsi/backendManager/extend.d',
                        )


hosts = backend.host_getObjects(type="OpsiClient")

for host in hosts:
        filename = "%s.cfg" % host.id
        entry = template.replace("%hostId%",host.id)
        f = open(filename, 'w')
        f.write(entry)
f.close()Now we have to define which of the check commands, which are described before, we want to use. You should do this in a file named opsicommands.cfg.
This is just an example which you may change to your needs:
First let us explain the structure of the entries:
define command{
        command_name    check_opsi_clientstatus
        command_line            $USER1$/check_opsi -H $_HOSTCONFIGSERVER$ -P $_HOSTCONFIGSERVERPORT$ -u $USER2$ -p $USER3$ -t checkClientStatus -c $HOSTADDRESS$
        }
The command_name will be used by other configuration files. The option command_line defines the command and all used arguments.
Based on this pattern we create now the file opsicommands.cfg:
define command {
        command_name    check_opsiwebservice
        command_line    /usr/lib/nagios/plugins/check_opsi -H $HOSTADDRESS$ -P 4447 -u $USER2$ -p $USER3$ -t checkOpsiWebservice
}
define command {
        command_name    check_opsidiskusage
        command_line    /usr/lib/nagios/plugins/check_opsi -H $HOSTADDRESS$ -P $_HOSTCONFIGSERVERPORT$ -u $USER2$ -p $USER3$ -t checkOpsiDiskUsage
}
define command {
        command_name    check_opsiclientstatus
        command_line    /usr/lib/nagios/plugins/check_opsi -H $_HOSTCONFIGSERVER$ -P $_HOSTCONFIGSERVERPORT$ -u $USER2$ -p $USER3$ -t checkClientStatus -c $HOSTADDRESS$
}
define command {
        command_name    check_opsiproductstatus
        command_line    /usr/lib/nagios/plugins/check_opsi -H $_HOSTCONFIGSERVER$ -P $_HOSTCONFIGSERVERPORT$ -u $USER2$ -p $USER3$ -t checkProductStatus -e $ARG1$ -d $HOSTADDRESS$ -v
}
define command {
        command_name    check_opsiproductStatus_withGroups
        command_line    /usr/lib/nagios/plugins/check_opsi -H $_HOSTCONFIGSERVER$ -P $_HOSTCONFIGSERVERPORT$ -u $USER2$ -p $USER3$ -t checkProductStatus -g $ARG1$ -G $ARG2$ -d "all"
}
define command {
        command_name    check_opsiproductStatus_withGroups_long
        command_line    /usr/lib/nagios/plugins/check_opsi -H $_HOSTCONFIGSERVER$ -P $_HOSTCONFIGSERVERPORT$ -u $USER2$ -p $USER3$ -t checkProductStatus -g $ARG1$ -G $ARG2$ -v -d "all"
}
define command {
        command_name    check_opsidepotsync
        command_line    /usr/lib/nagios/plugins/check_opsi -H $_HOSTCONFIGSERVER$ -P $_HOSTCONFIGSERVERPORT$ -u $USER2$ -p $USER3$ -t checkDepotSyncStatus -d $ARG1$
}
define command {
        command_name    check_opsidepotsync_long
        command_line    /usr/lib/nagios/plugins/check_opsi -H $_HOSTCONFIGSERVER$ -P $_HOSTCONFIGSERVERPORT$ -u $USER2$ -p $USER3$ -t checkDepotSyncStatus -d $ARG1$ -v
}
define command {
        command_name    check_opsidepotsync_strict
        command_line    /usr/lib/nagios/plugins/check_opsi -H $_HOSTCONFIGSERVER$ -P $_HOSTCONFIGSERVERPORT$ -u $USER2$ -p $USER3$ -t checkDepotSyncStatus -d $ARG1$ --strict
}
define command {
        command_name    check_opsidepotsync_strict_long
        command_line    /usr/lib/nagios/plugins/check_opsi -H $_HOSTCONFIGSERVER$ -P $_HOSTCONFIGSERVERPORT$ -u $USER2$ -p $USER3$ -t checkDepotSyncStatus -d $ARG1$ --strict -v
}
define command {
        command_name    check_opsipluginon_client
        command_line    /usr/lib/nagios/plugins/check_opsi -H $_HOSTCONFIGSERVER$ -P $_HOSTCONFIGSERVERPORT$ -u $USER2$ -p $USER3$ -t checkPluginOnClient -c $HOSTADDRESS$ --plugin $ARG1$
}
define command {
        command_name    check_opsipluginon_client_with_states
        command_line    /usr/lib/nagios/plugins/check_opsi -H $_HOSTCONFIGSERVER$ -P $_HOSTCONFIGSERVERPORT$ -u $USER2$ -p $USER3$ -t checkPluginOnClient -c $HOSTADDRESS$ --plugin $ARG1$ -s $SERVICESTATEID$ -o "$SERVICEOUTPUT$"
}
define command {
        command_name    check_opsipluginon_client_from_depot
        command_line    /usr/lib/nagios/plugins/check_opsi -H $_HOSTDEPOTID$ -P $_HOSTCONFIGSERVERPORT$ -u $USER2$ -p $USER3$ -t checkPluginOnClient -c $HOSTADDRESS$ --plugin $ARG1$
}This define the contacts which will get notifications.
define contact{
        contact_name                    adminuser
        alias                           Opsi
        service_notification_period     24x7
        host_notification_period        24x7
        service_notification_options    w,u,c,r
        host_notification_options       d,r
        service_notification_commands   notify-service-by-email
        host_notification_commands      notify-host-by-email
        email                           root@localhost
        }
define contactgroup{
        contactgroup_name       opsiadmins
        alias                   Opsi Administrators
        members                 adminuser
        }
You should replace adminuser by one or more real users.
Finally we define with the services what the Nagios server have to monitor and to display. This definition are using the definition of the other configuration file above like templates, commands and hostgroups or hosts.
As first part we define the services which give us information’s about the servers. One of these is the check if the depots are in sync, which is here down against all known depots.
#OPSI-Services
define service{
        use                             opsi-service-tmpl,srv-pnp
        hostgroup_name                  opsi-server
        service_description             opsi-webservice
        check_command                   check_opsiwebservice
        check_interval                  1
        }
define service{
        use                             opsi-service-tmpl
        hostgroup_name                  opsi-server
        service_description             opsi-diskusage
        check_command                   check_opsidiskusage
        check_interval                  1
        }
define service{
        use                             opsi-service-tmpl
        hostgroup_name                  opsi-server
        service_description             opsi-depotsyncstatus-longoutput
        check_command                   check_opsidepotsync_long!all
        check_interval                  10
        }
define service{
        use                             opsi-service-tmpl
        hostgroup_name                  opsi-server
        service_description             opsi-depotsyncstatus-strict-longoutput
        check_command                   check_opsidepotsync_strict_long!all
        check_interval                  10
        }
The next part is the monitoring of the software roll out. In one check a concrete opsi product opsi-client-agent is mentioned. In two other check are referenced on a opsi product group opsiessentials and opsi client group productiveclients.
define service{
        use                             opsi-service-tmpl
        hostgroup_name                  opsi-clients
        service_description             opsi-clientstatus
        check_command                   check_opsiclientstatus
        check_interval                  10
        }
define service{
        use                             opsi-service-tmpl
        hostgroup_name                  opsi-server
        service_description             opsi-productstatus-opsiclientagent
        check_command                   check_opsiproductstatus!opsi-client-agent
        check_interval                  10
        }
define service{
        use                             opsi-service-tmpl
        hostgroup_name                  opsi-server
        service_description             opsi-productstatus-opsiessentials-group
        check_command                   check_opsiproductStatus_withGroups!opsiessentials!productiveclients
        check_interval                  10
        }
define service{
        use                             opsi-service-tmpl
        hostgroup_name                  opsi-server
        service_description             opsi-productstatus-opsiessentials-group-longoutput
        check_command                   check_opsiproductStatus_withGroups_long!opsiessentials!productiveclients
        check_interval                  10
        }
In the third and last part of the file, the checks which are should run directly on the clients (direct checks) are defined.
These checks are (for example) not assigned to hostgroups but to single hosts or lists of hosts (client.domain.local,depotclient.domain.local).
Some description:
-
opsi-direct-checkpluginonclient
runs a normal direct check on the client and results to unknown if the client is offline.
At this check the config server try’s to reach the client directly. -
opsi-direct-checkpluginonclient-with-servicestate
is equal to opsi-direct-checkpluginonclient, but returns the last valid result if the client is offline (instead of unknown) -
opsi-direct-checkpluginonclient-from-depot
is equal to opsi-direct-checkpluginonclient, but the client will be connected by the server which is given in the host configuration as _depotid.
define service{
        use                             opsi-service-tmpl
        host_name                       client.domain.local,depotclient.domain.local
        service_description             opsi-direct-checkpluginonclient
        check_command                   check_opsipluginon_client!"C:\\opsi.org\\nagiosplugins\\check_memory.exe"
        check_interval                  10
        }
define service{
        use                             opsi-service-tmpl
        host_name                       client.domain.local
        service_description             opsi-direct-checkpluginonclient-with-servicestate
        check_command                   check_opsipluginon_client_with_states!"C:\\opsi.org\\nagiosplugins\\check_memory.exe"
        check_interval                  10
        }
define service{
        use                             opsi-service-tmpl
        host_name                       depotclient.domain.local
        service_description             opsi-direct-checkpluginonclient-from-depot
        check_command                   check_opsipluginon_client_from_depot!"C:\\opsi.org\\nagiosplugins\\check_memory.exe"
        check_interval                  10
}Usually the client installation of opsi software packets is started when booting the client. So the user has to wait for the installation to finish, before the user logon is granted. So it might be useful to do most of the software installation when the client is going to shut down.
The opsi module for installation on shutdown is providing that feature. Selected clients can be configured to do installation on shutdown.
The opsi module Installation on Shutdown can be used for clients with Windows XP or above. The required components are part of the opsi packet opsi-client-agent.
The packet opsi-client-agent must be version 4.0.2.3-2 or above with an opsiclientd version 4.0.75 or above.
The cofunding of this project has been finished, so with opsi version 4.0.5.4-2 it has become part of the free opsi system and doesn’t require a module file anymore. Older versions of opsi-client-agent still do require a modules file. For further details on cofunding projects see Section 6, “Activation of non free modules” and the weblink opsi cofunding projects.
Some technical restrictions and constraints are the following cases:
- WAN extension: the Installation on Shutdown module currently is not applicable for clients run with WAN extension. Using the WAN extension for a client under some conditions requires to use the local configuration files, which interferes with the state handling of the installation on shutdown mechanism.
- Group Policies: part of the mechanism for Installation on Shutdown is based on shutdown scripts per Local Group Policy. Other Group Policies might override these local configurations. In this case, the required configuration for running shutdown scripts should be included to your Group Policies in charge. See the section called “Installing by shutdown script” for the required configurations.
- If the install at shutdown has been triggered by a shutdown or a reboot, the Windows API doesn’t allow to convert a shutdown into a reboot (or vice versa). In case of a shutdown, the installation of any products, that contain a reboot, will continue at the next startup of the client.
- Windows Home Edition: Windows Home does not provide the required Local Group Policy shutdown script mechanim. Therefore Installation on Shutdown cannot be used for Windows Home Edition.
- Windows 2000: For Windows 2000 clients the maximum timeout for shutdown scripts is 10 minutes. After 10 minutes the installation is aborted by the Windows system. Therefore Installation on Shutdown cannot be used for Windows 2000 clients.
The required components for Installation on Shutdown are part of the current opsi-client-agent packet. Since opsi version 4.0.5.4-2 no modules file is required for install on shutdown anymore.
The Installation on Shutdown can be configured for suitable clients (see Section 22.2, “Preconditions for Installation on Shutdown”) simply by setting the opsi-client-agent product property on_shutdown_install=on and setting opsi-client-agent=setup.
This is it. All the rest of the configuration is done by the opsi-client-agent packet during setup.
Just in case client group policies already are in use at your side, there might be a conflict with the local opsi client group policiy setting. In case of such a conflict, the opsi shutdown script group policy entries of the opsi-client-agent package should be disabled (on_shutdown_install_set_policy = off) and instead be added to your local group policy administration, see the section called “Installing by shutdown script”.
The Installation on Shutdown is done in addition to the Installation at Startup. Usually this is the best way to ensure that the clients always have the current security updates installed, even if the client was off for a long time (when the user was on holiday for instance).
If required, the standard Installation on Startup can be disabled, see the section called “Special Configuration of Installation on Shutdown”. Installations in progress are continued anyway, which is triggered by the precondition installation_pending.
The Windows system during system shutdown does not distinguish shutdown from reboot. The Installation on Shutdown is started in both cases and it is not possible, to distinguish them during the installation process. Also the Windows API does not allow to transform a system shutdown into a reboot (or vice versa). So in case of a system shutdown, any further installations are continued at the next system startup.
The following explanations are for understanding the technical design and the interactions of the components in case of special configurations or error states. Usually all of the required configurations are done by the opsi-client-agent packet.
The Installation on Shutdown module is based on several system components. A major part is the Windows shutdown script mechanism per Local Group Policy. Shutdown scripts allow to run tasks at shutdown when the user is logged off already, but all the system services are still available.
The shutdown script performs an opsi task, which triggers the opsi system service opsiclientd to start the installation process and waits for the task to end. So the system waits for the installation process to finish and then shuts down. During the shutdown handling, the Windows system does not distinguish shutdown from reboot, so the installation is triggered in either case.
The opsi client service opsiclientd is configured for processing the action on_shutdown, which is starting the installation process. In case of required reboots, the precondition installation_pending allows the process control. If during an installation a reboot is required before continuing the installation, the precondition installation_pending leads to continuing the installation at the next system startup (even if installation at gui_startup is disabled). During the state of installation_pending, no further Installations on Shutdown are triggered, otherwise there would be no reboot between Installation on Startup and Installation on Shutdown. So until the current installation has completed, the Installation on Shutdown is suppressed by the setting event_on_shutdown{installation_pending}.
The following chapter gives some further details on the Installation on Shutdown.
By special registry entries, the Local Group Policy is configured to perform an opsi shutdown skript, which triggers the installation process. The registry entries used by opsi-client-agent are the same as can be done by using the Group Policy-Editor gpedit.msc.
This is how to configure the shutdown script by using the Group Policy-Editor gpedit.msc:
- Local Computer Policy
- Computer Configuration
- Windows Settings
- Scripts (Startup/Shutdown)
- Shutdown
- Scripts - Add - Browse
- C:\Programme\opsi.org\opsi-client-agent\on_shutdown\doinstall32.cmd (or doinstall64.cmd for 64Bit systems)
To configure the system to wait for the completion of the installation process, the maximum waittime is set to infinite (0 seconds):
- Administrative Templates
- System - Skripts
- Maximum Waittime for Group Policy scripts
- Setting - Enabled - Seconds: 0
The opsi shutdown script doinstall32.cmd / doinstall64.cmd changes the working directory and triggers the on_shutdown event:
echo Start opsi product installation ...
cd "%ProgramFiles%\opsi.org\opsi-client-agent"
opsiclientd_shutdown_starter.exe on_shutdown
For 64Bit systems:
echo Start opsi product installation ...
cd "%ProgramFiles(x86)%\opsi.org\opsi-client-agent"
opsiclientd_shutdown_starter.exe on_shutdown
The opsiclientd_shutdown_starter triggers the installation and waits for completion, so the system shutdown is delayed while the opsiclientd_shutdown_starter task is running.
These registry entries are set by the opsi-client-agent packet and start the execution of the shutdown script doinstall32.cmd on WinXP / 32Bit clients. For 64Bit-systems the script name is doinstall64.cmd (instead of doinstall32.cmd).
[HKEY_LOCAL_MACHINE\SOFTWARE\Microsoft\Windows\CurrentVersion\Group Policy\State\Machine\Scripts\Shutdown\0]
"GPO-ID"="LocalGPO"
"SOM-ID"="Local"
"FileSysPath"="C:\\WINDOWS\\System32\\GroupPolicy\\Machine"
"DisplayName"="opsi shutdown install policy"
"GPOName"="opsi shutdown install policy"

[HKEY_LOCAL_MACHINE\SOFTWARE\Microsoft\Windows\CurrentVersion\Group Policy\State\Machine\Scripts\Shutdown\0\0]
"Script"="C:\\Programme\\opsi.org\\opsi-client-agent\\on_shutdown\\doinstall32.cmd"
"Parameters"=""
"ExecTime"=hex(b):00,00,00,00,00,00,00,00,00,00,00,00,00,00,00,00

[HKEY_LOCAL_MACHINE\SOFTWARE\Policies\Microsoft\Windows\System\Scripts\Shutdown\0]
"GPO-ID"="LocalGPO"
"SOM-ID"="Local"
"FileSysPath"="C:\\WINDOWS\\System32\\GroupPolicy\\Machine"
"DisplayName"="opsi shutdown install policy"
"GPOName"="opsi shutdown install policy"

[HKEY_LOCAL_MACHINE\SOFTWARE\Policies\Microsoft\Windows\System\Scripts\Shutdown\0\0]
"Script"="C:\\Programme\\opsi.org\\opsi-client-agent\\on_shutdown\\doinstall32.cmd"
"Parameters"=""
"ExecTime"=hex:00,00,00,00,00,00,00,00,00,00,00,00,00,00,00,00

[HKEY_LOCAL_MACHINE\SOFTWARE\Microsoft\Windows\CurrentVersion\policies\system]
"MaxGPOScriptWait"=dword:00000000
These are the registry entries for Win6 64Bit (Vista / Win7 / Win8):
[HKEY_LOCAL_MACHINE\SOFTWARE\Microsoft\Windows\CurrentVersion\Group Policy\State\Machine\Scripts\Shutdown\0]
"GPO-ID"="LocalGPO"
"SOM-ID"="Local"
"FileSysPath"="C:\\WINDOWS\\System32\\GroupPolicy\\Machine"
"DisplayName"="opsi shutdown install policy"
"GPOName"="opsi shutdown install policy"

[HKEY_LOCAL_MACHINE\SOFTWARE\Microsoft\Windows\CurrentVersion\Group Policy\State\Machine\Scripts\Shutdown\0\0]
"Script"="C:\\Programme\\opsi.org\\opsi-client-agent\\on_shutdown\\doinstall32.cmd"
"Parameters"=""
"ExecTime"=hex(b):00,00,00,00,00,00,00,00,00,00,00,00,00,00,00,00

[HKEY_LOCAL_MACHINE\SOFTWARE\Microsoft\Windows\CurrentVersion\Group Policy\Scripts\Shutdown\0]
"GPO-ID"="LocalGPO"
"SOM-ID"="Local"
"FileSysPath"="C:\\Windows\\System32\\GroupPolicy\\Machine"
"DisplayName"="opsi shutdown install policy"
"GPOName"="opsi shutdown install policy"
"PSScriptOrder"=dword:00000001

[HKEY_LOCAL_MACHINE\SOFTWARE\Microsoft\Windows\CurrentVersion\Group Policy\Scripts\Shutdown\0\0]
"Script"="C:\\Program Files (x86)\\opsi.org\\opsi-client-agent\\on_shutdown\\doinstall64.cmd"
"Parameters"=""
"IsPowershell"=dword:00000000
"ExecTime"=hex:00,00,00,00,00,00,00,00,00,00,00,00,00,00,00,00

[HKEY_LOCAL_MACHINE\SOFTWARE\Microsoft\Windows\CurrentVersion\policies\system]
"MaxGPOScriptWait"=dword:00000000
For managing the Installation on Shutdown, the opsi client service opsiclientd has got entries for the special Event on_shutdown in the configuration file opsiclientd.conf. These are the relevant entries:
[event_gui_startup]
active = True

[event_gui_startup{installation_pending}]
active = True

[event_on_shutdown]
active = False

[event_on_shutdown{installation_pending}]
active = False

[precondition_installation_pending]
installation_pending = true
The precondition installation_pending is set to true by the opsiclientd while an installation is in progress and set to false when the installation is finished. So an unfinished installation, which needs to proceed the installation after a reboot, can be detected by the precondition installation_pending still being true at the end of the script processing.
When the event_on_shutdown section is set to False (which is the default), the Installation on Shutdown is disabled.
This is the configuration for a client with activated Installation on Shutdown:
[event_gui_startup]
active = True

[event_gui_startup{installation_pending}]
active = True

[event_on_shutdown]
active = True

[event_on_shutdown{installation_pending}]
active = False

[precondition_installation_pending]
installation_pending = true
So the only difference is the event_on_shutdown section being True:
[event_on_shutdown]
active = True.
The setting of the event_on_shutdown section is managed by the product switch on_shutdown_install of the opsi-client-agent packet.
The precondition precondition_installation_pending = true indicates, that the current installation process has not completed yet. This precondition stays true, even after several Reboots, until the current installation has completed. In case of a required Reboot during the installation process, the configuration [event_gui_startup{installation_pending}] active = True triggers the installation to continue at the next system startup. This configuration may not be changed, because the current installation has to be completed, before the user is allowed to logon.
Also the configuration [event_on_shutdown{installation_pending}] active = False must keep its value False at all times, because the installation has to continue AFTER the next reboot. Otherwise there wouldn’t be a reboot between Installation at Startup and Installation on Shutdown.
As soon as the installation process has completed, the precondition is set to installation_pending = false, so the Installation on Shutdown is active again.
For activating the Installation on Shutdown, just a current opsi-client-agent package is required, as described in Section 22.3, “Activating Installation on Shutdown”. The Shutdown on Install can be activated by setting the product switch on_shutdown_install of the clients opsi-client-agent packet.
As the default, the Installation at startup is also active. So it is ensured, that the client always has the current software. Even if it had been offline for a while (when the user returns from holiday, for instance).
The Installation at startup can be turned off, if desired. The configuration of the opsi-client-agents can be done by the web service (see: the section called “Configuration via web service (Host Parameter)”), therefore an host parameter should be created:
-
opsiclientd.event_gui_startup.active(boolean, default:true)
By this host parameter the gui_startup event can be configured for a client. The host parameter can be created by opsi-configed or opsi-admin.
For creating the host parameter with opsi-admin, execute the following command on the opsi-config-server:
opsi-admin -d method config_createBool opsiclientd.event_gui_startup.active "gui_startup active" true
The default value true is the default value as it comes with the default opsiclientd.conf.
To disable the Installation at Startup for a client, the host parameter can be configured like this:
-
opsiclientd.event_gui_startup.active:false
Be careful with disabling the Installation on startup, for there is a high risk of outdated software. Never change the settings of the sections with the precondition installation_pending. The default settings are required to manage the installation process.
For setting the host parameter with opsi-admin, execute the following command on the opsi-config-server (in this example for a client with the opsi-host-Id myclient.domain.de):
opsi-admin -d method configState_create opsiclientd.event_gui_startup.active myclient.domain.de false
With the configuration event_gui_startup=false there is no connect to the opsi-config-server and no software installation at startup. With the exception of installations in progress, which continue at system startup. This is managed by the configuration event_on_shutdown{installation_pending}. So do not change the settings for sections with the precondition installation_pending, for they are important for products, that request a reboot during installation.
During Install on Shutdown a logfile is written:
-
C:\opsi.org\tmp\doinstall.log
with, in case of success, has the following content:
doinstall32.cmd started
The current date is: .Tue 02/012/2013
Enter the new date: (mm-dd-yy) Backend connected.
modules: passed first checkpoint.
Modules file signature verified (customer: my company)
Check completed.
Event fired
Task completed.
This Logfile is rewritten each time and can be checked in case of a malfunction.
Technical precondition is opsi 4.0.5 with following packet versions:
The opsi support for Linux is based on a free Open Source component (the netboot products) and a co-funded component (the client-agent).
The opsi-linux-client-agent is a
co-funded opsi extension module.
For using the opsi Linux extension module, an activation file is required, which can be acquired by buying the extension module. To obtain a temporary activation file for evaluation, please email to info@uib.de.
For further details on handling extension modules refer to the opsi manual.
A single management tool for Windows and Linux
The objective of the opsi Linux extension module is to provide a homogenous management system for heterogenous environments. The focus is on integrating both worlds into the same management processes and tools
This means, that a Linux installation is triggered the same way as a Windows installation. The Linux opsi-client-agent is based on the same source code as the Windows client and provides (when applicable) the same opsiscript instruction sets.
Independent from Linux distribution
The opsi Linux Support is designed to be independent from any special Linux distribution.
The following distributions are supported:
- Debian
- Ubuntu
- OpenSuse / SLES (Suse Linux Enterprise Server)
- Fedora / RHEL (RedHat Enterprise Linux)
- CentOS
Basic OS installation per netboot
For installing Linux on a client, at first the standard opsi-linux-bootimage is booted per netboot. It is the same image as being used for the Windows installation.
The bootimage automatically performs the partitioning and formatting of the hard disc (/ and swap). Next the installation of the basic Linux Operating System is performed (including network and ssh, but without X11). The installation process itself is quite different for the individual distributions, but has in common, that the installation is performed directly from the original distribution packets.
The basic Linux installation can be extended with optional opsi packets, for instance to turn the system into an opsi-Server (a new depotserver for instance).
Also the opsi-client-agent for Linux can be installed, which enables the automated installation and configuration of further software packets.
The opsi-client-agent for Linux is available as a co-funded opsi extension module, the required opsi netboot products for Linux installation are available as free Open Source modules.
Because the base installation is done from the Standard opsi-linux-bootimage, there ar some distribution dependent differences, that have to be installed and configured after the first reboot of the installed system. This is for example the se-linux installation of the RedHat like or the keyboard configuration of the Debian like systems. These after boot installations and patches are done by the standard localboot produkt l-os-postinst.
The following properties for controlling the Linux installation are available with all netboot products:
-
askbeforeinst:
confirm start of the new installation on the client? (default=true) -
architecture:
architecture selection - affects the selection of the bootimage and the installation architecture. (default=64bit) -
system_partition_size:
size of the system partition - the size may be given as percent of the harddisk size or as absolute size (G=Gigabyte). If you choose another value than 100%, the remaining rest will be used as data_partition. (default=100%) -
swap_partition_size: +size of the swap partition. (default=2000M) -
data_partition_create:
create a data partition if there is some space left. (true/false) (default=true) -
data_partition_preserve:
preserve an existing data partition?
always = cancel the installation in case the preservation of an existing partition with the label data is not possible with the given partition data.
if_possible = an existing partition with the label data is preserved if possible according to the given partioning parameters. Otherwise it will be deleted.
never = a new partition table will be created. (default=never) -
language:
language / locale to be installed (default=de) -
console_keymap:
keyboard layout to be used (default = distribution dependent / de) -
timezone:
time zone to be configured (default=Europe/Berlin) -
root_password:
root password (default=linux123) -
user_password:
user password (default=linux123) -
install_opsi_server:
install opsi server packages (default=false) -
online_repository:
repository to use for installation - repository of the Linux distribution to be used for installation (not for SLES) (default = distribution dependent) -
opsi_online_repository:
repository for opsi-server installation - repository for the opsi-server packets (default = distribution dependent) -
proxy:
proxystring (if required) as:http://<ip>:<port>(default='') -
additional_packages:
additional packets to install. Packet names separated by blanks. (default='') -
wget_and_execute:
fetch a file via wget and execute it - URL (http) of a file to be executed at the end of installation. (default='') -
install_opsi-client-agent:
install the Linux opsi-client-agent (cofunding project: has to be activated by the /etc/opsi/modules) (default=false) -
release:
(Debian and Ubuntu only)
which release of the distribution is to be installed? (default = distribution dependent) -
setup_after_install:
opsi product(s) to be installed after the OS installation is done (opsi products to be set to setup) (default=l-os-postinst)
The basic installation is performed per debootstrap directly from the network.
This product has the status productive.
It is UEFI/GPT compatible (tested for release=trusty).
For this product applicable opsi-server packets are available, that can be installed by setting install_opsi_server=true.
The basic installation is performed per debootstrap directly from the network.
This product has the status productive.
It is UEFI/GPT compatible (tested for release=wheezy).
For this product applicable opsi-server packets are available, that can be installed by setting install_opsi_server=true.
The basic installation is performed by using the products embedded RPM files. Therefore each release requires a corresponding product.
OpenSuse 12.3. This product has the status productive.
This product is not UEFI compatible.
For very new releases the opsi-server packets might not be available yet. In this case using the property install_opsi_server=true might cause some errors.
OpenSuse 13.1. This product has the status productive.
This product is not UEFI compatible.
For this product applicable opsi-server packets are available, that can be installed by setting install_opsi_server=true.
Known Bugs: At some Hardware (eg. VMWare ESXi) the prediction of the network interface fails and the machine starts with unconfigured network interface.
The basic installation is performed by using the products embedded RPM files. Therefore each release requires a corresponding product.
The SLES product contains some RPMs which are not available as Open Source, so we cannot provide this product for public download. But we can provide the packet for our customers at no charge ( → mail to info@uib.de).
This product has the status productive.
For very new releases the opsi-server packets might not be available yet. In this case using the property install_opsi_server=true might cause some errors.
This product is not UEFI compatible.
This product has additional properties:
-
use_gpt
when set totrue, the hard disc (also in MBR-BIOS mode) will be partitioned as GPT. This requires a boot partition. In case the propertyboot_partition_sizeis set to 0, nevertheless a boot partition of size 1 GB will be created. -
boot_partition_size
size of the boot partition - in case of 0 no boot partition will be created. -
kernel_modules
blank separated list of additional kernel modules to be loaded (e.g. for special hard disc controller). -
suse_register
In case oftruethe server will be registered online. This requires the email address and the product key (registration key) in form ofemail:productkey. The key is retrieved (depending on the host parameterlicense-management.use) from the license management or from the propertyproductkey.
In case offalsethe propertylocal_repositoriesmust contain at least one suitable repository server. -
productkey
email address and registration key in form ofemail:productkey(if no license management used). -
local_repositories
blank separated list of repositories to be integrated per zypper, in form of: "http://myserver.local description"
The property online_repository is omitted.
The basic installation is performed by using the products embedded RPM files. Therefore each release requires a corresponding product.
This product has the status under development. Outstanding features are: localisation.
For this product applicable opsi-server packets are available, that can be installed by setting install_opsi_server=true.
This product is not UEFI compatible.
CentOS 7. This product is not available yet.
The basic installation is performed by using the products embedded RPM files. Therefore each release requires a corresponding product.
Fedora 20. This product has the status testing.
For new releases the opsi-server packets might not be available yet. In this case using the property install_opsi_server=true might cause some errors.
This product is not UEFI compatible.
The opsi-client-agent for Linux ist part of the co-funding project Linux Agent, which is liable to pay costs.
The opsi-client-agent for Windows is based on two components:
-
the service
opsiclientd -
the action processor
opsi-winst / opsi-script
The opsi-client-agent for Linux is based on the Linux port of the Windows client agent.
With the first release of opsi Linux, the Linux port of the opsiclientd has not been completed yet, so it is replaced by the opsiscriptstarter, which performs the following opsiclientd tasks at system start:
- connect to the opsi-server: check whether actions are to be performed
- mount the depot share
- start the action processor
- unmount the depot share
- transfer the logfile to the server
The Linux action processor is named opsi-script and is built from the same sources as the Windows opsi-winst. So on Linux the same scripting syntax is available as on Windows. All common features, that are not Windows specific, are available, as there are e.g.:
- file handling
- string and stringlist functions
- executing external scripts and programs
- communication with the opsi-Server
- patching config files
Of course Windows specific features (like patching the Windows registry) are not available on Linux, but there are some additional Linux specific functions like e.g.:
- getLinuxDistroType
- getLinuxVersionMap
Logging of the opsi-script ist available (like with the opsi-winst on Windows).
Linux opsi-script is available as a grafical version for working with X-Windows and a noGUI version for systems without grafical user interface.
Copy a bundle of files via Files section from a smb share may fail according to the Samba version
Workaround: Instead of:
[Files_copy_netboot]
copy -s "%scriptPath%/installfiles/*" "$target$/installfiles/"
you may use:
[ShellInAnIcon_opsi_copy_netboot]
set -x
export PATH=/usr/local/bin:/usr/bin:/bin:/usr/local/sbin:/usr/sbin:/sbin
cd "%scriptPath%"
tar cf - installfiles | ( cd "$target$/installfiles/" ; tar xf - )
As usual on Linux, the linux-opsi-client-agent is spread to several directories:
the binaries:
/usr/bin/opsi-script (X11)
/usr/bin/opsi-script-nogui (without X11)
/usr/bin/opsiscriptstarter (preliminary opsiclientd replacement)
auxiliary files:
usr/bin/winstskin/
config files:
/etc/opsi-client-agent/opsiclientd.conf (configuration of the opsiscriptstarter/opsiclientd)
/etc/opsi-client-agent/opsi-script.conf (under construction)
logfiles / temporary files:
/var/log/opsi-client-agent
For software deployment on Windows clients there can be said: the installation of software itself is as important as the subsequent configuring of the software.
On Linux most packets are available from the distribution repositories. So the installation part is less, but the configuration part stays the same. Also there are applications, that are not available from the standard repositories.
In this case special repositories or installation sources have to be added to the system. The important feature is, that all installation and configuration settings can be managed and logged on the opsi-server.
Here are some example snippets for an opsi-linux-client-agent opsi-script:
- exit in case the script detects a non Linux system
-
detecting the distribution type (to use
apt-get,zypperoryum) - detecting the Linux version
- installing a packet
- adding a repository
Example: exit in case the script detects a non Linux system:
[Actions]
requiredWinstVersion >= "4.11.4.1"
ScriptErrorMessages=off

DefVar $OS$

set $OS$ = GetOS

if not($OS$ = "Linux")
        LogError "Wrong OS: Product: " + $ProductId$ + "is only for Linux"
        isFatalError "Wrong OS"
endif
Example: detecting the distribution type:
[Actions]
requiredWinstVersion >= "4.11.4.1"
ScriptErrorMessages=off

DefVar $distrotype$

set $distrotype$ = getLinuxDistroType

if $distrotype$ = 'debian'
        ShellInAnIcon_Upgrade_deb
else
        LogError "Wrong Distro: This Product is for Debian/Ubuntu only"
        isFatalError "Wrong distro"
endif

if not("0" = getLastExitCode)
        Message "failed ShellInAnIcon_Upgrade"
        LogError "failed ShellInAnIcon_Upgrade"
        isFatalError "failed Upgrade"
endif


[ShellInAnIcon_Upgrade_deb]
set -x
export DEBIAN_FRONTEND=noninteractive
apt-get --yes install aptitude
apt-get update
apt-get --yes dist-upgrade
exit $?
Example: detecting the Linux version and installing a packet:
[Actions]
requiredWinstVersion >= "4.11.4.1"
ScriptErrorMessages=off

DefVar $distCodeName$
DefVar $distroName$
DefVar $distRelease$
DefVar $desktop$

DefStringList $linuxInfo$

set $linuxInfo$ = getLinuxVersionMap
set $distCodeName$ = getValue("Codename", $linuxInfo$)
set $distRelease$ = getValue("Release", $linuxInfo$)
set $distroName$  = getValue("Distributor ID", $linuxInfo$)

set $desktop$ = GetProductProperty("desktop", "kde")


if $distrotype$ = 'suse'
        if $desktop$ = "unity"
                Message " No Unity on SUSE - fallback to KDE ..."
                set $desktop$ = "kde"
        endif ; unity


        if $desktop$ = "kde"
                if ($distroName$ = 'openSUSE project')
                        ShellInAnIcon_kde_suse
                endif
                if ("SUSE LINUX" = $distroName$) and ($distRelease$ = "11")
                        ShellInAnIcon_kde_sles11
                endif
                if not("0" = getLastExitCode)
                        LogError "failed ShellInAnIcon"
                        Message "failed kde"
                        isFatalError "failed kde"
                endif
        endif ; kde
endif; suse type

[ShellInAnIcon_kde_suse]
set -x
zypper --no-gpg-checks --non-interactive install patterns-openSUSE-kde4 patterns-openSUSE-kde4_basis
zypper --no-gpg-checks --non-interactive install splashy-branding-openSUSE
exit $?

[ShellInAnIcon_kde_sles11]
set -x
zypper --no-gpg-checks --non-interactive install --auto-agree-with-licenses -t pattern kde
exit $?
Example: adding a repository:
[Actions]
requiredWinstVersion >= "4.11.4.1"
ScriptErrorMessages=off

DefVar $distCodeName$
DefVar $distroName$
DefVar $distRelease$
DefVar $desktop$

DefStringList $linuxInfo$

set $linuxInfo$ = getLinuxVersionMap
set $distCodeName$ = getValue("Codename", $linuxInfo$)
set $distRelease$ = getValue("Release", $linuxInfo$)
set $distroName$  = getValue("Distributor ID", $linuxInfo$)

set $desktop$ = GetProductProperty("desktop", "kde")


if $distroName$ = 'Ubuntu'

        if $desktop$ = "cinnamon"
                set $desktopPackage$ = $desktop$
                ShellInAnIcon_ubuntu_cinnamon
                if not("0" = getLastExitCode)
                        Message "failed ShellInAnIcon_ubuntu_cinnamon"
                        LogError "failed ShellInAnIcon_ubuntu_cinnamon"
                        isFatalError "failed cinnamon"
                endif
        endif ; cinnamon
endif; ubuntu

[ShellInAnIcon_ubuntu_cinnamon]
set -x
export DEBIAN_FRONTEND=noninteractive
# we need to get the add-apt-repository command
apt-get --yes --force-yes install python-software-properties
# the cinnamon repository
add-apt-repository ppa:gwendal-lebihan-dev/cinnamon-stable
apt-get update
apt-get --yes install ubuntu-desktop
exit $?Here some localboot products that are part of the standard opsi Linux support.
This product installs and configures those parts of the base installation, that cannot be done from the bootimage in a proper way.
This is for the different distributions:
Fedora / CentOS:
- installation of se-linux
Fedora:
- installation of se-linux
This product has a dependency to the product l-system-update which is executed before running l-os-postinst.
This product has a high priority, so it is executed before common products.
The product l-desktop installs a desktop packet on the computer.
The property desktop selects the desktop to be installed. Not all of the desktops are available for every distribution. For instance Unity is available for Ubuntu only. If the selected desktop is not available, the distribution specific default desktop will be installed. Furthermore the scope of the desktop packets differs according to the distribution and the selected desktop. It can be just the actual desktop software, or might also contain some base products like libreoffice, firefox, PDF Reader etc.
The property desktop can have the following values:
-
Gnome
Default for Debian, Fedora, CentOS, RHEL.
Available for all distributions. -
KDE
Default für SLES, OpenSuse. Available for all distributions. -
Unity
Available for Ubuntu only. -
Cinnamon
Available for Ubuntu only. -
xfce4
Available for Ubuntu, Debian, Fedora. -
lxde
Available for Ubuntu, Debian.
Hardware inventory.
The hardware inventory currently is based on the Python implemented method as also used by the bootimage. Therefore the packet python-opsi from the opsi-repository of the distribution must be installed. So if there is no opsi-repository available for this distribution, the hardware inventory fails.
To create an inventory, the data are collected on the client and sent to the server. The hardware inventory is based on the methods implemented in the bootimage.
The software inventory is based on the data from the packet management of the deployed Linux distribution.
With opsi 4.0.5 an increasing number of Linux products are UEFI/GPT compatible. For details refer to the list of netboot products above.
Linux support is a brand new opsi feature. Therefore not all of the planned features have been implemented yet with the first release.
Planned features to follow are:
- opsiclientd Linux port
- configurable partitioning
- logical volume management
- patching XML- and JSON files
- patching hierarchical configuration files like dhcpd.conf
Instructions for installation and use of local deb packets:
German:
English:
This module currently is a
co-funded opsi extension.
Some preconditions are required to work with that module, which is to get a suitable modules file to unlock the feature. You can get this unlock file by purchasing the extension module. For evaluation you can get a time limited modules unlock file without charge. ( → mail to info@uib.de).
Technical requirements are opsi 4.0.5 with packet versions:
- opsi 4.0.5 supports only 64-Bit UEFI-Installations
-
PXE-boot installs requires a winpe_uefi (analogous the winpe for legacy-Installations). This winpe_uefi has to be build with dism on Windows 8.1 replacing the file
startnet.cmdwith astartnet.cmdcontaining one line`c:\opsi\startnet.cmd` - you have to configure your external DHCP server with the bootfile
linux/pxelinux.cfg/elilo.efi
-
Activate in the opsi-configed the checkbox "Uefi-Boot" for uefi-clients (since version 4.0.5.8.1) or set hostparameter
clientconfig.dhcpd.filename=linux/pxelinux.cfg/elilo.efi
Recent PCs, tablets and server often are equpped with an UEFI BIOS. Often there is a legacy mode available to support the old features including PXE boot. But more and more devices come with an UEFI only BIOS (especially tablets). So they cannot be managed with the previous opsi environment.
To integrate these devices into opsi and to be able to use the advantages of UEFI, the uib gmbh developed the opsi extension for UEFI support.
UEFI is the abbreviation of Unified Extensible Firmware Interface and is the follow-up to the classic PC-BIOS (MBR-BIOS).
For detailled information on UEFI there are some links listed below.
UEFI has much more features than the old BIOS. Basically UEFI is a small operating system by itself. But in this place, we just consider some features, that are of special interes to the system administrator:
-
The recent (by January 2014) implementations of UEFI by the hardware manufacturers have not developed any clear standards yet. As soon as the system is to be booted from any other device but the hard disc, you face the utter chaos. Often UEFI and classic BIOS are implemented both, sometimes they can be deactivated individually, or sometimes not. UEFI can be implemented with the Compatibility Support Module (CSM), or without. Netboot might work, or might not.
Especially the availability of netboot is essential for structurd client management. -
With the classic PC-BIOS the BIOS and its configuration usually are separated from the operating system. So BIOS configurations like the boot sequence cannot be changed by the operating system.
This is different with UEFI. The operating system can change the boot sequence (and usually it does). This has consequences for a client management that relies on netboot. - The UEFI Bios comes with its own boot manager, which not only can be used by the operating systems to change the boot sequence, but also contains the start entries for the operating systems themselves. This is to support the parallel installation of different operating systems, so that there is no conflict with the different boot loaders.
- The UEFI BIOS can be implemented for 32 or 64 bit, which also presets a 32 or 64 bit operating system. So there cannot be installed a 32 bit OS on a 64 bit UEFI system.
- Secureboot (not supported yet by opsi)
partitioning with GPT and additional partitions for the bootloader:
- 1. partition: EFI system partition (ESP) 100 - 260 MByte ; VFAT
- 2. partition: Microsoft reserved (MSR) 32 - 128 MB; NTFS
- following the actual OS partitions
Links :
http://de.wikipedia.org/wiki/Unified_Extensible_Firmware_Interface
GPT (GUID Partition Table) id the follow-up for the previous MBR partition tables. GPT is part of the UEFI specification.
- The main features for the sysadmin are
- overriding the 2 Terabyte limit (now it is 8 Zebibyte)
- almost unlimited number of primary partitions
- changed partition types / GUIDs
- new: partition GUIDs
- new: partition attributes (hidden, read only, …)
- different tools: gdisk
Basically GPT can be used without UEFI. But UEFI depends on GPT. With UEFI there are up to two additional partitions:
- the EFI system partition (ESP) with the bootloaders
- Microsoft reserved (MSR)
Links :
In contrary to the old BIOS the boot sequence not only can be defined for devices, but also can be set for different bootloaders on the EFI system partition. Furthermore the sequence can be changed by a running operating system. So if you set netboot as the first boot priority, this setting will not survive the first OS installation.
Unfortunately early UEFI implementations do not support netboot at all, but netboot support is increasing.
Meanwhile there are a lot of UEFI bootloader (like grub2 or elilo), but mostly without netboot support.
With the UEFI support extension module uib gmbh has developed a succesfull UEFI netboot support for integrating UEFI clients into opsi. Because the UEFI standard is still under development and changing, in future the opsi UEFI module will continue to adapt to the technical changes, which might require structural redesigns of the module.
The opsi support for UEFI is based on several components:
- adaption of the netboot UEFI bootloader ELILO to the opsi / client-management requirements.
- new opsipxeconfd, which also supports config files for the opsi-ELILO (in addition to the PXE config).
- new (64 bit) opsi-linux-bootimage with the tools for UEFI- and GPT management
- redesigned netboot products for OS installation (Windows/Linux) with additional support of UEFI/GPT (of course only for OS that support UEFI).
- client setting on the opsi-server whether to be treated as UEFI client or not. (clientconfig.dhcpd.filename=linux/pxelinux.cfg/elilo.efi)
-
support of a software triggered switch to UEFI netboot.
The label of the UEFI netboot entry of the Bios can be saved on the opsi-server (clientconfig.uefinetbootlabel), as far as the BIOS supports it (so there is an activatable netboot entry in the Bios). This allows opsi-product to enbale netboot selective for the next reboot. This technique is implemented in several opsi products. An important example is the productopsi-uefi-netboot:
This product tries to configure the Bios for netboot and then triggers a reboot. If there is nouefinetbootlabelor it is a non UEFI client, just a reboot is triggered.
This product is available for Windows and for Linux.
Configuration example of a Linux isc-dhcp-server:
filename "linux/pxelinux.0";

# this is the UEFI detection:
if substring (option vendor-class-identifier , 19,1 ) = "0" {
        log (info, "pxe client");
        filename "linux/pxelinux.0";
}
else if substring (option vendor-class-identifier , 19,1 ) = "6" {
        log (info, "efi32 client");
        filename "linux/pxelinux.cfg/elilo32.efi";
}
else if substring (option vendor-class-identifier , 19,1 ) = "7" {
        log (info, "efi64 client");
        filename "linux/pxelinux.cfg/elilo.efi";
}
else {
        log (info, concat ( "Unhandled vendor class Arch: ", substring (option vendor-class-identifier , 19,1 )));
}
http://docs.fedoraproject.org/en-US/Fedora/17/html/Installation_Guide/s1-netboot-pxe-config.html
Whether an UEFI BIOS meets the requirements of a client management system like opsi depends on several criteria. These criteria do not estimate the qualitiy of the device, but only whether it can be managed by using netboot. This requires BIOS functions for UEFI netboot. Hier an example comparison:
Table 14. Example for UEFI BIOS differences
| Lenovo Twist | MS-Surface | Dell Venue 11 | |
|---|---|---|---|
UEFI pure | √ | √ | √ |
UEFI + CSM | √ | x | √ |
Legacy | √ | x | √ |
Both | √ | x | x |
UEFI Netboot | √ | √ | √ |
activatable entry | √ | x | √ |
netboot without interaction | √ | x | √ |
In this case activatable entry means, that for the next reboot a netboot can be activated by standard software. netboot without interaction means, that an activated netboot will be executed at the next reboot without any require4d interaction (like pressing any key combinations, F12 key, …). If these preconditions are met, special opsi products can trigger a netboot. This feature is very important for automated processing. A product using this feature is for instance the localboot product for Windows and Linux opsi-uefi-netboot.
The following sub chapters provide some information for scripted or manual handling of UEFI / GPT. For understanding how opsi works with UEFI/GPT, knowing these details is not required.
UEFI Bootloader entries can be managed on Linux with the program efibootmgr.
List of boot entries:
efibootmgr -v
BootCurrent: 000D
Timeout: 0 seconds
BootOrder: 0012,0011,000D,0010,000B,0009,0007,0008,000A,000C
Boot0000  Setup
Boot0001  Boot Menu
(..)
Boot0007* USB CD        030a2400d23878bc820f604d8316c068ee79d25b86701296aa5a7848b66cd49dd3ba6a55
Boot0008* USB FDD       030a2400d23878bc820f604d8316c068ee79d25b6ff015a28830b543a8b8641009461e49
Boot0009* ATA HDD0      030a2500d23878bc820f604d8316c068ee79d25b91af625956449f41a7b91f4f892ab0f600
Boot000D* PCI LAN       030a2400d23878bc820f604d8316c068ee79d25b78a84aaf2b2afc4ea79cf5cc8f3d3803
Boot0010* ubuntu        HD(1,800,31801,faffb7b9-bdf9-4767-b475-0b8aee68d3ac)File(\EFI\ubuntu\grubx64.efi)
Boot0011* opsitempwinpe HD(4,3c72800,7cf801,dc1cea68-a296-4fb8-a97a-263227ed86f4)File(\EFI\boot\bootx64.efi)
Boot0012* Windows Boot Manager  HD(1,800,31801,5e4ffde2-3e25-42dd-b0f7-fcb7ee5d2b20)File(\EFI\Microsoft\Boot\bootmgfw.efi)WINDOWS.........x...B.C.D.O.B.J.E.C.T.=.{.9.d.e.a.8.6.2.c.-.5.c.d.d.-.4.e.7.0.-.a.c.c.1.-.f.3.2.b.3.4.4.d.4.7.9.5.}...a................
On Windows UEFI boot loader entries can be managed with the program bcdedit.
List of boot entries:
bcdedit /enum firmware

Start-Manager für Firmware
- - - - - - - - - - - - - - -
Bezeichner              {fwbootmgr}
displayorder            {bootmgr}
                        {99a9f9be-9a98-11e3-b22f-806e6f6e6963}
                        {11a8b97e-99df-11e3-ae5c-b888e3e3cbb4}
                        {11a8b986-99df-11e3-ae5c-b888e3e3cbb4}
Windows-Start-Manager
- - - - - - - - - - - - - - -
Bezeichner              {bootmgr}
device                  partition=\Device\HarddiskVolume1
path                    \EFI\Microsoft\Boot\bootmgfw.efi
Firmwareanwendung (101fffff)
- - - - - - - - - - - - - - -
Bezeichner              {11a8b971-99df-11e3-ae5c-b888e3e3cbb4}
description             Setup
Firmwareanwendung (101fffff)
- - - - - - - - - - - - - - -
Bezeichner              {11a8b972-99df-11e3-ae5c-b888e3e3cbb4}
description             Boot Menu
(...)
Firmwareanwendung (101fffff)
- - - - - - - - - - - - - - -
Bezeichner              {11a8b978-99df-11e3-ae5c-b888e3e3cbb4}
description             USB CD
Firmwareanwendung (101fffff)
- - - - - - - - - - - - - - -
Bezeichner              {11a8b979-99df-11e3-ae5c-b888e3e3cbb4}
description             USB FDD
Firmwareanwendung (101fffff)
- - - - - - - - - - - - - - -
Bezeichner              {11a8b97a-99df-11e3-ae5c-b888e3e3cbb4}
description             ATA HDD0
Firmwareanwendung (101fffff)
- - - - - - - - - - - - - - -
Bezeichner              {11a8b97e-99df-11e3-ae5c-b888e3e3cbb4}
description             PCI LAN
Firmwareanwendung (101fffff)
- - - - - - - - - - - - - - -
Bezeichner              {99a9f9be-9a98-11e3-b22f-806e6f6e6963}
device                  partition=X:
path                    \EFI\boot\bootx64.efi
description             opsitempwinpe
Mit beiden Programmen lassen sich Einträge erstellen, löschen, der nextboot setzen und die Reihenfolge manipulieren.
Beispiel: Eintrag für den nächsten Boot setzen:
Linux
efibootmgr /bootnext <hexId>
Windows
bcdedit /set {fwbootmgr} bootsequence <GUID>GPT partitions know some new partition types. These are derived from the standard types. So the partition type for NTFS 07 becomes GPT 0700. The Linux partition types 82 and 83 become 8200 and 8300.
The list of known partition types can be shown:
# sgdisk -L
0700 Microsoft basic data  0c01 Microsoft reserved    2700 Windows RE
4100 PowerPC PReP boot     4200 Windows LDM data      4201 Windows LDM metadata
7501 IBM GPFS              7f00 ChromeOS kernel       7f01 ChromeOS root
7f02 ChromeOS reserved     8200 Linux swap            8300 Linux filesystem
8301 Linux reserved        8302 Linux /home           8400 Intel Rapid Start
8e00 Linux LVM             a500 FreeBSD disklabel     a501 FreeBSD boot
a502 FreeBSD swap          a503 FreeBSD UFS           a504 FreeBSD ZFS
a505 FreeBSD Vinum/RAID    a580 Midnight BSD data     a581 Midnight BSD boot
a582 Midnight BSD swap     a583 Midnight BSD UFS      a584 Midnight BSD ZFS
a585 Midnight BSD Vinum    a800 Apple UFS             a901 NetBSD swap
a902 NetBSD FFS            a903 NetBSD LFS            a904 NetBSD concatenated
a905 NetBSD encrypted      a906 NetBSD RAID           ab00 Apple boot
af00 Apple HFS/HFS+        af01 Apple RAID            af02 Apple RAID offline
af03 Apple label           af04 AppleTV recovery      af05 Apple Core Storage
be00 Solaris boot          bf00 Solaris root          bf01 Solaris /usr & Mac Z
bf02 Solaris swap          bf03 Solaris backup        bf04 Solaris /var
bf05 Solaris /home         bf06 Solaris alternate se  bf07 Solaris Reserved 1
bf08 Solaris Reserved 2    bf09 Solaris Reserved 3    bf0a Solaris Reserved 4
bf0b Solaris Reserved 5    c001 HP-UX data            c002 HP-UX service
ea00 Freedesktop $BOOT     eb00 Haiku BFS             ed00 Sony system partitio
ef00 EFI System            ef01 MBR partition scheme  ef02 BIOS boot partition
fb00 VMWare VMFS           fb01 VMWare reserved       fc00 VMWare kcore crash p
fd00 Linux RAID
Actually the partition types shown in this list are just short forms for the actual GUIDs that are used. The partition schema is named after that.
So:
0700 stands for Microsoft basic data and for the GUID EBD0A0A2-B9E5-4433-87C0-68B6B72699C7
A list of GUIDs can be found at Wikipedia:
https://de.wikipedia.org/wiki/GUID_Partition_Table#Partitionstyp-GUIDs
https://en.wikipedia.org/wiki/GUID_Partition_Table#Partition_type_GUIDs
Furtheron the tool gdisk (and sgdisk, …) has an internal substitution table for unknown partition types. For the old partion type for vfat32 0b there is no corresponding 0b00. By passing the type 0b00 to sgdisk, it will be translated to 0700 without any message. Perhaps because of the consideration: vfat32 - this must be some Microsoft data partition …
GPT partitionen can have attributes.
List of the currently known attributes
Value | Description | Attribute value (sgdisk --info / diskpart gpt attribute) |
nix | nix | 0000000000000000 |
0 | system partition | 0000000000000001 |
1 | partition hidden from EFI | 0000000000000002 |
2 | legacy boot flag (legacy BIOS bootable) | 0000000000000004 |
60 | read-only | 1000000000000000 |
62 | hidden | 4000000000000000 |
63 | do not automount | 8000000000000000 |
On Linux the attributes can be set with sgdisk by the option -A, --attributes and using the short form. On Windows they can be set with diskpart by the command gpt attributes and using the long form.
Examples:
select disk 0
select partition 1
gpt attributes=0x0000000000000000
sgdisk -t 1:0700 --attributes 1:clear:63 --attributes 1:set:62 -p /dev/sda
show the partition table with -p , --print:
sgdisk -p /dev/sda
show detailled infos for a partition (1) with --info=:
sgdisk --info=1 /dev/sda
This module currently is a
cofunding project.
Some preconditions have to be met to use this module. So it requires a special modules file to unlock this feature. This module file can be obtained by buying the extension module. For evaluation we also provide a temporary modules file without charge ( → mail to info@uib.de).
Important
The sale of this extension is restricted. Please ask for an offer.
As a technical precondition opsi 4.0.3 is required with the packet versions:
Opsi is a good point to start the the automated installation and maintenance of Windows clients - especially when there is heterogenous hardware to be managed. But the opsi standard installation technique based on installation packets is not fast enough to restore class room workstations in short time, like during the break between two classes. So this module is introducing a new concept, by saving the result of the package based installation as an image on a second partition. From this partition the recovery can performed in short time.
- Initial installation with mit concluding local image backup
- Fast recovery based on different techniques
- System maintenance with concluding local image backup
- Integration of Linux clients into the Backup/Restore procedure.
The requirements of computer networks for education / trainings / class rooms differ from those of other networks. An important requirement, which will be discussed in the following, is the fast recovery of workstations to regain a clean and well known installation status, which has been spoiled by temporary use. This is required for workstations in class rooms, but also for computer pools at universities or any networks for commercial trainings.
The restore must be completed within reliable short time (like the 15 minutes break between two classes) and should also be able to switch the workstations to a differnet base installation (like Win XP / Win 7 / Linux). Also the continuous system maintenance by installing security updates must be included.
opsi is a client management system, that features the packet based installation and maintenance of Windows systems. Its advantage, compared to image based concepts, is especially the handling of heterogenous hardware. The average installation time of two hours is not fast enough to meet the requirements stated above. Image based solutions can be much faster, but also might run into network problems when trying to restore the workstations for a whole class room at once. This problem can be solved by local buffered images. This concept is used for instance by the Linux based system LinBo (Source http://linbo.sourceforge.net/). But even with local buffered images the time limit of 15 minutes might be exceeded because on the hardware in use (like hard disc performance).
Another possible solution would be to lock the system state and redirect all write access to an external container, that can be discarded at system reset. For Linux this approach is used e.g. with FUSE file systems. For windows there exist some commercial products, that can be controlled from the command line and thereby could be used from opsi. But as far as we know, there are no Open Source products available for Windows. So this approach is not available for Open Source solutions.
The resulting solution, that is introduced here, is trying to combine the advantages of the different approaches, to avoid the disadvantages and to provide some scalability to support differing hardware performances. The main features of this combined concept are:
- Initial Windows installation per PXE boot, packet based with individual driver integration by using the opsi-Linux-Bootimage
- Storing the result of the initial installation as a backup image on another partition on the local disc by using the opsi-Linux-Bootimage
- Fast recovery of the installation by using the opsi-Linux-Bootimage
- Maintenance of the local installation (security updates) by using the opsi system and storing the updated system to the local backup-image by using the opsi-Linux-Bootimage
The workstation is being used with a static partition table of three or four partitions.:
-
Partition 1 (System)
holds the currently installed operating system (Windows / Linux).
The size of this patition is set during partitioning by the productopsi-local-image-prepareaccording to the particular property state. -
Optional: Partition 2 (sysdata)
These are user data that are to sustain during the restore. The format is NTFS.
The size of this patition is set during partitioning by the productopsi-local-image-prepareaccording to the particular property state. -
Partition 3 (winpe / swap)
The size of this partition is static and set to 4GB.
With Windows XP this partition is not used.
With NT6 (Windows 7) this partition is used during installation for the winpe (which is required for installation) and will not be visible during the operating state of the workstation.
With Linux this partition is used as swap. -
Partition 4 (backup)
This partition is for holding the backup images and their meta data.
The size of this partition is whatever is left by the other partitions.
The netboot products for the operating system installation use the first two or three partitions (XP the first one only) and do not touch the last partiton. So the backup images on partiton four are still available after installating a new operating system.
The packet opsi-local-image consists of several components:
The netboot products
-
opsi-local-image-prepare -
opsi-local-image-winxp -
opsi-local-image-win7 -
opsi-local-image-win7-x64 -
opsi-local-image-win8 -
opsi-local-image-win8-x64 -
opsi-local-image-win81 -
opsi-local-image-win81-x64 -
opsi-local-image-ubuntu -
opsi-local-image-backup -
opsi-local-image-restore -
opsi-local-image-delete -
opsi-local-image-capture
The local boot products:
-
opsi-local-image-backup-starter -
opsi-local-image-sysprep
and an extension of the opsi service methods.
-
opsi-local-image-prepare
To create the static partitioning of the hard disc for all other products.
The propertysystem_partition_sizedefines the size of partition 1 (Default = 30G)
The property data_partition_size defines the size of the partition 2. When set to 0G, no partition will be created for data (default = 0G).
The property start_os_installation selects a product for installing an operating system and to be started after the partitioning automatically.
When installing this product, the product properties imagefile and imagefiles_list of the product opsi-local-image-restore are deleted, for they have become invalid after the repartitioning.
Important
Use this product only for the initial preparation of the disc for it deletes all existing images.
The special netboot products for installing Windows are derived from the opsi standard products for windows installation. Therefore the structure and the driver integration are the same as with the standard. For details please refer to the opsi-getting-started manual.
-
opsi-local-image-winxp
Installation of Windows XP. Uses the first partition only. Administrator password is empty. -
opsi-local-image-win7
Installation of Windows7 32 Bit. Administrator password =nt123. -
opsi-local-image-win7-x64
Installation of Windows 7 64 Bit. Administrator password =nt123. -
opsi-local-image-win8
Installation of Windows 8 32 Bit. Administrator password =nt123. -
opsi-local-image-win8-x64
Installation von Windows 8 64 Bit. Administrator password =nt123. -
opsi-local-image-win81
Installation von Windows 8.1 32 Bit. Administrator password =nt123. -
opsi-local-image-win81-x64
Installation von Windows 8.1 64 Bit. Administrator password =nt123.
The following products have special properties for opsi-local-image:
-
backup_after_install with default value true. In this case this means, that after the OS installation at first the application software is being installed and then an image backup of the installation is generated. Furthermore the value of
imageFileof the productopsi-local-image-restorewill be deleted. So the generated backup will be named like the current netboot product (e.g.opsi-local-image-win7). -
setup_after_install
Here one or more products can be listed, that after the OS installation shall be set to setup. This includes the dependencies of these products.
opsi-local-image-ubuntu
Installation of Ubuntu Linux 12.04/14.04 32Bit/64Bit.
The installed system has 2 users:rootanduser. The password for root will be set according to the product propertyroot_password(default:linux123). For user the password will be set according touser_password(default:linux123). Details of the installation can be configured with some product properties. The main product properties are:-
askbeforeinst:
Has the start of the installation to be confirmed at the client? (default=true) -
architecture:
architecture selection, affects the selection of the bootimage and the installation architecture (default=64bit) -
additional_packages:
list of additional packets to be installed, separated by blanks (default = '') -
language:
language / locale to be installed (default=de) -
console_keymap
keyboard layout to be installed (default=de-latin1-nodeadkeys) -
timezone:
timezone to be set (default=Europe/Berlin) -
online_repository
the online repository to get the install packets from. Default is http://de.archive.ubuntu.com/ubuntu -
proxy:
Proxystring (if required) with following syntax:http://<ip>:<port>(default = '') -
backup_after_install
(true/false) default = true. If true, after the installation an image backup will be generated. -
setup_after_install
Here one or more products can be listed, that are to be set to setup and so will be installed after the OS installation. This also includes the dependencies of these products. -
wget_and_execute:
Url (http) of a file to be fetched and executed at the end of the installation (default = '') -
release:
Ubuntu release to be installed (default="trusty") -
install_opsi-client-agent:
The Linux opsi-client-agent is to be installed if true (this is a co-funding project and requires activation by /etc/opsi/modules) (default=false)
-
opsi-local-image-backup
This product saves the OS which is installed on partition 1 as an image on partition 3. The image name will be set according to the propertyimageFile. If this is empty, the name of the opsi netboot product will be used, that currently is set to installed (e.g.opsi-local-image-winxp). This name also is set as the product property imagefile of the productopsi-local-image-restore, so that a following call ofopsi-local-image-restoreis going to restore this image. This name also will be added to the product property imagefiles_list of the productopsi-local-image-restore. So this property holds the list of all available images. Furthermore (for Windows products) the current opsi product settings will be saved together with the image, so they also can be restored.
The backup tool in use is partclone.
Properties:-
imagefile
name of the image file to be generated (default = empty = automated name setting). The name may include spaces, but no umlauts (like ä, ö, ü). (In case of spaces they will internally be treated as underscore. So my image = my_image.
-
opsi-local-image-restore
This product restores the image defined by the product property imagefile to partition 1 and makes it bootable. Furthermore (for Windows products) the product settings connected with this image will be restored.
Properties:-
imagefile
Name of the image to be restored. The value of this property has been set automatically by the last backup. The list of available images is to be found in the propertyimagefiles_list. -
imagefiles_list
List of all available images. This list is managed automatically by the backup product. -
method
method to be used to restore images. Available methods arepartclone-image-restoreandrsync-partclone-image. The default is set torsync-partclone-image. The methodrsync-partclone-imagerequires that the operating system that had been backuped is residing on partition 1. So this method can be used for restoring minor changes of the currently installed operating system, but it cannot switch between several operating systems. The methodpartclone-image-restoregenerates a full image backup. The methodrsync-partclone-imagecurrently (10.7.2013) is available for Windows (NTFS file system). If the method is set torsync-partclone-imagefor a Linux image or for an image that has been generated from another Windows version as the one which is currently installed on the productive partition, it will automatically use the methodpartclone-image-restore.
If the restore with the methodrsync-partclone-imagefails, the restore will continue automatically by using the methodpartclone-image-restore.
The methodrsync-partclone-imageis advantageous in case of minor changes on slow (IDE) discs. With state of the art (SATA) discs we generally recommend usingpartclone-image-restore. -
update_and_backup
(true/false) default = false. If set to true, after the restore all localboot products, that have a different version on the server, will be set tosetupand the productopsi-local-image-backup-starterwill be set toonce. This results in installing all available updates of the products and then automatically generating a backup. -
setup_after_restore
can be set to one or multiple opsi products, that after the restore are to be set to setup, so that after the reboot they will execute automatically. The default is set to the product windomain to add the restored client to the Windows domain again.
-
opsi-local-image-delete
This product deletes the image given by the product property imagefile from the backup partition
-
imagefile
Name of the image to be deleted (default = empty, results in an error when executing)
-
-
opsi-local-image-backup-starter
This localboot product sets the Netboot productopsi-local-image-backupto setup and reboots the client. This product has a very low priority of -98. This means, that all usual localboot products will be installed first. This feature can be used as follows:
For a client the following products are set tosetup:
-
The product
opsi-local-image-restore - all localboot products that are outdated
-
The product
opsi-local-image-backup-starter
This results in the following process order:
- restore of the image
- update of the restored operating system (all outdated products are updated)
- backup of the updated operating system
With this extension the clients of a training classroom can be listed as a opsi-client group. The following extensions have been implemented to provide comfortable collective action management for all clients of a classroom:
-
setProductActionRequestForHostGroup
Parameter:hostGroupId, productId, actionRequest
allows to start a defined action (like image restore) for all members of a group (e.g. clients of a training classroom). -
setProductPropertyForHostGroup
Parameter:productId propertyId propertyValue hostGroupId
allows to set a given product property (like which image is to be restored) for all members of a group (e.g. clients of a training classroom). -
getPossibleImagefileValuesForHostGroup
Parameter:groupId
gets the list of present imagefile names that have been generated byopsi-local-image-backupon all members of the group. If a special image (likeopsi-local-image-winxp) is not available on one or more of the clients, it will not be on the returned list.
These methods will be integrated into the opsi standard packets at a later date. Until then these extensions are available by executing the file 40_groupActions.conf, which is part of this release. Please copy it with root rights to /etc/opsi/backendManager/extend.d and execute:
opsi-setup --set-rights /etc/opsi.
The product opsi-local-image-prepare first generates the required static partitioning.
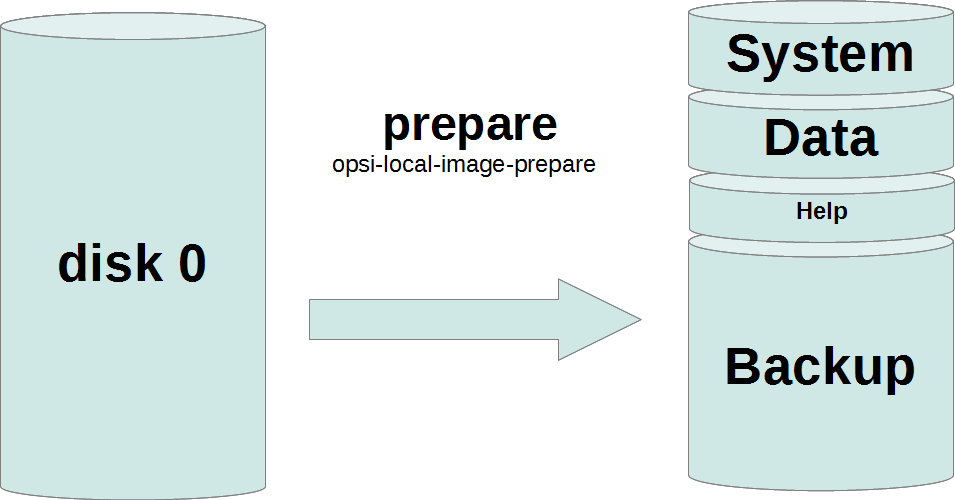
Then the products opsi-local-image-winxp, opsi-local-image-win7, opsi-local-image-win7-x64 and opsi-local-image-ubuntu can install several operating systems with different client configuration and different application software.
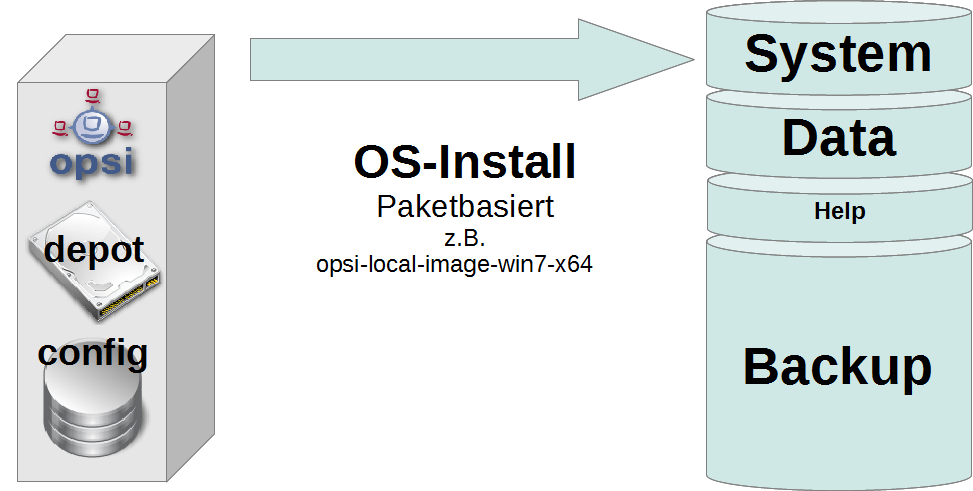
Per default after the installation they will be backuped as image.
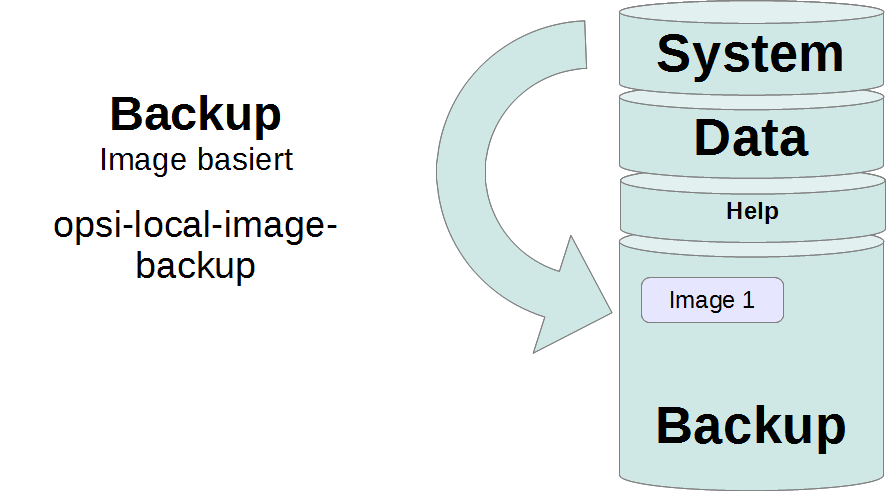
Executing the product opsi-local-image-restore per default restores the image that has been generated recently. In case a different image is to be restored, the name of the image has to be specified by the property imagefile.
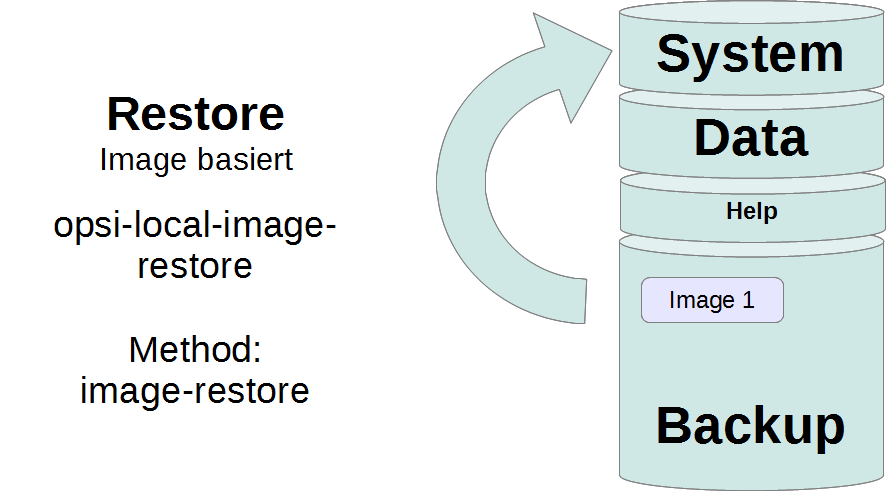
By executing the product opsi-local-image-restore with the property setting update_and_backup = true the given image will be restored, all application software will be updated (as updates are available on the server) and finally a backup is generated.
The backup partion is (with MBR BIOS without data partition) the third partition of disc one.
It contains:
-
The file
master.logwith information about all image operations performed. This logfile is transfered to the bootimage logs. -
The image files
The image directories have the same name as the image and hold the image and the meta files of the image.
To give an idea about file sizes, here as an example the sizes of different image files with OS and standard software (Libreoffice, Adobereader, firefox, thunderbird, javavm, flashplayer): -
opsi-local-image-ubuntu: 3.6G -
opsi-local-image-winxp: 6.4G -
opsi-local-image-win7: 9.4G -
opsi-local-image-win7-x64: 13G
Starting with NT6 (Vista) Microsoft has introduced the new image format Windows Imaging Format (WIM) for installation. A WIM image is not a disc or partition image anymore, but a file and meta archive. A WIM file can hold several images. The standard installation of a NT6 client is based on a setup.exe extracting an installation image from the file install.wim which is then to be configured and equipped with additional drivers.
From an existing client the Windows operating system including the installed software and configuration can be extracted and saved in form of a WIM. Then such a WIM can be the starting point for a new installation.
The packet opsi-local-image consists of several components:
The netboot products:
-
opsi-local-image-capture
The localboot products:
-
opsi-local-image-sysprep
-
opsi-client-agent>= Version 4.0.4.5-3
Generating the master client:
this will be generated with opsi-local-image as client and can get software and configuration per opsi as well as manually.
sysprep: depersonalisation of the master:
for that an image can be the starting point of an installation, at first it must be prepared. The client has to be depersonalised, so that the client has no identity anymore and so can be the template for new installations. But being depersonalised it can not be used as a working client anymore.
So with the product opsi-local-image-sysprep by special properties can be configured, whether there has to be created a backup before depersonalisation:
always_backup_before_sysprep (true/false) default=true: always make a backup before starting the sysprep.
abort_on_no_backup (true/false) default=true: check whether the backup partition has a backup for this product and abort if not. After the sysprep usually the actual capture will be started, which is performed by the netboot product opsi-local-image-capture. Whether it starts automatically is set by the property:
startcapture (true/false) default=true: set the product
opsi-local-image-capture to setup and reboot the client.
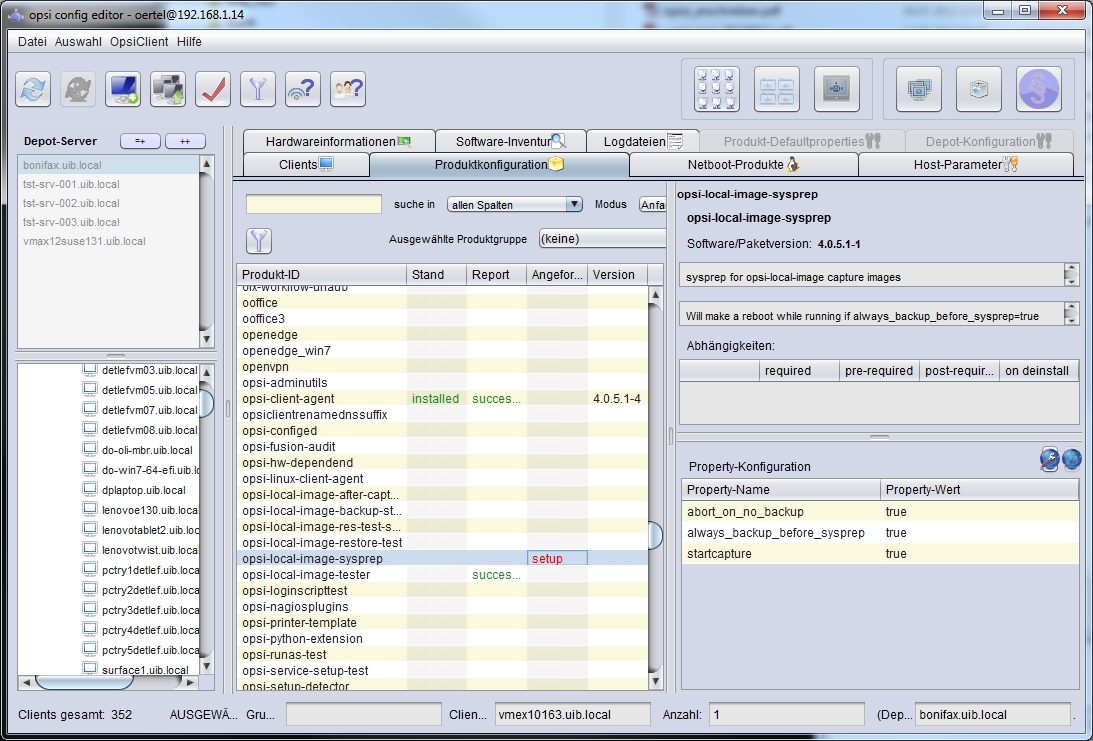
capture: read the existing installation and provide for installation:
within this multi-stage process the existing client will be readout and integrated as WIM into an existing opsi Windows installation product. So there is a product property to define, in which product the image readout is to be integrated:
target_product: name of target product (default = '')
Important
this property isn’t smart, so it does not check whether the image matches the specified target. So you could by mistake integrate a Win7-32Bit into a Win81-64Bit product without getting an error or warning message. So you must take care not to do so! We recommend using special capture target products (like opsi-local-image-win81-x64-capture).
The target product, like the standard product for Windows installation must be prepared. The target file within the target product is install.wim (installfiles/sources/install.wim), that also includes the images provided by Microsoft. Whether the image readout has to be appended to this file or a new install.wim has to be generated, is defined by the property:
capture_mode (append/always_create) default = append:
with append the new image will be appended to the existing install.wim.
Important
In case the install.wim contains an image with the same name it will be deleted without notice. With always_create a new install.wim will be created.
The install.wim file is a container that can hold several images. The images have a name and a description. The name and the description of the new created images is set by these properties:
imagename default = ''
image_description default = ''
The property start_after_capture is a list of products, which have to be set to setup after the capture. This could be for instance opsi-local-image-restore, which restores the client from the backup that had been generated before the sysprep.
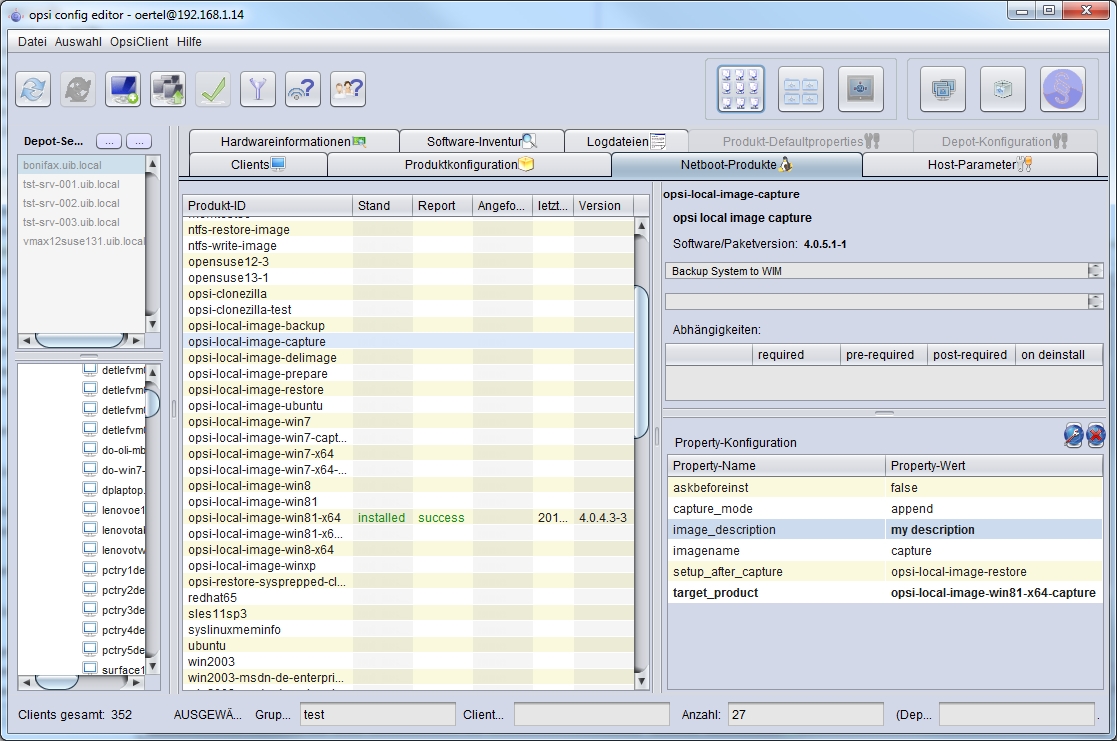
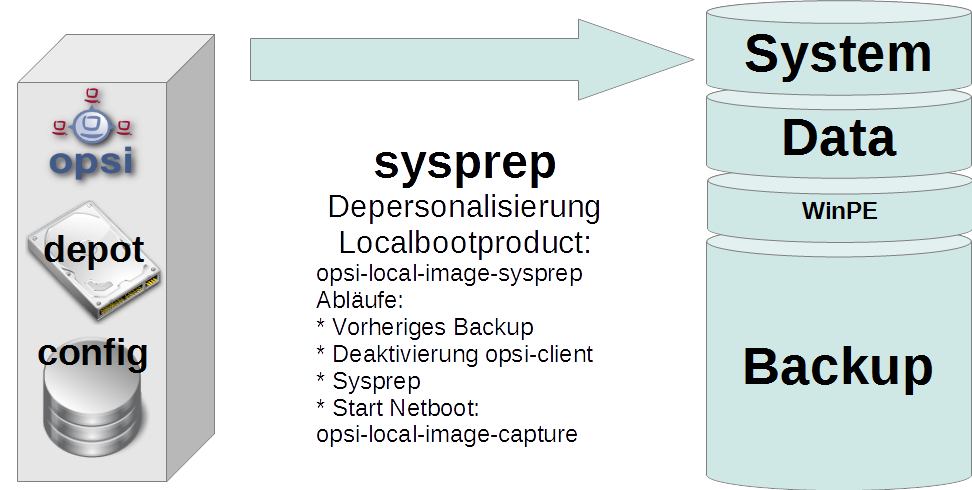

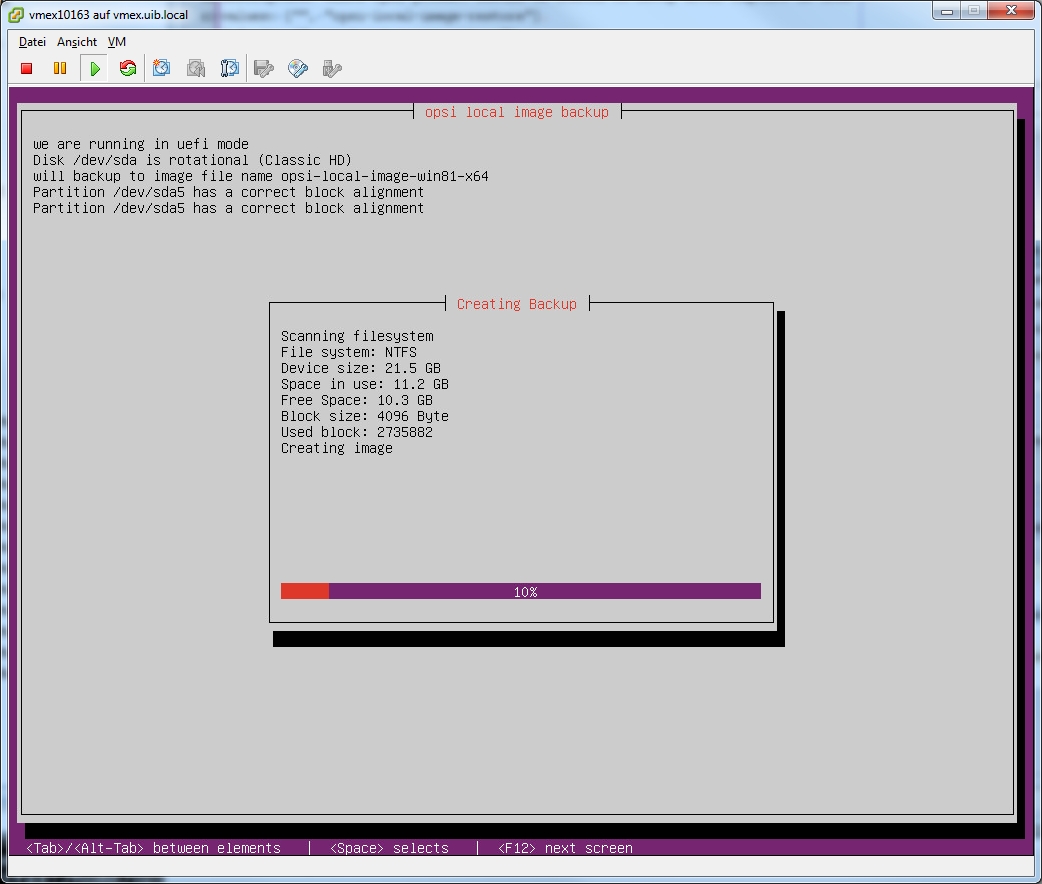
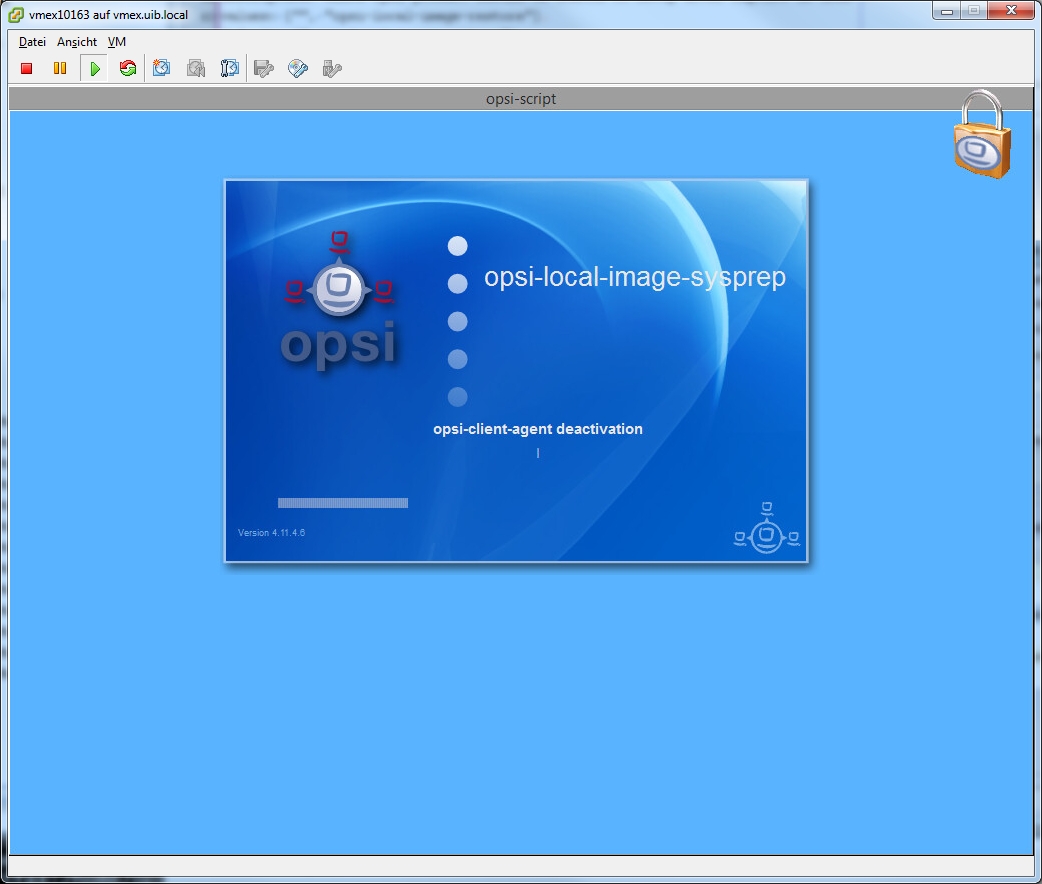
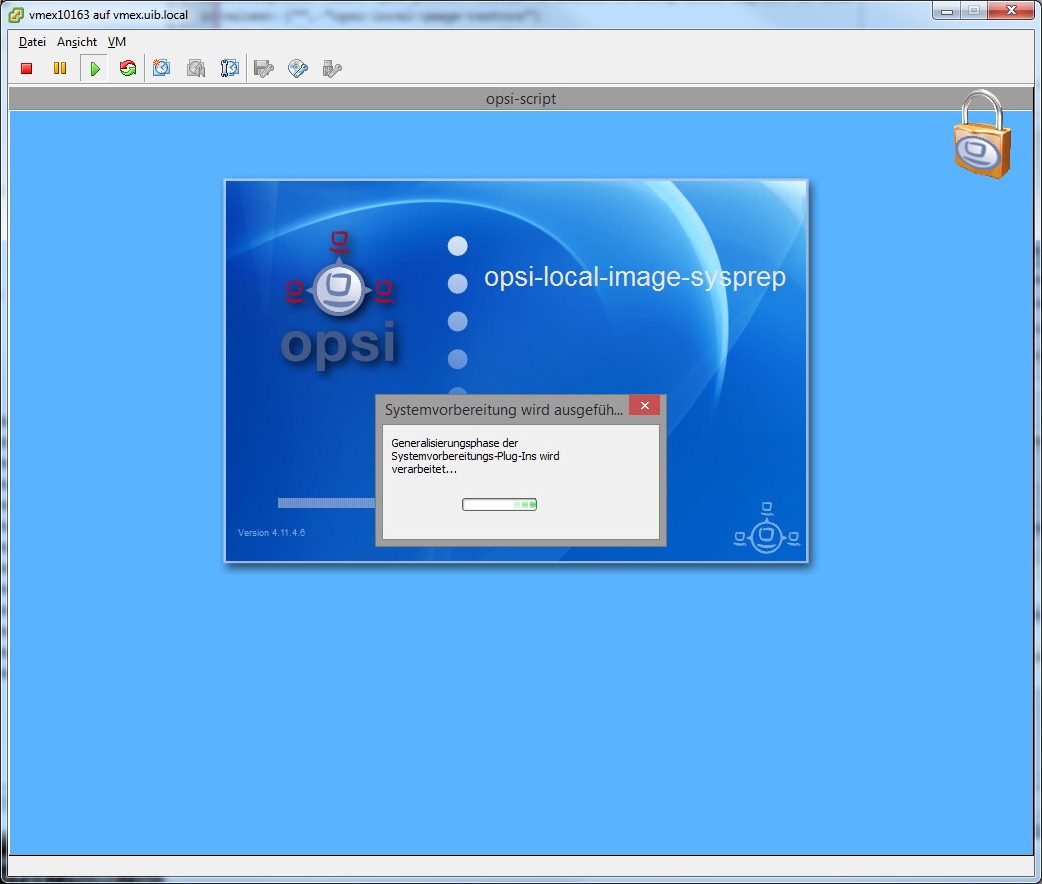
With the property startcapture the capture process can be started directly following the sysprep.
The capture process basically consists of two phases:
the actual capture process is performed by winpe on the disc. Therefore this must be prepared and this is phase one:
- Activating WinPE as bootable partition, generating the required boot records and, if necessary, deactivating the drive letter for other partitions.
- Reading the opsi meta data about installed products on the client and saving these date on the client in a temporary directory.
- Some cleanups on the readout system.
- Writing a command file, that initiates the capture process at the next start of WinPE.
-
Providing some more files for the processing of WinPE like the list of products from the property
start_after_capture - Rebooting the client
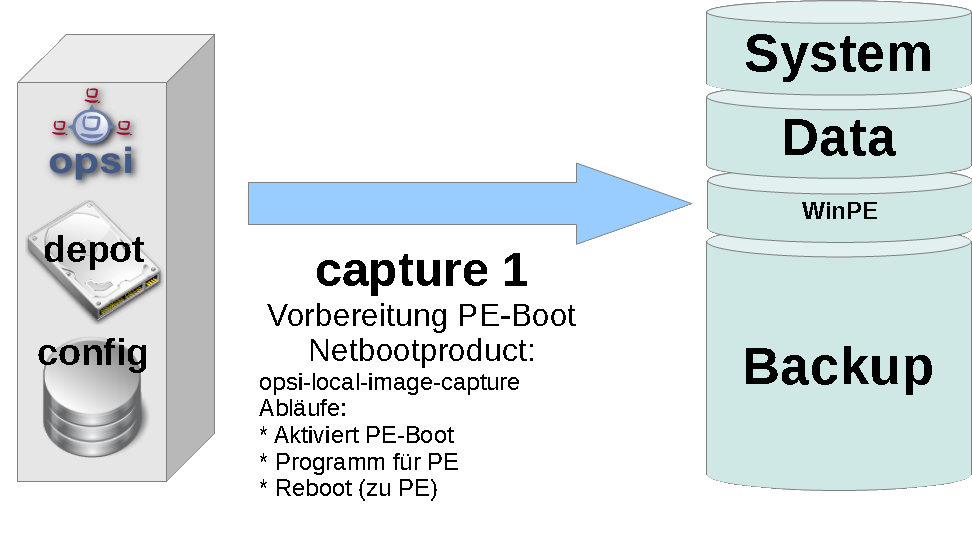
During the second phase WinPE starts and executes the actual capture process. In detail:
- mount the opsi_depot_rw share for writing.
- check the architecture of WinPE (32/64 bit) and start the opsi-script in the corresponding architecture.
- connect to the opsi-webservice
- reactivating the drive letters
-
in case of
appendmode: check whether an image with this name exists and in case deletge this existing image. - start the capture process. Doing so, depending on the Windows version of the WinPE, on Windows 7 the program imagex from the opsi-local-image-capture product will be used. On Windows 8 the programm dism from WinPE will be used (with fallback to imagex).
- The resulting logfiles will be merged.
-
check the list of images in the modified install.wim and set this list as the product property
Imagenamesof the target product, so that the new created image can be selected for installation. -
set the product
start_after_captureto setup. - deactivate the WinPE partition and activate the system partition (Windows). Including activating UEFI netboot if possible.
- write the logfile to the server. It will be attached to the logfile from the opsi-local-capture bootimage process.
- reboot
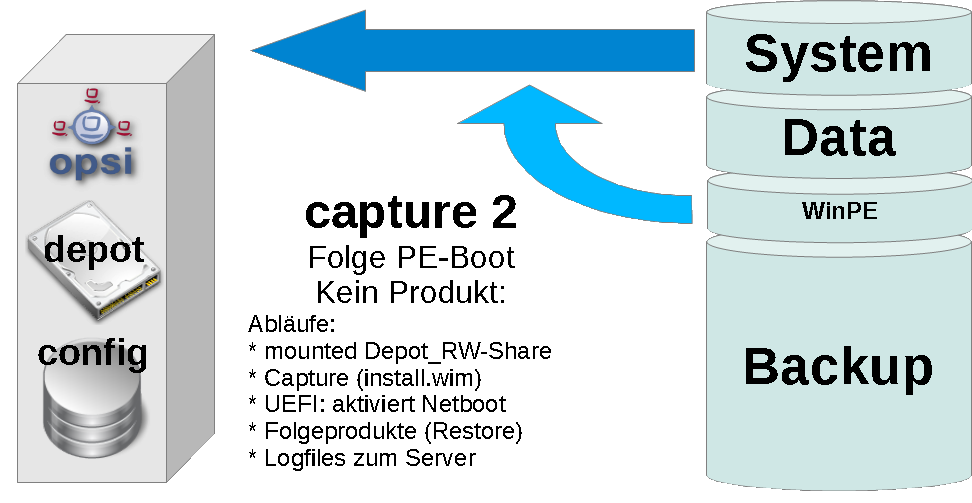
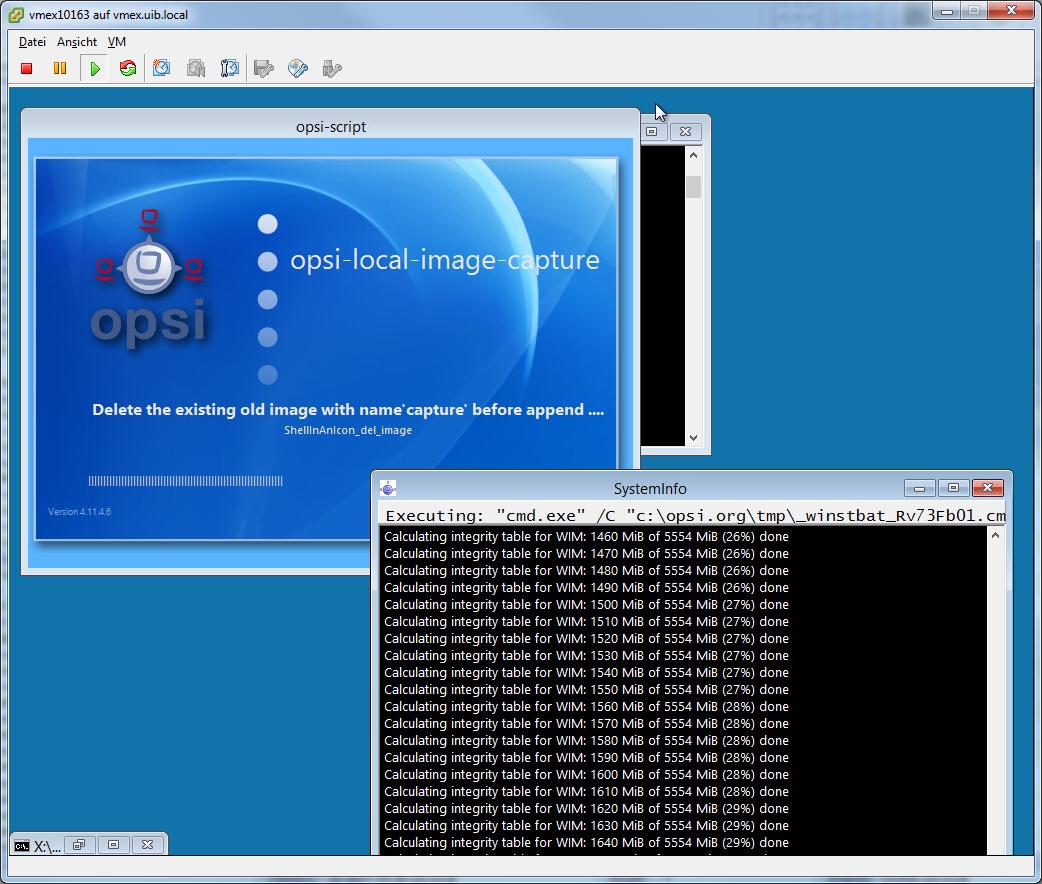
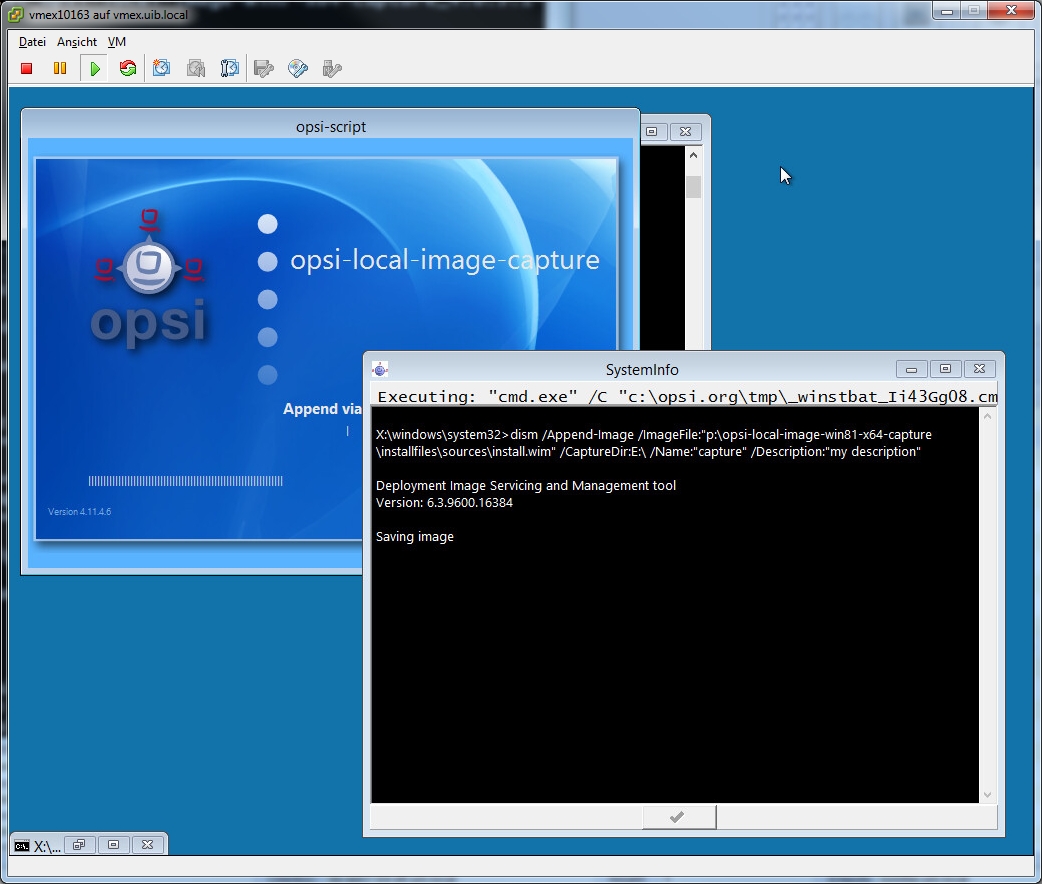
To rollout the generated image use the target product defined as target_product. Set the imagename to the name of the generated image and then the product can be installed like any other Windows installation. So all the standards like driver integration and installation of the opsi-client-agent are performed like with using the original Microsoft image.
One important aspect has to be taken into account: if on the client the image has been generated from, software had been installed per opsi, these installation files are restored when installing the opsi-client-agent. This results in the side effect, that, differing from the standard installation, not all the products that have been set to installed before the installation are set to setup. Because this standard feature would result in installing again all the products that have been integrated into the image. So in this case only those products will be installed, that have explicitely been set to setup before the OS installation.
For a helpful manual for creating an own Ubuntu proxy refer to:
http://wiki.ubuntuusers.de/Lokale_Paketquellen/Apt-Cacher-ng
http://www.gambaru.de/blog/2011/10/26/apt-cacher-ng-ein-proxy-server-fur-debian-und-ubuntu/
The opsi feature SilentInstall-provides for administrators the ability to install software on a client without the logged on user being disturbed. This chapter describes the characteristics of this feature and offers a guideline for configuring this new installation method.
For using this feature, opsi version 4.0.3. or above is required. Basically the opsi-client-agent version 4.0.3.1 or above is required.
The SilentInstall method offers the ability to install a pre-defined list of products on a client, without the user having to interrupt his work. Unlike the installation by the onDemand-Event (push Installation), the SilentInstall method does not display anything on the user desktop.
All displays are suppressed and are not to be seen on any desktop. Of course this feature bears some risk. In case of a problem, e.g. a syntax error of the opsi-winst script, there is no way to interact with the installation process, for no dialog windows are shown. So this would result in the opsi-winst and so the Event processing not coming to an end, and so no more events will be executed. To avoid this "Worst case scenario", the maximum installation time is limited by a timeout configuration. This timeout value might have to be adapted in case of an extended installation. For further information, see the configuration chapter.
Another very important ability of this feature is the predefined list of products to be installed silently. Contact to the service is established, but different from the usual procedure, the ActionRequests given by the service are ignored. The list of software to be installed is defined by an opsi-client-agent configuration. The "setup" action will be executed for all the products on this list and they do not have to be set to setup. As usual after processing the setup script, also the update script will be executed, if there is one. No product dependencies will be resolved. So either no products containing product dependencies should be installed by the SilentInstall feature, or all the products from the dependency list must be added to the SilentInstall product list. As usual the installation process is completed by sending the installation status and installation logfiles to the service.
In summary it is recommended to use the SilentInstall only for products, that meet the following requirements:
- small packets or installations only
- little system load: some software installations, so for instance most of the MSI installations, request during installation most of the clients ressources. This could result in a poor system performance remaining for the user.
- installable within a fixed amount of time: the default timeout for this event is set to 300 seconds. If the installation process has not completed within the timeout, the 'opsi-winst’process will be terminated and so the event can be completed.
- no reboots required: software requesting a reboot should not be installed from the SilentInstall. With the default configuration the event is configured not to process any reboot requests. Without this safety configuration the opsi-client-agent could reboot the client without any warning to the user. This could result in loss of data if there is a logged on user. This could result in in an inoperable software installed by SilentInstall without reboot.
Within the default configuration swaudit and hwaudit are installed by this method. The inventory products of opsi meet all the requirements above and so are applicable for this method. With the default configuration the opsi hard- and software inventory are generated on demand, without the need to set the setup action request with the opsi-configed. With this method the inventory information can be generated in real-time operation. Also applicable would be any configuration products, that perform automatic repairs or restore client patches.
This event will not be triggered automatically like other events. So there are two ways to perform this event.
The first way is to trigger the event from the opsi webservice, like e.g.:
opsi-admin -d method hostControl_fireEvent silent_install client.domain.local
So this command is scriptable and can be used within scripts that can be combined with an at-job to plan the execution of the event.
As an alternative the event can be triggered by a timer event after a certain amount of time. The default configuration for this event is 6 hours. This value presumes, that a work station usually is in use for 8 hours. So the event would be executed once a day after six hours of uptime. For mor information on configuring and activating this event see the following configuration chapter.
This chapter is about the default configuration of this feature. The default opsiclientd.conf has got a SilentInstall event. This listing just shows the important options:
Standard Event SilentInstall:
[event_silent_install]
process_shutdown_requests = false
action_processor_productIds = swaudit,hwaudit
action_processor_command = %action_processor.command% /productlist %action_processor_productIds% /silent
action_processor_desktop = winlogon
action_processor_timeout = 300
action_processor_productIds
- This option is an important new property for the event control. For all events that perform product actions, this option can define a list of products. The product list must be given as a comma separated list.
process_shutdown_request = false
- this configuration suppresses reboot requests from the opsi-winst.
action_processor_command
- this prepares the call of opsi-winst.
action_processor_desktop
- This option defines the desktop to display the opsi-winst GUI.
action_processor_timeout
- This option sets the timeout for terminating the opsi-winst-process.
The second event is the Timer Event, which triggers the event after a certain amount of time:
Default Timer Event for SilentInstall
[event_timer_silentinstall]
super = silent_install
type = timer
active = false
interval = 21600
super
- This option defines the event to inherit properties from. As the default configuration the Timer-Event inherits from the event silent_install.
type
- This option defines this event configuration to be a Timer-Event.
active
- as default this event is not active. To acivate it, set this option to true.
interval
- This option defines the intertval to fire the event. The default value is set to 6 hours, so after six hours of uptime the event is triggered the first time and then every other six hours. So this interval should (like any timer intervall) not be too short, otherwise the event would be peformed most of the time and thereby block the execution of other actions. On the other hand the interval also should not be too long, for the opsi-client-agent must be running all that time until the event is triggered. If the client or the opsi-client-agent always is restarted before the interval elapsed, this event never will be triggered.
Also the SilentInstall event could be triggered by another system event detected by an WMI request. Therefore a wql option can be specified. How to specify a wql option is to be seen in the event_net_connection section. If the wql option is used, the event should be set to active = false as default, so it can be activated later on when requested.
To trigger the event by a timer, usually it only needs to set a host parameter. Therefore at first a default configuration has to be created. In this case it is sufficient to activate the Timer Event.
To create the standard option the following host parameter are to be created by the opsi-admin. Also this configuration could be created by the opsi-configed:
opsi-admin -d method config_createBool opsiclientd.event_timer_silentinstall.active "event_timer_silentinstall active" false
So at first this event is disabled for all the clients. Then the event can be enabled for single clients:
opsi-admin -d method configState_create opsiclientd.event_timer_silentinstall.active silentclient.domain.de true
To define the products to be installed, the following entry must be set. If for instance instead of swaudit and hwaudit the product firefox shall be installed, the entries should be created as described above:
opsi-admin -d method config_createUnicode opsiclientd.event_silent_install.action_processor_productIds "event_silent_install productIds" "swaudit,hwaudit"
With this option as the default for all clients the product list for the Silent Install Event is set to swaudit and hwaudit. To change the product list for a single client into firefox execute the following command:
opsi-admin -d method configState_create opsiclientd.event_silent_install.action_processor_productIds client.domain.de "firefox"
As you can see, the product list can be different for each client.
The basic steps of software packaging and distribution are:
- analyzing the setup and creating the files on the opsi workbench
- packing the opsi package
- installing the opsi package on the opsi server
- installing the software on the clients (roll out)
The opsi setup detector is a tool for supporting the packaging of software to prepare for software rollouts. All the steps can be done from the graphical user interface: selecting and analyzing the setup, creating the files on the opsi workbench, packing and installing the package on the opsi server. For packing and installing, the opsi setup detector invokes the community projekt opsi Package Builder. When opening a setup file, the opsi setup detector checks whether it is a well known Installer type and then automatically detects the available parameters from the setup file. Over the time, by feed back from opsi users and increasing experience with different installer types and setup files, the setup detector will improve its ability to detect different setup types.
The opsi Setup Detector runs on Windows XP or above and is available on our download server as an installable opsi package: http://download.uib.de/opsi4.0/experimental/opsi-setup-detector
If also packets shall be packed and installed on the opsi server, the community projekt opsi Package Builder is required to be installed on the same Windows client. For further information about the opsi Package Builder see the Community Projects section of the opsi Forum: https://forum.opsi.org/viewforum.php?f=22
For creating the files and packets a writable Samba share to the opsi Workbench is required. Further on some software setups (especially for 64 bit software) require for analyzing and integration the matching Windows system. This means, that analyzing and integrating software for 64bit Windows7 might not run on a 32bit Windows XP Client. This must be considered in each individual case.
So this is the list of preconditions:
- Windows clients from Windows XP and above
- opsi package Builder installed and configured
- writable Samba share to the opsi Workbench
- opsi Setup Detector itself with all its helper files
The opsi Setup Detector is a Windows program developed with Lazarus. It requires some additional helper files to analyze special Setup types and some templates to generate the files for a new opsi packet from. The opsi Setup Detector is available as an opsi package, which includes all its helper files (but not the community project opsi Packet Builder). After installing the opsi Setup Detector, just the Share to the opsi Workbench has to be configured as Packet BaseDir and then a setup file to analyze can be opened with File - Open Setup File And Analyze.
When starting the opsi Setup Detector, the language of the Windows system is detected and, if for language xx a suitable language file languages\opsisetupdetector.xx.po is detected, it will be used. The opsi Setup Detector comes with German and English language files. Additional languages can be supported by generating a suitable language file.
The opsi Setup Detector package contains the following files:
- opsisetupdetector.exe - the opsi Setup Detector itself
- extractMSI.cmd - helper file for analyzing Setups with embedded MSI files
- MSIInfo.js - helper file to analyze MSI files
- innounp.exe - helper file to analyze Inno Setup files
- innounp.htm - help for the innounp.htm helper file
- favicon.ico - opsi Icon
- languages\ - directory for language specific files
- languages\opsisetupdetector.po - default language file (English)
- languages\opsisetupdetector.de.po - German language file
- languages\Help.en.html - English help file
- languages\Help.de.html - German help file
To create new opsi packages on the opsi workbench, several template files are required. These templates will be copied and patched according to the information from the opsi Setup Detector:
- files2opsi\OPSI\ - templates for the opsi packaging
- files2opsi\OPSI\control
- files2opsi\OPSI\postinst
- files2opsi\OPSI\preinst
- files2opsi\CLIENT_DATA\ - templates for the opsiscripts
- files2opsi\CLIENT_DATA\setup.opsiscript
- files2opsi\CLIENT_DATA\uninstall.opsiscript
- files2opsi\CLIENT_DATA\delsub.opsiscript
- files2opsi\CLIENT_DATA\check_advanced_exitcode.opsiscript
- files2opsi\CLIENT_DATA\check_inno_exitcode.opsiscript
- files2opsi\CLIENT_DATA\check_installshield_exitcode.opsiscript
- files2opsi\CLIENT_DATA\check_installshieldmsi_exitcode.opsiscript
- files2opsi\CLIENT_DATA\check_inno_exitcode.opsiscript
- files2opsi\CLIENT_DATA\check_msi_exitcode.opsiscript
The menu on the upper left contains the following options:
- File - (opens a sub menu, see below)
- Help - show help in an opsi Setup detector window. The help file %ProgramFilesDir%\opsiSetupDetector\languages\Help.de.html also can be displayed with a browser.
- About - Show program version
The menu option File opens a sub menu with:
- Open Setup File and Analyze - select the Setup to be analyzed. This option has the same effect as the Open Setup File button on the Analyze Tab down at the right side and opens a file selection dialog, which shows all file types. The file selection dialog on the other setup tabs only shows files with the extension .MSI(MSI Tab) or .EXE (on all the other Tabs).
- Create Logfile - The current content of the Analyze Tab will be written as logfile. The name of the created logfile is %TEMP%\opsitmp\opsiSetupDetector.log and will be shown when generating a logfile. The logfile will be generated when executing this command and only contains information, that is currently shown in the Analyze tab.
- Exit - quits the opsi Setup Detektor
When opening a setup file with Open Setup File and Analyze, it will be analyzed automatically and, if it is a well known Installer type, automatically switched to the suitable tab. If the installer type is not detected, the Analyze tab keeps the focus. Even when the installer type was detected, you can switch back to the Analyze tab any time to check the info details sampled by the analysis.
When analyzing a MSI file, the extension .MSI already indicates a MSI setup file. When analyzing an .EXE file the extension is not very specific and could be anything. So the EXE file is scanned for special markers to indicate the installer type. If the marker of a well known Installer type is found, the focus switches to the corresponding installer type tab. This might give some clue to what kind of installer it is. If the Setup type cannot be detected, the file will be scanned for a special set of words like (e.g. "Installer" or "Setup") and the corresponding lines will be written to the Analyze tab. This also might show some cryptic text passages and error codes, which are contained within the setup file like:
o@dejDs@s@t@t@du@u@<v@w@w@lx@Hy@x@x{@X|@|@@@@L@x@@Inno Setup Setup Data
The Setup has detected a serious error and quits
This just means, that these strings are found within the setup file and match the search pattern, so they are written to the Analyze Tab . In this case the search pattern is "Setup". In case of an unknown setup type this might give some clue about the installer type. All output on the Analyze Tab, which is preceded by:
Analyzing: F:\<setup.exe>
und closed by:
default grep finished.
derives from the automated analysis. If the setup type is detected, it is written below "default grep finished". In case of a well known installer type, the focus switches to the corresponding Tab.
According to the installer type some more information is to be found in the Analyze tab. This will be discussed in each of the installer chapters.
The content of the Analyze tab is cleared when starting a new analysis and so only contains information from the current setup analysis.
Before going into the different installer types, just a few general things about setup files with embedded MSI: at the moment the opsi Setup Detector automatically detects embedded MSI that are wrapped by by Advanced Installer and Installshield based EXE files. The opsi Setup Detector extracts and analyses the MSI and writes the detected information to the Advanced+MSI Tab or InstallShield+MSI Tab and additionally to the MSI Tab. An EXE file with embedded MSI can contain several different MSI packages, e.g. for different Windows platforms 32bit/64bit. Usually a setup like this detects the system to use the matching MSI. In this case, when analyzing a setup, only the MSI will be detected for the system where the opsi Setup Detector is running on. Such EXE files often have command line options to get more information about the package and install options. Also there might be several MST-files, which will be used in case of detectable conditions. To make a long story short: you never really know, what a setup might do under different conditions. So in most cases you just need the MSI code to patch the deinstallation script. So you just have to make sure, that you have captured all of the codes to be handled in the deinstallation script. For instance a MSI for 32bit and 64bit usually has got a different code. To get all of the codes, you can run the opsi Setup Detector on different platforms to grab the MSI codes. When the opsi Setup Detector detects an embedded MSI, it will be analyzed and the information is shown in the MSI tab. It is possible to create the opsi packet based on the MSI tab. But usually you would take the EXE file for the packet, for it is easier to adapt it to updates and also the EXE file might do some additional jobs.
During the analysis the MSI and other components of the EXE file will be extracted to the directory %TEMP%\opsitmp. Before doing so, the directory will be cleaned, so all files to be found there are from the current setup.
Some of the well known installer types have pretty good standards and are accessible for automated analysis. From a MSI packet or an Inno Setup based Setup a lot of useful information can be detected automatically, whereas other Installer types, like NSIS, don’t make any information accessible. So in many cases the automatic analysis gives good results, but in other cases it doesn’t work at all or requires to work it over. With increasing experience from user results the detection skill of the opsi Setup Detector will surely improve.
MSI packages are the most important and widespread Installer type, so the MSI tab is the first one to follow the *Analyze tab, and then the others in alphabetical order.
MSI files are the installer format of the Microsoft Windows Installer. Setups of type MSI can be detected by the file extension .MSI. The internal format of MSI packages is a well known standard, so the opsi Setup Detector can read several information from the packet to show on the Analyze tab and the MSI Tab, where the focus will switch to. When analysing a MSI, the detected information shown in the Analyze Tab looks like this:
Analyzing MSI: F:\Setups\MSI\7-zip\7-Zip.msi

Microsoft (R) Windows Script Host, Version 5.8
Copyright (C) Microsoft Corporation 1996-2001. All rights reserved.

MSI file: F:\uib\setupdetector\Setups\MSI\7-zip\7-Zip.msi
Manufacturer: Igor Pavlov
ProductName: 7-Zip 4.57
ProductVersion: 4.57.00.0
ProductCode: {23170F69-40C1-2701-0457-000001000000}
UpgradeCode: {23170F69-40C1-2701-0000-000004000000}
MSI file size is: 0,9 MB
Estimated required space is: 5,2 MB

get_MSI_info finished
The detected information is extracted from the MSI packet and automatically fills in the MSI tab form. It is used to patch the opsiscript installation/deinstallation scripts:
- MSI file: Name of the analysed MSI file
- opsi Product ID: this is the name of the new opsi packet to be created. It is derived from the product name below, by substituting spaces and other invalid characters with -. The suggested opsi Product ID can be changed.
- Product Name: this is the name of the software as detected from the MSI. This name can be changed, but most likely the detected name will fit.
- Product Version: the version of the software as detected from the MSI. Usually the detected value can be taken, but it should contain only numbers and points.
- MSI Product Code: the MSI product code as detected from the MSI. It will be used to patch the deinstall opsiscript. Caveat: a MSI product for 32bit and 64bit usually has a different product code.
- Required Space: this value is not read from the MSI packet, but is assumed as being six times the size of the MSI file. Before installting the software on the client, the setup.opsiscript checks, whether there is enough disc space.
- MSI File Size: the size of the MSI file.
- use MST File: if there is a MST file (Transform file) to be found in the same directory (where the MSI file is), its name will be filled in this edit field and will be checked to use for installation. By using the Select button on the right, another MST file can be selected. By removing the selection mark on the left, the MST file will not be used.
- Description: The product name is set to this edit space and can be supplemented with additional information to be shown in the product description of the opsi product.
- License required: When this selection mark is checked, the opsiscript will be patched with license=true to indicate that a license is required.
In case of analysing an EXE file with embedded MSI, the MSI file will be extracted automatically and the detected information will be shown in the MSI tab in addition to the corresponding tab (Advanced+MSI or InstallShied+MSI).
The Advanced Installer is a tool for creating MSI packets that also can be embedded in EXE setup files. When the opsi Setup Detector detects an EXE file as an MSI embedded with Advanced Installer, it extracts the MSI file from the EXE file and analyses the information. The result is shown in the Advanced+MSI tab and in addition in the MSI tab. For further information on the MSI tab see chapter the section called “Installer Type MSI”.
When extracting and analysing an embedded MSI from an Advanced Installer setup the Analyze tab will look like this:
xxxxxxxxxxxxxxxxxxxxxxxxx
Analyzing AdvancedMSI Setup:
F:\Setups\AdvancedMSI\Phase5\phase562install.exe
Analyzing MSI from Setup
F:\Setups\AdvancedMSI\Phase5\phase562install.exe
cmd.exe /C "F:\Setups\AdvancedMSI\Phase5\phase562install.exe" /extract:e:\Temp\opsitmp\
!! PLEASE WAIT !!
!! PLEASE WAIT !! Extracting and analyzing MSI ...
!! PLEASE WAIT !!
e:\Temp\opsitmp\*.msi
Analyzing MSI: e:\Temp\opsitmp\phase5.msi
The MSI will be extracted to the directory =%TEMP%\opsitmp= and then analysed. With the result the Advanced+MSI tab will be filled in:
- Setup file: Name of the analysed setup file
- opsi Product ID: this is the name of the new opsi packet to be created. It is derived from the product name below, by substituting spaces and other invalid characters with -. The suggested opsi Product ID can be changed.
- Product Name: this is the name of the software as detected from the MSI. This name can be changed, but most likely the detected name will fit.
- Product Version: the version of the software as detected from the MSI. Usually the detected value can be taken, but it should contain only numbers and points.
- MSI Product Code: the MSI product code as detected from the MSI. It will be used to patch the deinstall opsiscript. Caveat: a MSI product for 32bit and 64bit usually has a different product code and an Advanced Installer packet might contain different MSI files. In this case it depends on the system the analysis is running on, which MSI is extracted and analysed. Usually a 64bit MSI cannot be extracted on a 32bit system. So for packing a 64bit software, a 64 system should be used.
- Required Space: this value is not read from the MSI packet, but is assumed as being six times the size of the EXE file. Before installting the software on the client, the setup.opsiscript checks, whether there is enough disc space.
- Setup File Size: the size of the EXE file.
- Description: The product name is set to this edit space and can be supplemented with additional information to be shown in the product description of the opsi product.
- License required: When this selection mark is checked, the opsiscript will be patched with license=true to indicate that a license is required.
Signature Advanced+MSI: for detection of an Advanced+MSI setup, the EXE file is scanned for the marker:
name="microsoft.windows.advancedinstallersetup
Setups created with Inno Setup follow a pretty well known standard and contain a special file named install_script.iss, which can be extracted from the EXE file. The information from install_script.iss is filled into the edit fields of the Inno Setup tab and the focus switches to this tab. Going back to the Analyze Tab it looks like this:
............................................
Analyzing: F:\Setups\Inno\openssl\Win32OpenSSL_Light-1_0_0i.exe
stringsgrep started (verbose:false, skipzero:false)
found string "<description>Inno Setup</description>"
detected Inno Setup
stringsgrep completed (verbose:false, skipzero:false)
............................................
Analyzing Inno-Setup:
extract install_script.iss from F:\Setups\Inno\openssl\Win32OpenSSL_Light-1_0_0i.exe to
C:\ProgramData\opsi setup detector\INNO\Win32OpenSSL_Light-1_0_0i\install_script.iss
"E:\Program Files (x86)\opsiSetupDetector\innounp.exe" -x -a -y -d"C:\ProgramData\opsi setup detector\INNO\Win32OpenSSL_Light-1_0_0i" F:\Setups\Inno\openssl\Win32OpenSSL_Light-1_0_0i.exe install_script.iss
; Version detected: 5402
#66 install_script.iss
C:\ProgramData\opsi setup detector\INNO\Win32OpenSSL_Light-1_0_0i\install_script.iss
........
[Setup]
AppName=OpenSSL Light (32-bit)
AppVerName=OpenSSL 1.0.0i Light (32-bit)
AppPublisher=OpenSSL Win32 Installer Team
AppPublisherURL=http://www.openssl.org
AppSupportURL=http://www.slproweb.com
AppUpdatesURL=http://www.slproweb.com/products/Win32OpenSSL.html
DefaultDirName={sd}\OpenSSL-Win32
DefaultGroupName=OpenSSL
OutputBaseFilename=Win32OpenSSL_Light-1_0_0i
Compression=bzip2
........
Setup file size is: 1,9 MB
Estimated required space is: 11,1 MB
........
get_inno_info finished
Inno Setup detected
The information from install_script.iss is taken to fill in the edit fields of the Inno Setup tabs to patch the opsiscripts:
- Setup file: Name of the analysed setup file
- opsi Product ID: this is the name of the new opsi packet to be created. It is derived from the product name below, by substituting spaces and other invalid characters with -. The suggested opsi Product ID can be changed.
- Product Name: this is the name of the software as detected from install_script.iss. This name can be changed, but most likely the detected name will fit.
- Product Version: the version of the software as detected from install_script.iss. Usually the detected value can be taken, but it should contain only numbers and points.
- Install Directory: this is the name of the directory, where the software is supposed to be installed on the client. This is taken to patch the deinstall script. The installation dir is read from install_script.iss and usually can be taken as is. But sometimes this entry might contain some Inno Setup specific notations, which are usually enclosed in curly braces. Some of them the opsi Setup Detector will translate to opsiscript syntax, like There could be a number of other entries in curly brackets, which opsiscript does not understand. In this case manual translation to opsiscript syntax is required. The entry UninstallDisplayName from install_script.iss might give some clue to this. A list and description of Inno Setup constants can be found in the Inno Setup help, e.g. http://www.jrsoftware.org/ishelp/index.php
- Required Space: this value is not read from install_script.iss, but is assumed as being six times the size of the EXE file. Before installting the software on the client, the setup.opsiscript checks, whether there is enough disc space.
- Setup File Size: the size of the EXE file.
- Description: The product name is set to this edit space and can be supplemented with additional information to be shown in the product description of the opsi product.
- License required: When this selection mark is checked, the opsiscript will be patched with license=true to indicate that a license is required.
Signature Inno Setup: for detecting a setup as Inno Setup, the EXE file is scanned for the marker:
<description>inno setup</description>
EXE files created with Installshield are not accessible for automated analysis. It just can be detected, that it is a setup of type Installshield. So all the entries to be found in the InstallShield tab are derived from the name of the setup file. So if the filename is simply Setup.exe, the edit fields will be filled with Setup. In addition it depends on the Installshield version, what command line parameters are accepted by the setup and the deinstallation program. So integrating an Installshield setup is mainly manual work. The first test could be to check out available command line parameters of the setup, e.g. with setup -?. More and more Installshield packets contain embedded MSI files. So pure Installshield packets without MSI will become less important.
When analysing an Installshield setup, the Analyze tab looks like this:
.....................................
Analyzing: F:\uib\setupdetector\Setups\InstallShield\viclient\VMware-viclient.exe
stringsgrep started (verbose:false, skipzero:false)
found string "InstallShield"
detected InstallShield Setup
stringsgrep completed (verbose:false, skipzero:false)
.....................................
Analyzing InstallShield-Setup:
Setup file size is: 32,1 MB
Estimated required space is: 192,6 MB
........
get_InstallShield_info finished
InstallShield Setup detected
The edit fields of the InstallShield tab are:
- Setup file: Name of the analysed setup file
- opsi Product ID: this is the name of the new opsi packet to be created. It is derived from the product name below, by substituting spaces and other invalid characters with -. The suggested opsi Product ID can be changed.
- Product Name: this is the name of the software as detected from the setup filename. Most likely it has to be adapted.
- Product Version: the version of the software as detected from from the setup filename. It should contain only numbers and points and most likely has to be adapted .
- Install Directory: this is the name of the directory, where the software is supposed to be installed on the client. This is taken to patch the deinstall script and must be set manually
- Required Space: this value is assumed as being six times the size of the EXE file. Before installting the software on the client, the setup.opsiscript checks, whether there is enough disc space.
- Setup File Size: the size of the EXE file.
- Description: The product name is set to this edit space and can be supplemented with additional information to be shown in the product description of the opsi product.
- License required: When this selection mark is checked, the opsiscript will be patched with license=true to indicate that a license is required.
Signature InstallShield: for detecting an Installshield setup file, the EXE is scanned for the marker:
<description>InstallShield.Setup</description>
Finding the Installshield signature without detecting the marker for embedded MSI, the setup is assumed to be of type InstallShield. If also the marker for an embedded MSI is found, the setup is assumed to be of type InstallShield+MSI (see below).
Setups created with InstallShield often contain embedded MSI files. To extract the MSI file from the EXE file, a batch is invoked to start the setup and wait for a MSI file to be extracted. The batch will wait for about 10 seconds for a MSI file to appear and then kill the setup tasks. The extracted MSI will be analysed and the gathered information will be shown in the InstallShield+MSI tab and the MSI tab. It depends on the EXE file and the system conditions, whether it extracts an MSI file or not. Eventually it does not extract any MSI for the operating system is not suitable or because ther is a GUI question waiting to be answered. If the automated extraction fails, the MSI might be unpacked manually and analysed as MSI. These entries can be transfered to the InstallShield+MSI tab.
In case of a successful InstallShield+MSI analysis the Analyze tab looks like this:
.....................................
Analyzing: F:\Setups\Installshield-MSI\javavm\jre-6u22-windows-x64.exe
stringsgrep started (verbose:false, skipzero:false)
found strings "Installer,MSI,Database" and "InstallShield"
detected InstallShield+MSI Setup (InstallShield with embedded MSI)
found strings "Installer,MSI,Database" and "InstallShield"
detected InstallShield+MSI Setup (InstallShield with embedded MSI)
stringsgrep completed (verbose:false, skipzero:false)
.....................................
Analyzing InstallShield+MSI Setup: F:\Setups\Installshield-MSI\javavm\jre-6u22-windows-x64.exe
Analyzing MSI from InstallShield Setup F:\Setups\Installshield-MSI\javavm\jre-6u22-windows-x64.exe
cmd.exe /C E:\Program Files (x86)\opsiSetupDetector\extractMSI.cmd "F:Setups\Installshield-MSI\javavm\jre-6u22-windows-x64.exe"
!! PLEASE WAIT !!
!! PLEASE WAIT !! Extracting and analyzing MSI ...
!! PLEASE WAIT !!
e:\Temp\opsitmp\*.msi
Analyzing MSI: e:\Temp\opsitmp\phase5.msi
cmd.exe /C cscript.exe "E:\Program Files (x86)\opsiSetupDetector\msiinfo.js" "e:\Temp\opsitmp\phase5.msi"
........
Microsoft (R) Windows Script Host, Version 5.8
Copyright (C) Microsoft Corporation 1996-2001. Alle Rechte vorbehalten.

MSI file: e:\Temp\opsitmp\phase5.msi
Manufacturer: Systemberatung Schommer
ProductName: Phase 5 HTML-Editor
ProductVersion: 5.6.2.3
ProductCode: {20B1B020-DEAE-48D1-9960-D4C3185D758B}
UpgradeCode: {C63B6E47-6A28-44B6-A2C9-2BF084491FAD}
MSI file size is: 0,3 MB
Estimated required space is: 1,7 MB
........
get_MSI_info finished
Setup file size is: 15,4 MB
Estimated required space is: 92,7 MB
........
get_InstallShield_info finished
InstallShield+MSI Setup detected
If the automated extraction of the MSI succeeds, the detected valueswill be written to the InstallShield+MSI tab:
- Setup file: Name of the analysed setup file
- opsi Product ID: this is the name of the new opsi packet to be created. It is derived from the product name below, by substituting spaces and other invalid characters with -. The suggested opsi Product ID can be changed.
- Product Name: this is the name of the software as detected from the setup filename. Most likely it has to be adapted.
- Product Name: this is the name of the software as detected from the MSI. This name can be changed, but most likely the detected name will fit.
- Product Version: the version of the software as detected from the MSI. Usually the detected value can be taken, but it should contain only numbers and points.
- MSI Product Code: the MSI product code as detected from the MSI. It will be used to patch the deinstall opsiscript. Caveat: a MSI product for 32bit and 64bit usually has a different product code and an Advanced Installer packet might contain different MSI files. In this case it depends on the system the analysis is running on, which MSI is extracted and analysed. Usually a 64bit MSI cannot be extracted on a 32bit system. So for packing a 64bit software, a 64 system should be used.
- Required Space: this value is not read from the MSI packet, but is assumed as being six times the size of the EXE file. Before installting the software on the client, the setup.opsiscript checks, whether there is enough disc space.
- Setup File Size: the size of the EXE file.
- Description: The product name is set to this edit space and can be supplemented with additional information to be shown in the product description of the opsi product.
- License required: When this selection mark is checked, the opsiscript will be patched with license=true to indicate that a license is required.
Signature InstallShield+MSI: for the automated detection of an Installshield setup with embedded MSI the EXE file is scanned for the Installshield marker and the marker for an embedded MSI:
<description>InstallShield.Setup</description>
...
installer,msi,database
If both of them are found, the EXE file is supposed to be InstallShield+MSI.
NSIS setups are known to be small and fast. But it is not possible to extract further information from the packet, besides from detecting it as a NSIS setup. All further information to be shown is derived from the name of the setup. So the information must be sampled manually (for instance by installing the setup).
The entries in the Analyze tab might look like this:
...................................
Analyzing: F:\Setups\NSIS\7z920\7z920.exe
stringsgrep started (verbose:false, skipzero:false)
found string "Nullsoft.NSIS.exehead"
detected NSIS Setup
stringsgrep completed (verbose:false, skipzero:false)
...................................
Analyzing NSIS-Setup:
Setup file size is: 1,1 MB
Estimated required space is: 6,4 MB
........
get_nsis_info finished
NSIS (Nullsoft Install System) detected
The edit fields of the NSIS tab are:
- Setup file: Name of the analysed setup file
- opsi Product ID: this is the name of the new opsi packet to be created. It is derived from the product name below, by substituting spaces and other invalid characters with -. The suggested opsi Product ID can be changed.
- Product Name: this is the name of the software as detected from the setup filename. Most likely it has to be adapted.
- Product Version: the version of the software as detected from from the setup filename. It should contain only numbers and points and most likely has to be adapted.
- Install Directory: this is the name of the directory, where the software is supposed to be installed on the client. This is taken to patch the deinstall script and must be set manually.
- Required Space: this value is assumed as being six times the size of the EXE file. Before installting the software on the client, the setup.opsiscript checks, whether there is enough disc space.
- Setup File Size: the size of the EXE file.
- Description: The product name is set to this edit space and can be supplemented with additional information to be shown in the product description of the opsi product.
- License required: When this selection mark is checked, the opsiscript will be patched with license=true to indicate that a license is required.
Signatur NSIS: for detecting a NSIS Setup, the EXE file will be scanned for the marker:
Nullsoft.NSIS.exehead
...
Nullsoft Install System
After analyzing the setup and the edit fields of the corresponding tab being filled, clicking the button Create opsi Packet (on the lower right) generates the files for a new opsi product.
Attention:
- the Packet BaseDir must be a writable share to the opsi Workbench.
- for safety reasons a new opsi packet only can be created if it doesn’t exist. To rewrite the product, first delete the product directory from the opsi workbench.
Left of the Create opsi Packet button are three available options to specify the operation of the button:
- create opsi packet: the product directory and the corresponding files will be generated and patched on the opsi workbench. The packet will not be packed nor installed.
- create opsi packet and start interactive PacketBuilder: as above the files will be created and patched and then the opsi Packet Builder will be started. The product data will be passed to the Packet Builder and the packet can be packed and installed in interactive mode. After completion the opsi Packet Builder should be closed to be startable again for the next data transfer.
- create and auto -build -install -quiet: as above the directory and the files will be generated and patched and for further actions the opsi Packet Builder will be started. The opsi product data will be passed to the packet Builder and the packet will be built and installed, if the corresponding options are checked. If e.g. the packet just should be packed but not installed, the checkmark at install can be removed. Additionally the checkmark quiet can be set to execute the opsi Packet Builders without showing its user interface. After completion the opsi Packet Builder should be closed again.
For installation, configuration and instructions for the Community Project opsi Packet Builder see https://forum.opsi.org/viewforum.php?f=22
Add the abo repositories to the /etc/opsi/opsi-product-updater.conf
[repository_abo_mshotfix]
baseUrl = http://download.uib.de
dirs = abo/mshotfix/opsi4/glb
active = false
username = <user>
password = <pass>
autoInstall = false
autoUpdate = true
autoSetup = false
onlyDownload = false

[repository_abo_standard]
baseUrl = http://download.uib.de
dirs = abo/standard/opsi4
active = false
username = <user>
password = <pass>
autoInstall = false
autoUpdate = true
autoSetup = false
onlyDownload = false

[repository_abo_msoffice]
baseUrl = http://download.uib.de
dirs = abo/msoffice/opsi4
active = false
username = <user>
password = <pass>
autoInstall = false
autoUpdate = true
autoSetup = false
onlyDownload = false
Since opsi Version 4.0.5 one can choose specific packages via for instance
'opsi-product-updater -p "mshotfix,mshotfix-win7-x86-glb,mshotfix-win7-win2 008r2-x64-glb" -i '
for the mshotfix-packages for Windows 7.
Before opsi 4.0.5 one can download the opsi-packages and install them via opsi-package-manager -p ask -i <paketname>.opsi and set the default properties for the opsi-config-server. (Without the option -p ask the package defaults would be depot defaults)-
Since opsi 4.0.5 it is possible to set the product-property defaults per depot with the managementinterface opsi-configed
Regular updates for the product MS-Hotfix (OS hotfixes for Windows XP to 2008R2).
The updates will be provided within 3 working days after Microsofts publication of important and critical patches.
This opsi-package is delivered via download area (restricted access).
http://technet.microsoft.com/en-us/security/gg309177.aspx
Rating  Definition
Critical

A vulnerability whose exploitation could allow code execution without user interaction. These scenarios include self-propagating malware (e.g. network worms), or unavoidable common use scenarios where code execution occurs without warnings or prompts. This could mean browsing to a web page or opening email.

Microsoft recommends that customers apply Critical updates immediately.
Important

A vulnerability whose exploitation could result in compromise of the confidentiality, integrity, or availability of user data, or of the integrity or availability of processing resources. These scenarios include common use scenarios where client is compromised with warnings or prompts regardless of the prompt's provenance, quality, or usability. Sequences of user actions that do not generate prompts or warnings are also covered.

Microsoft recommends that customers apply Important updates at the earliest opportunity.
Moderate

Impact of the vulnerability is mitigated to a significant degree by factors such as authentication requirements or applicability only to non-default configurations.

Microsoft recommends that customers consider applying the security update.
Low     Impact of the vulnerability is comprehensively mitigated by the characteristics of the affected component. Microsoft recommends that customers evaluate whether to apply the security update to the affected systems.
The opsi-mshotfix package uses (like WSUS Offline Update http://forums.wsusoffline.net/viewtopic.php?f=7&t=172 Abdeckung des / Coverage of WSUS Offline Update ) Microsoft’s wsusscn2.cab. wsusscn2.cab delivers all „critical“ and „important“ updates, but not all "optional" updates.
The base-package „mshotfix“ contains the master-script for installing the patches contained in the other mshotfix-packages.
Caution
mshotfix packages for on Windows 8 / Window 2012 with Wan/VPN-extension opsi-client-agent >= 4.0.4.4-1.opsi
Caution
mshotfix packages for Windows 8.1 / Windows 2012 R2 requires opsi-winst >= opsi-winst_4.11.3.11-1.opsi and opsi-client-agent >= 4.0.4.4-1.opsi
Table 16. mshotfix Client-Requirements
OS | |
Windows XP | Service Pack 3 |
Windows 2003 / Windows XP 64bit | Service Pack 2 |
Windows Vista / Windows 2008 | Service Pack 2 |
Windows 7 / Windows 2008 R2 | Servicepack 1 |
Windows 8 / Windows 2012 | |
Windows 8.1 / Windows 2012 R2 |
Structure of the download area:
mshotfix
  !-opsi4/
     !-glb/     Base-package mshotfix  and global packages
                mshotfix-vista-win2008-x86-glb,
                mshotfix-vista-win2008-x64-glb ,
                mshotfix-win7-x86-glb,
                mshotfix-win7-win2008r2-x64-glb
                mshotfix-win8-x86-glb
                mshotfix-win81-x86-glb
                mshotfix-win8-win2012-x64-glb
                        mshotfix-win81-win2012r2-x64-glb
     !-deu/
                mshotfix-winxp-x86-deu ,
                mshotfix-win2003-x86-deu
     !-enu/
     !-fra/
     !-ita/
Table 17. mshotfix Client-OS
OS | Arch. Language | Patch-package |
Windows XP SP3 | 32Bit Deutsch | mshotfix-winxp-x86-deu |
Windows XP SP2 | 64Bit Englisch | mshotfix-win2003-winxp-x64-enu |
Windows 2003 SP2 | 32Bit Deutsch | mshotfix-win2003-x86-deu |
Windows 2003 SP2 | 64Bit Englisch | mshotfix-win2003-winxp-x64-enu |
Windows Vista SP2 | 32Bit | mshotfix-vista-win2008-x86-glb |
Windows Vista SP2 | 64Bit | mshotfix-vista-x64-glb |
Windows 7 | 32Bit | mshotfix-win7-x86-glb |
Windows 7 | 64Bit | mshotfix-win7-win2008r2-x64-glb |
Windows 8 | 32Bit | mshotfix-win8-x86-glb |
Windows 8 | 64Bit | mshotfix-win8-win2012-x64-glb |
Windows 8.1 | 32Bit | mshotfix-win81-x86-glb |
Windows 8.1 | 64Bit | mshotfix-win81-win2012r2-x64-glb |
Windows 2008 Server | 32Bit | mshotfix-vista-win2008-x86-glb |
Windows 2008 Server | 64Bit | mshotfix-vista-win2008-x64-glb |
Windows 2008 Server R2 | 64Bit | mshotfix-win7-win2008r2-x64-glb |
Windows 2012 | 64Bit | mshotfix-win8-win2012-x64-glb |
Windows 2012 R2 | 64Bit | mshotfix-win81-win2012r2-x64-glb |
Since mshotfix 201304-1 a list of installed patches is saved in file
C:\opsi.org\mshotfix\deployed.txt
- noreboot
- noreboot=on: Don’t Reboot. Warning will be logged if a reboot is required. Should be "on" for Server. values: ["off", "on"] default: ["off"]
- force
- force=on: All Hotfixes will be installed forced values: ["off", "on"] default: ["off"]
- excludes
- Commaseparated list with kb-numbers or ms-no, that will be excluded (Only Number without beginning kb and no spaces. Example: 123456,789011,2222) Browser Choice update? (KB976002)
- severity
- choose the severity that will be installed. Possible Entries are Critical, Important, Moderate, all values: ["Critical", "Important", "Moderate", "all"] default: ["Critical", "Important"]
Regular updates for the product:
Ms-Office 2010 (32 Bit International)
The updates will be provided within 3 working days after Microsoft’s publication of important and critical patches.
office_2010_hotfix 201210-2 Microsoft Office 2010 Hotfixes
Containes global Office 2010 patches (inclusive Visio and Project 2010) . Requires Servicepack 1.
Since office_2010_hotfix 201305-2 a list of installed patches is saved in file
C:\opsi.org\mshotfix\office_2010_hotfix_deployed
SinceSeit office_2010_hotfix 201503-1:
- excludes
- Commaseparated list with kb-numbers or ms-no, that will be excluded (Only Number without beginning kb and no spaces. Example: 2553154,ms14-082)
office_2013_hotfix 201401-1 Microsoft Office 2013 Hotfixes
Containes global Office 2013 patches (inclusive Visio 2013) .
A list of installed patches is saved in file
C:\opsi.org\mshotfix\office_2013_hotfix_deployed
Since office_2010_hotfix 201503-1:
- excludes
- Commaseparated list with kb-numbers or ms-no, that will be excluded (Only Number without beginning kb and no spaces. Example: 2553154,ms14-082)
Adobe Acrobat Reader (german, english and french / 32 Bit)
Adobe Flashplayer (international / 32 Bit / 64 Bit)
Apache OpenOffice.org (german / 32 Bit)
Google Chromium for business ( international 32 Bit /64 Bit )
LibreOffice (international / 32 Bit)
Mozilla Firefox (dutch, german, english and french / 32 Bit)
Mozilla Thunderbird (german, english and french / 32 Bit)
Oracle Java VM (international / 32 Bit / 64 Bit)
Depending on your contracts we offer the subscriptions with:
Adobe Acrobat Reader (in addition dutch and italian / 32 Bit)
Adobe Acrobat Reader XI (in addition danish, dutch, italian and spanish / 32 Bit)
Mozilla Firefox (in addition danish, italian or spanish / 32 Bit)
Mozilla Thunderbird (in addition italian / 32 Bit)
further languages can be asked for.
The updates will be provided within 2 working weeks after manufacturers release. For critical security patches the opsi packet will be provided within 1 working week after the patch release.
For the opsi-packages
acroread
acroread11
adobe.reader.dc.classic
firefox
flashplayer
javavm
thunderbird
one can provide configuration files and populate them via product-properties (for details see the relevant chapters)
For the opsi-packages
acroread11      (since 11.0.3-1)
adobe.reader.dc.classic
firefox         (since 17.0.6esrorstandard-1)
flashplayer     (since 13.0.0.182or11.7.700.275-1)
google-chrome-for-business
javavm          (since 1.7.0.51-4 )
libreoffice     (since 4.3.5or4.4.0-2)
ooffice         (since 4.1.1-2)
thunderbird     (since 17.0.6esrorstandard-1)
one can use custom-scripts in directory custom\scripts
Simple templates can be found in directory opsi\scripts
custom.actions.post.setup
custom.actions.post.uninstall
custom.actions.pre.setup
custom.actions.pre.uninstall
custom.declarations
custom.sections

custom scripts will be included at
- setup-script
- uninstall-script

custom pre-scripts will be included in
- setup-script
- uninstall-script

custom post-scripts will be included in
- in setup-script
- uninstall-script

custom.declarations
; intended for declaration of custom Variables and Stringlist Variables
; will be included with "include_insert" at top of [actions]
; but after GetProductProperties

custom.sections
; intended for declaration of custom secondary sections
; will be included with "include_append" at top of [actions]
; but after GetProductProperties

custom.actions.pre.setup  (or custom.actions.pre.uninstall)
; will be included with "include_insert" at at top of [actions]
; (but after GetProductProperties)

custom.actions.post.setup (or custom.actions.post.uninstall)
; will be included with "include_insert" in case of successfull installation before "endof_"actions"
; in setup-script ( or uninstall-script)
adobe.reader.dc.classic 20151500630033-3 Adobe Acrobat Reader dc
The adobe.reader.dc.classic-Paket contains Adobe Acrobat Document Cloud Classic ( MUI-Version )
Adaptation in the transform file *.mst
cat transform.txt
Changes vs default the transform file *.mst

Personalisation Options
Suppress Eula

Installation Options
acivated - Make Reader the default PDF viewer
IF REBOOT REQUIRED - suppress reboot


Shortcuts
deactivated - Destination Computer/Desktop/Adobe Reader XI (Icon)


Online and Acrobat.com Features
Online Features
activated - Disable product updates
Enable & Ask before Installing - Load trustet root certificates from Adobe

Online Services and Features
disable product updates
Load trusted root certificates from Adobe disable
DISABLE all Services
- adobereader.mst
-
The Adobe Reader package uses a default transform
build with the Adobe Customization Wizard.
Own mst-files could be placed in the share
opsi_depotin/var/lib/opsi/depot/adobe.reader.dc.classic/customDuring the installation viaopsi-package-manager -i <adobe.reader.dc.classic>the directory custom ueber will preserved by the preinst/postinst-scripts and the names of any mst-file in the custom-directory will be appear as a possible propertyentry.
Caution
opsi WAN/VPN extension: The synchronization process is based on the file <product-id>.files.
So any change in the custom share requires new installation of the package via the opsi-package-manager
- client_language
- The adobe.reader.dc.classic-package contains Adobe Acrobat Document Cloud Classic ( MUI-Version ) "auto" tries to install the correct language. values: ["auto", "de", "en", "fr" ] default: ["auto"]
- noreboot
- description: noreboot=true: Don’t Reboot. Warning will be logged if a reboot is required. values: ["false", "true"] default: ["false"]
acroread11 11.0.10-1 Adobe Reader 11
End of core support (https://www.adobe.com/support/products/enterprise/eol/eol_matrix.html#864) 10/15/2017
The acroread-package contains Acrobat Reader XI in german, english and french.
Adaptation in the transform file *.mst
Installation Options
acivated - Make Reader the default PDF viewer


Shortcuts
deactivated - Destination Computer/Desktop/Adobe Reader XI (Icon)


Online and Acrobat.com Features
Online Features
activated - Disable product updates
Enable & Ask before Installing - Load trustet root certificates from Adobe

Adobe Online Service Integration
activated - Disable all Adobe online services based workflows an entry points
- adobereader.mst
-
The Adobe Reader package uses a default transform
build with the Adobe Customization Wizard.
Own mst-files could be placed in the share
opsi_depotin/var/lib/opsi/depot/acroread11/customDuring the installation viaopsi-package-manager -i <acroread11>the directory custom ueber will preserved by the preinst/postinst-scripts and the names of any mst-file in the custom-directory will be appear as a possible propertyentry.
Caution
opsi WAN/VPN extension: The synchronization process is based on the file <product-id>.files.
So any change in the custom share requires new installation of the package via the opsi-package-manager
- client_language
- The acroread11-package contains Acrobat Reader X in german, english and french. "auto" tries to install the correct language. values: ["auto", "de", "en", "fr" ] default: ["auto"]
- protectedmode
- Enable Adobe Reader Protected Mode values: ["off", "on", "userchoice"] default: ["on"]
- misc
provides additional fonts
- AdbeRdrSD11000_all.msi : Adobe Reader XI Spelling Dictionary Pack
- FontPack11000_XtdAlf_Lang.msi: Adobe Reader XI Font Packs - Asian and Extended Language Pack
values: ["AdbeRdrSD11000_all.msi", "FontPack11000_XtdAlf_Lang.msi", "none"] default: ["none"]
- noreboot
- description: noreboot=true: Don’t Reboot. Warning will be logged if a reboot is required. values: ["false", "true"] default: ["false"]
acroread 10.1.13-1 Adobe Reader 10
End of core support (https://www.adobe.com/support/products/enterprise/eol/eol_matrix.html#864 The acroread-package contains Acrobat Reader X in german, english and french.
Adaptation in the transform file *.mst
Installation Options
acivated - Make Reader the default PDF viewer

Shortcuts
deactivated - Destination Computer/Desktop/Adobe Reader X (Icon)

Online and Acrobat.com Features
Online features
activated - Disable all updates

Acrobat.com Features
activated - Disable only Upload and Share documents to Acrobat.com
- adobereader.mst
-
The Adobe Reader package uses a default transform
build with the Adobe Customization Wizard.
Own mst-files could be placed in the share
opsi_depotin/var/lib/opsi/depot/acroread/customDuring the installation viaopsi-package-manager -i <acroread>the directory custom ueber will preserved by the preinst/postinst-scripts and the names of any mst-file in the custom-directory will be appear as a possible propertyentry.
Caution
opsi WAN/VPN extension: The synchronization process is based on the file <product-id>.files.
So any change in the custom share requires new installation of the package via the opsi-package-manager
- client_language
- The acroread-package contains Acrobat Reader X in german, english and french. "auto" tries to install the correct language. values: ["auto", "de", "en", "fr" ] default: ["auto"]
- desctopicon
- Place an icon on the desktop. values: ["off", "on"] default: ["off"]
- protectedmode
- Enable Adobe Reader Protected Mode values: ["off", "on", "userchoice"] default: ["on"]
- misc
provides additional fonts
- AdbeRdrSD1000_all.msi : Adobe Reader X Spelling Dictionary Pack (http://www.adobe.com/support/downloads/detail.jsp?ftpID=4859)
- FontPack1000_Xtd_Lang.msi: Adobe Reader X Font Packs - extended languages (http://www.adobe.com/support/downloads/detail.jsp?ftpID=4885) This Font Pack supports Hebrew, Arabic, Thai, and Vietnamese as well as the Eastern and Central European languages (including Cyrillic and Greek scripts)
- FontPack1000_ja_JP.msi: Adobe Reader X Font Packs - Japanese (http://www.adobe.com/support/downloads/detail.jsp?ftpID=4881).
values: ["AdbeRdrSD1000_all.msi", "FontPack1000_Xtd_Lang.msi", "FontPack1000_ja_JP.msi", "FontPack1000_ko_KR.msi", "FontPack1000_zh_CN.msi", "FontPack1000_zh_TW.msi", "none"] default: ["none"]
flashplayer 13.0.0.277-1 Adobe Flashplayer
The flashplayer-package contains Adobe Flashplayer standard or the Extended Support Release
- flashplayer-version
- Flashplayer standard as default; Version esr ( Extended Support Release http://blogs.adobe.com/flashplayer/2014/03/upcoming-changes-to-flash-players-extended-support-release.html )
values: esr, standard default: standard
- mms.cfg
- The configuration file mms.cfg
will be created during "setup" and patched according the properties below.
Since Version 13.0.0.250-2 one can use custom mms.cfg files in the share opsi_depot in
/var/lib/opsi/depot/flashplayer/custom
During the installation via opsi-package-manager -i <flashplayer> the directory custom ueber will preserved by the preinst/postinst-scripts and the names of any mms.cfg-file in the custom-directory will be appear as a possible propertyentry.
Caution
opsi WAN/VPN extension: The synchronization process is based on the file <product-id>.files.
So any change in the custom share requires new installation of the package via the opsi-package-manager
- mms.cfg
-
/var/lib/opsi/depot/flashplayer/customcustom mms.cfg-files.
Only the property autoupdatedisable will be populated if custom mms.cfg are used
Adobe Flashplayer Admin Guide:
flash_player_11_1_admin_guide.pdf (flash_player_admin_guide.pdf)

#####################################
Chapter 4: Administration

You can create and place files on the end user’s machine to manage
features related to security, privacy, use of disk
space, and so on.

Privacy and security settings (mms.cfg)

As a network administrator, you can install Flash Player across the
enterprise while enforcing some common global
security and privacy settings (supported with installation-time
configuration choices). To do this, you install a file
named mms.cfg on each client machine.

The mms.cfg file is a text file. When Flash Player starts, it reads its
settings from this file, and uses them to manage
functionality as described in the following sections.

mms.cfg file location

Assuming a default Windows installation, Flash Player looks for the
mms.cfg file in the following system directories:

32-bit Windows - %WINDIR%\System32\Macromed\Flash

64-bit Windows - %WINDIR%\SysWow64\Macromed\Flash

Note: The %WINDIR% location represents the Windows system directory,
such as C:\WINDOWS.
- assetcachesize
- description: hard limit, in MB, on the amount of local storage that Flash Player uses for the storage of common Flash components values: ["20"] default: ["20"]
- autoupdatedisable
- description: Lets you prevent Flash Player from automatically checking for and installing updated versions. values: ["0", "1"] default: ["1"]
- autoupdateinterval
- description: (without meaning if AutoUpdateDisable=1) how often to check for an updated version of Flash Player
- avhardwaredisable
- description: Lets you prevent SWF files from accessing webcams or microphones values: ["0", "1"] default: ["1"]
- disabledevicefontenumeration
- description: Lets you prevent information on installed fonts from being displayed. values: ["0", "1"] default: ["1"]
- fullscreendisable
- description: Lets you disable SWF files playing via a browser plug-in from being displayed in full-screen mode values: ["0", "1"] default: ["1"]
- localfilereaddisable
- description: Lets you prevent local SWF files from having read access to files on local hard drives values: ["0", "1"] default: ["0"]
- filedownloaddisable
- description: Lets you prevent the ActionScript FileReference API from performing file downloads values: ["0", "1"] default: ["0"]
- fileuploaddisable
- description: Lets you prevent the ActionScript FileReference API from performing file uploads values: ["0", "1"] default: ["0"]
- disableproductdownload
- description: Lets you prevent native code applications that are digitally signed and delivered by Adobe from being downloaded values: ["0", "1"] default: ["1"]
- disablesockets
- description: enable or disable the use of the Socket.connect() and XMLSocket.connect() methods values: ["0", "1"] default: ["1"]
- enablesocketsto
- description: Lets you create a whitelist of servers to which socket connections are allowed
- enforcelocalsecurityinactivexhostapp
- description: Lets you enforce local security rules for a specified application.
- legacydomainmatching
- description: Lets you specify whether SWF files produced for Flash Player 6 and earlier can execute an operation that has been restricted in a newer version of Flash Player values: ["0", "1"] default: ["0"]
- localfilelegacyaction
- description: Lets you specify how Flash Player determines whether to execute certain local SWF files that were originally produced for Flash Player 7 and earlier values: ["0", "1"] default: ["0"]
- allowuserlocaltrust
- description: Lets you prevent users from designating any files on local file systems values: ["0", "1"] default: ["0"]
- localstoragelimit
- description: Lets you specify a hard limit on the amount of local storage that Flash Player uses (per domain) for persistent shared objects. values: ["3"] default: ["3"]
- overridegpuvalidation
- description: Overrides validation of the requirements needed to implement GPU compositing values: ["0", "1"] default: ["0"]
- rtmfpp2pdisable
- description: Specifies how the NetStream constructor connects to a server when a value is specified for peerID, the second parameter passed to the constructor values: ["0", "1"] default: ["1"]
- disablenetworkandfilesysteminhostapp
description: 1 (Acrobat.exe,Acroread.exe,WINWORD.EXE,EXCEL.EXE,POWERPNT.EXE,PPTVIEW.EXE,OUTLOOK.EXE,MSACCESS.EXE,VISIO.EXE,thunderbird.exe) values: ["0", "1"] default: ["1"]
Known problems:
- Installation "On Demand" may fail cause running browsers.
google-chrome-for-business 41.0.2272.89-1
Uses the msi-installer (see Chrome for Business FAQ https://support.google.com/chrome/a/answer/188447?hl=en )
remarks:
Installing and uninstalling google-chrome.msi seems sometimes to hang.
There are several approachs working around this issue.
One customer reported a quote of 100% successfull Installations on 40 installations with the following property setting:
install_architecture: 32 reboot_on_retry: True reboot_after_uninstall: True timeout: 240
In our internal tests we work with: install_architecture: system specific reboot_on_retry: True reboot_after_uninstall: True timeout: notimeout
- autoupdate
- !!! Will not work anymore!!!
https://support.google.com/chrome/a/answer/187207
ADM= use Policy based on Googles Template, 0=UpdatesDisabled, 1=UpdatesEnabled, 2=ManualUpdatesOnly, 3=AutomaticUpdatesOnly, values: ["0", "1", "2", "3", "ADM"] default: ["0"]
- removeupdatehelper
- default: ["true"]
- install_architecture
- description: which architecture (32/64 bit) has to be installed values: ["32", "64", "system specific"] default: ["system specific"]
- reboot_on_retry
- description: If installation fails and (timeout > 0) then reboot before retry default: False
- reboot_after_uninstall
- description: reboot after uninstall old version default: False
- timeout
- description: TimeOutSeconds msi installs values: ["240", "300", "600", "notimeout"] default: ["notimeout"]
ooffice 4.1.1-2 Apache OpenOffic
The ooffice-package contains Apache OpenOffice in german.
- handle_excel_xls , handle_powerpoint_ppt , handle_word_doc , remove_ooo2
- remove OpenOffice.org 2 true = OpenOffice.org 2 will be removed
libreoffice 4.3.6or4.4.1-2 libreoffice
LibreOffice 3 international.
- client_language
- client_language - only for messages important, cause libre office is international values: ["auto", "de", "en", "fr"]
- msoregister
- Open Microsoft Office documents with LibreOffice (true) values: ["false", "true"] default: ["false"]
- libreoffice-version
- description: Stable - is an Extended Support Release from LibreOffice for the conservative user - default version (4.2.6.6); Experimentell is a version for the experimentell user from LibreOffice (4.3.1) values: ["experimentell", "stable"] default: ["stable"]
- hide_component
- description: Hide component base by removing desctoplink and exe file values: ["base", "none"] default: ["none"]
firefox 31.5.0esrorstandard-2
The firefox-package contains Mozilla Firefox german, englisch, french and dutch.
Customized configurations (see http://kb.mozillazine.org/Locking_preferences) can provided in
/var/lib/opsi/depot/firefox/custom/
The entries for the property "mozillacfg" will be populated via preinst-/postinst-scripts when installing the opsi-package
- example
cat /var/lib/opsi/depot/firefox/custom/mozilla.cfg
//
lockPref("browser.startup.homepage", "http://www.uib.de");
lockPref("network.proxy.type", 1);
lockPref("network.proxy.http", "router.uib.local");
lockPref("network.proxy.http_port", 3128);
Caution
opsi WAN/VPN extension: The synchronization process is based on the file <product-id>.files.
So any change in the custom share requires new installation of the package via the opsi-package-manager
- client_language
- values: ["auto", "de", "en", "fr", "nl"] default: ["auto"]
- firefox-version
- Firefox 17.0esr - is the Extended Support Release from Mozilla.org (17.0.9esr) as default version; Firefox 24.0esr - is the new Extended Support Release from Mozilla.org (24.0esr); standard (24.0) is the Mozilla.org standard version values: ["17.0esr", "24.0esr", "standard"] default: ["17.0esr"]
- pref_file
- (user/prefs)= use user.js or prefs.js. values: ["prefs", "user"] default: ["prefs"]
- noautoupdate
- (on/off): disable auto update. default=on
- setproxy
(off/direct/manual/file) proxy settings
- off= do nothing
- direct = direct
- manual = use proxy settings via property proxysetting (<ip-numme>:<port>) and property noproxy_hosts (host1,host2)
- file = use proxy settings via property proxysetting (<path_to_proxyconf.pac>) and property noproxy_hosts (host1,host2)
- system
- default=off
- proxysetting
- string for proxy setting (see: setproxy)
- noproxy_hosts
- comma separated list of hosts
- mozillacfg
-
description: filename for mozilla.cfg in
%scriptpath%\custom-directory, http://kb.mozillazine.org/Locking_preferences - profilemigrator
enable or disable Profilemigrator on first run values: ["off", "on"] default: ["off"]
Known problems:
- Installation "On Demand" may fail cause running browsers.
thunderbird 31.5.0-1
The thunderbird-package contains Mozilla Thunderbird in german, englisch and french.
Customized configurations (see http://kb.mozillazine.org/Locking_preferences) can provided analogous the firefox-Package and property "mozillacfg"
- client_language
- values: ["auto", "de", "en", "fr"] default: ["auto"]
- thunderbird-version
- Thunderbird 17.0esr - is the Extended Support Release from Mozilla.org (17.0.9esr)(default); standard (24.0) is the Mozilla.org standard version values: ["17.0esr", "standard"] default: ["17.0esr"]
- addonsactivation
- description: Enable/Disable AddOns (default = enable) values: ["off", "on"] default: ["on"]
https://developer.mozilla.org/en/Addons/Add-on_Manager/AddonManager
http://mike.kaply.com/2012/02/09/integrating-add-ons-into-firefox/
Set_Netscape_User_Pref ("extensions.autoDisableScopes", 11)
Set_Netscape_User_Pref ("extensions.shownSelectionUI", true)- enigmail
- description: Install GnuPG-Plugin values: ["off", "on"] default: ["off"]
Thunderbird 17.0. Enigmail 1.5.1
- mozillacfg
-
description: filename for mozilla.cfg in
%scriptpath%\custom-directory, http://kb.mozillazine.org/Locking_preferences - noautoupdate
- description: disable automatic updates values: ["off", "on"] default: ["on"]
- lightning
- description: Install calender plugin lightning values: ["off", "on"] default: ["off"]
Thunderbird 17.0. Lightning 1.9.1
Known problems:
- Installation "On Demand" may fail cause running thunderbird.
javavm 1.7.0.75-4 Oracle Java Run
The javavm-package contains Oracle Jre version 7.x ( cpu und psu) and 8.x (see http://www.oracle.com/technetwork/java/javase/downloads/cpu-psu-explained-2331472.html)
( Oracle announced "End Of Public Updates Februar 2013" http://www.oracle.com/technetwork/java/eol-135779.html )
The Oracle JRE will be installed with "Patch-in-place configuration" (since jre 1.6.0_10 )
http://www.oracle.com/technetwork/java/javase/jre-install-137694.html
Existing "Patch-in-place" Jre-versions 1.6.x, 7.x and 8.x will be uninstalled. - Existing Oracle JRE with "Static configuration" will not be uninstalled - Earlier Oracle JRE (version 1.6.0 - version 1.6.7) will be uninstalledby default. One can change this behaviour using the property "keepversion".
Starting with 8u20 the jre8 will be installet in static mode
Customized configurations deployment.properties (see http://docs.oracle.com/javase/6/docs/technotes/guides/deployment/deployment-guide/properties.html http://docs.oracle.com/javase/7/docs/technotes/guides/deployment/deployment-guide/properties.html) can provided in
/var/lib/opsi/depot/javavm/custom/
The entries for the property "deployment.properties" will be populated via preinst-/postinst-scripts when installing the opsi-package - example
cat /var/lib/opsi/depot/javavm/custom/deployment.properties
//
#deployment.properties
#Tue Dec 18 12:36:01 CET 2012
deployment.javaws.autodownload=NEVER
deployment.javaws.autodownload.locked=
deployment.security.validation.ocsp=true
deployment.security.validation.ocsp.locked=
deployment.security.validation.crl=true
deployment.security.validation.crl.locked=
Caution
opsi WAN/VPN extension: The synchronization process is based on the file <product-id>.files.
So any change in the custom share requires new installation of the package via the opsi-package-manager
- install_architecture
- description: which architecture (32/64 bit) has to be installed values: ["32 only", "64 only", "both", "system specific"] default: ["both"]
- javaversion
- description: which version has to be installed (JRE 1.8.x or JRE 7 = 1.7.x) values: ["jre7", "jre7psu", "jre8"] default: ["jre7"]
- keepversion
- description: Dont uninstall jre version values: ["1.6.0_0", "1.6.0_1", "1.6.0_2", "1.6.0_3", "1.6.0_4", "1.6.0_5", " 1.6.0_6", "1.6.0_7", "none"] default: ["none"]
- webjava
- description: TESTING: http://java.com/en/download/help/silent_install.xml WEB_JAVA=0, if used, disables any Java application from running in the browser values: ["0", "1", "none"] default: ["none"]
Caution
Setting WEB_JAVA=0 results in misleading browsermessages ("missing plugin")
- deployment.properties
- description: filename for deployment.properties in %scriptpath%\custom-directory, http://docs.oracle.com/javase/7/docs/technotes/guides/deployment/deployment-guide/properties.html saved by pre- postinstscript
- uninstalljava16
- Uninstall Java 1.6 "Patch in Place" Installations default: True
- startmenuentry
- Create Entry for java in common startmenu aboutJava,CheckForUpdates,ConfigureJava,GetHelp,VisitJava.com default: False
- timeout
- TimeOutSeconds msi installs values: ["180", "240", "300", "notimeout"] default: ["300"]
- copy.java.exe.to.system32
Copy java.exe,javaw.exe, javaws.exe to system32 default: False
Known problems:
- Installation "On Demand" may fail cause running browsers.
With the backend type {file backend} the configuration information is kept in text files (ini file syntax) on the server.
Important details of the backend file :
- It is the default backend
-
You will find the files of this backend at
/var/lib/opsi.
More details to the files and theire structure you will find at Section 31.4, “Files of the file backend”.
Inventory data at the file backend is stored in structured text files by default. This type of storage is not very useful if you wish to form free queries on these data. In order to allow free queries and reports a mysql based backend for the inventory data has been introduced.
The main characteristics of this backend are: * only for inventory data free (for other data it is part of a co funding project until now) * optional (not the default backend) * a very fine granulated data structure with an additional table to make queries easier. * a history function which tracks changes in the inventory.
Regarding the very different structure of the components in the inventory the resulting data structure is complex.
The table hosts comprises all known hosts. For every device type we use two tables: The HARDWARE_DEVICE_ .table describes the model without individual aspects like the serial number. The HARDWARE_CONFIG table stores these individual and configuration data.
These both tables are connected via the field hardware_id. This is the resulting list of tables:
HARDWARE_CONFIG_1394_CONTROLLER
HARDWARE_CONFIG_AUDIO_CONTROLLER
HARDWARE_CONFIG_BASE_BOARD
HARDWARE_CONFIG_BIOS
HARDWARE_CONFIG_CACHE_MEMORY
HARDWARE_CONFIG_COMPUTER_SYSTEM
HARDWARE_CONFIG_DISK_PARTITION
HARDWARE_CONFIG_FLOPPY_CONTROLLER
HARDWARE_CONFIG_FLOPPY_DRIVE
HARDWARE_CONFIG_HARDDISK_DRIVE
HARDWARE_CONFIG_IDE_CONTROLLER
HARDWARE_CONFIG_KEYBOARD
HARDWARE_CONFIG_MEMORY_BANK
HARDWARE_CONFIG_MEMORY_MODULE
HARDWARE_CONFIG_MONITOR
HARDWARE_CONFIG_NETWORK_CONTROLLER
HARDWARE_CONFIG_OPTICAL_DRIVE
HARDWARE_CONFIG_PCI_DEVICE
HARDWARE_CONFIG_PCMCIA_CONTROLLER
HARDWARE_CONFIG_POINTING_DEVICE
HARDWARE_CONFIG_PORT_CONNECTOR
HARDWARE_CONFIG_PRINTER
HARDWARE_CONFIG_PROCESSOR
HARDWARE_CONFIG_SCSI_CONTROLLER
HARDWARE_CONFIG_SYSTEM_SLOT
HARDWARE_CONFIG_TAPE_DRIVE
HARDWARE_CONFIG_USB_CONTROLLER
HARDWARE_CONFIG_VIDEO_CONTROLLER
HARDWARE_DEVICE_1394_CONTROLLER
HARDWARE_DEVICE_AUDIO_CONTROLLER
HARDWARE_DEVICE_BASE_BOARD
HARDWARE_DEVICE_BIOS
HARDWARE_DEVICE_CACHE_MEMORY
HARDWARE_DEVICE_COMPUTER_SYSTEM
HARDWARE_DEVICE_DISK_PARTITION
HARDWARE_DEVICE_FLOPPY_CONTROLLER
HARDWARE_DEVICE_FLOPPY_DRIVE
HARDWARE_DEVICE_HARDDISK_DRIVE
HARDWARE_DEVICE_IDE_CONTROLLER
HARDWARE_DEVICE_KEYBOARD
HARDWARE_DEVICE_MEMORY_BANK
HARDWARE_DEVICE_MEMORY_MODULE
HARDWARE_DEVICE_MONITOR
HARDWARE_DEVICE_NETWORK_CONTROLLER
HARDWARE_DEVICE_OPTICAL_DRIVE
HARDWARE_DEVICE_PCI_DEVICE
HARDWARE_DEVICE_PCMCIA_CONTROLLER
HARDWARE_DEVICE_POINTING_DEVICE
HARDWARE_DEVICE_PORT_CONNECTOR
HARDWARE_DEVICE_PRINTER
HARDWARE_DEVICE_PROCESSOR
HARDWARE_DEVICE_SCSI_CONTROLLER
HARDWARE_DEVICE_SYSTEM_SLOT
HARDWARE_DEVICE_TAPE_DRIVE
HARDWARE_DEVICE_USB_CONTROLLER
HARDWARE_DEVICE_VIDEO_CONTROLLER
HOST
SOFTWARE
SOFTWARE_CONFIG
Which field name in the database is corresponding to which reported and localized name in the opsi management interface is defined in a configuration file. Example (/etc/opsi/hwaudit/locales/en_US):
DEVICE_ID.deviceType = Device type
DEVICE_ID.vendorId = Vendor ID
DEVICE_ID.deviceId = Device ID
DEVICE_ID.subsystemVendorId = Subsystem vendor ID
DEVICE_ID.subsystemDeviceId = Subsystem device ID
DEVICE_ID.revision= Revision
BASIC_INFO.name = Name
BASIC_INFO.description = Description
HARDWARE_DEVICE.vendor = Vendor
HARDWARE_DEVICE.model = Model
HARDWARE_DEVICE.serialNumber = Serial number
COMPUTER_SYSTEM = Computer
COMPUTER_SYSTEM.systemType = Type
COMPUTER_SYSTEM.totalPhysicalMemory = Physical Memory
CHASSIS = Chassis
CHASSIS.name = Name
CHASSIS.chassisType = Chassis type
CHASSIS.installDate = Installation date
CHASSIS.serialNumber = Serial number
BASE_BOARD = Base board
BASE_BOARD.product = Product
BIOS = BIOS
BIOS.version = Version
SYSTEM_SLOT = System slot
SYSTEM_SLOT.currentUsage = Current usage
SYSTEM_SLOT.status = Status
SYSTEM_SLOT.maxDataWidth = Maximum data width
PORT_CONNECTOR = Port
PORT_CONNECTOR.connectorType = Attributes
PORT_CONNECTOR.internalDesignator = Internal designator
PORT_CONNECTOR.internalConnectorType = Internal type
PORT_CONNECTOR.externalDesignator = External designator
PORT_CONNECTOR.externalConnectorType = External type
PROCESSOR = Processor
PROCESSOR.architecture = Architecture
PROCESSOR.family = Family
PROCESSOR.currentClockSpeed = Current clock speed
PROCESSOR.maxClockSpeed = Maximum clock speed
PROCESSOR.extClock = External clock
PROCESSOR.processorId = Processor-ID
PROCESSOR.addressWidth = Address width
PROCESSOR.socketDesignation = Socket designation
PROCESSOR.voltage = Voltage
MEMORY_BANK = Memory bank
MEMORY_BANK.location = Location
MEMORY_BANK.maxCapacity = Maximum capacity
MEMORY_BANK.slots = Number of slots
MEMORY_MODULE = Memory module
MEMORY_MODULE.deviceLocator = Device locator
MEMORY_MODULE.capacity = Capacity
MEMORY_MODULE.formFactor = Form factor
MEMORY_MODULE.speed = Speed
MEMORY_MODULE.memoryType = Memory type
MEMORY_MODULE.dataWidth = Data width
MEMORY_MODULE.tag = Tag
CACHE_MEMORY = Cache memory
CACHE_MEMORY.installedSize = Installed size
CACHE_MEMORY.maxSize = Maximum size
CACHE_MEMORY.location = Location
CACHE_MEMORY.level = Level
PCI_DEVICE = PCI device
PCI_DEVICE.busId = Bus id
NETWORK_CONTROLLER = Network adapter
NETWORK_CONTROLLER.adapterType = Adapter type
NETWORK_CONTROLLER.maxSpeed = Maximum speed
NETWORK_CONTROLLER.macAddress = MAC address
NETWORK_CONTROLLER.netConnectionStatus = Net connection status
NETWORK_CONTROLLER.autoSense = auto-sense
NETWORK_CONTROLLER.ipEnabled = IP protocoll enabled
NETWORK_CONTROLLER.ipAddress = IP address
AUDIO_CONTROLLER = Audio controller
HDAUDIO_DEVICE = HD Audio device
HDAUDIO_DEVICE.address = Addresse
IDE_CONTROLLER = IDE controller
SCSI_CONTROLLER = SCSI controller
FLOPPY_CONTROLLER = Floppy controller
USB_CONTROLLER = USB controller
1394_CONTROLLER = 1394 controller
PCMCIA_CONTROLLER = PCMCIA controller
VIDEO_CONTROLLER = Video controller
VIDEO_CONTROLLER.videoProcessor = Video processor
VIDEO_CONTROLLER.adapterRAM = Adapter RAM
DRIVE.size = Size
FLOPPY_DRIVE = Floppy drive
TAPE_DRIVE = Tape drive
HARDDISK_DRIVE = Harddisk drive
HARDDISK_DRIVE.cylinders = Cylinders
HARDDISK_DRIVE.heads = Heads
HARDDISK_DRIVE.sectors = Sectors
HARDDISK_DRIVE.partitions = Partitions
DISK_PARTITION = Partition
DISK_PARTITION.size = Size
DISK_PARTITION.startingOffset = Starting offset
DISK_PARTITION.index = Index
DISK_PARTITION.filesystem = Filesystem
DISK_PARTITION.freeSpace = Free space
DISK_PARTITION.driveLetter = Drive letter
OPTICAL_DRIVE = Optical drive
OPTICAL_DRIVE.driveLetter = Drive letter
USB_DEVICE = USB device
USB_DEVICE.vendorId = Vendor ID
USB_DEVICE.deviceId = Device ID
USB_DEVICE.usbRelease = USB release
USB_DEVICE.maxPower = Maximum power
USB_DEVICE.interfaceClass = Interface class
USB_DEVICE.interfaceSubClass = Interface sub class
USB_DEVICE.interfaceProtocol = Interface protocol
USB_DEVICE.status = Status
MONITOR = Monitor
MONITOR.screenHeight = Screen height
MONITOR.screenWidth = Screen width
KEYBOARD = Keyboard
KEYBOARD.numberOfFunctionKeys = Number of function keys
POINTING_DEVICE = Pointing Device
POINTING_DEVICE.numberOfButtons = Number of buttons
PRINTER = Printer
PRINTER.horizontalResolution = Horizontal resolution
PRINTER.verticalResolution = Vertical resolution
PRINTER.capabilities = Capabilities
PRINTER.paperSizesSupported = Supported paper sizes
PRINTER.driverName = Driver name
PRINTER.port = Port
Examples for queries: Listing of all hard drives:
SELECT * FROM HARDWARE_DEVICE_HARDDISK_DRIVE D
LEFT OUTER JOIN HARDWARE_CONFIG_HARDDISK_DRIVE H ON D.hardware_id=H.hardware_id ;
The software inventory uses as primary keys the following entries:
-
Name
This is the windowsDisplayName or, if this entry isn’t found at the registry, it is the windowsSoftwareId. Both values come from the registry:
HKLM\SOFTWARE\Microsoft\Windows\CurrentVersion\Uninstall
HKLM\SOFTWARE\Microsoft\Windows\CurrentVersion\Uninstall\<id> DisplayName -
Version
HKLM\SOFTWARE\Microsoft\Windows\CurrentVersion\Uninstall\<id> DisplayVersion - SubVersion
- Language
- Architecture (32 Bit / 64 Bit)
At the table Software_config these primary keys are integrated to one key: config_id.
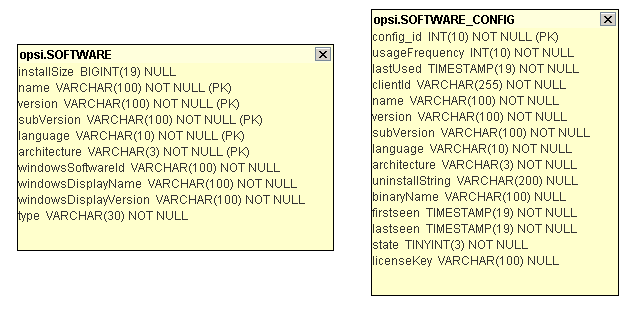
The mysql backend for configuration data is available since opsi 4.0.
This opsi extension is currently in the co-funding process and not free. For more details see Section 6, “Activation of non free modules”.
The mysql backend has a high performance which is important for large installations.
Here a data structure overview:
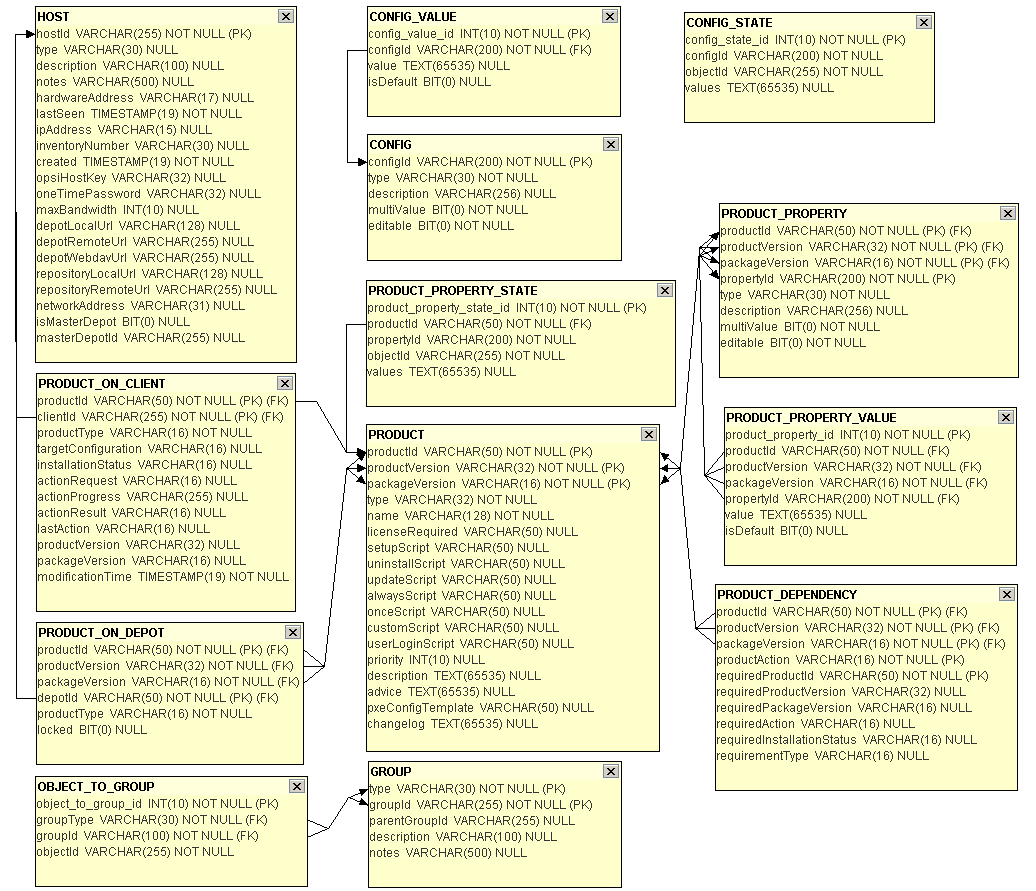
First, the mysql-server has to be installed (if not done yet):
apt-get install mysql-server
In the next step the administrative password for the mysql-server has to been set:
mysqladmin --user=root password linux123
The command
opsi-setup --configure-mysql
will now initialize the mysql backend.
A example session:
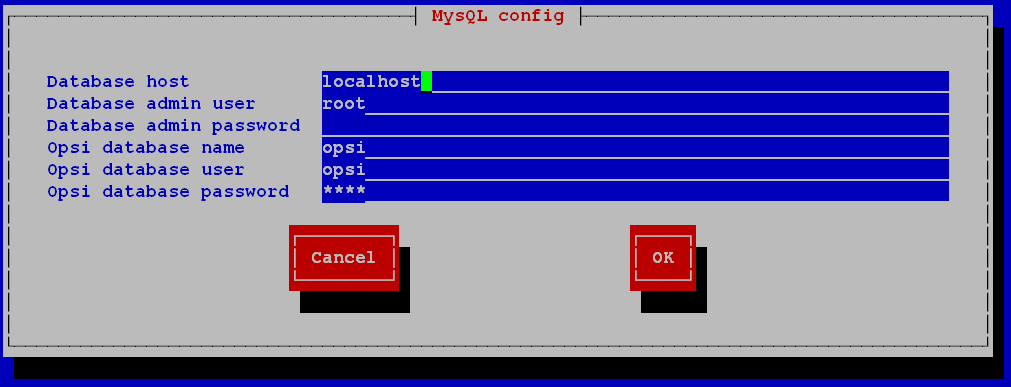
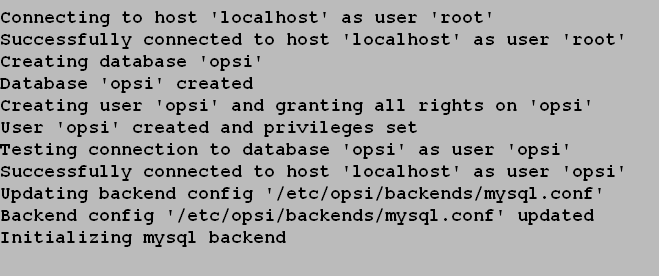
At all questions (beside the password) you may accept the defaults by pressing ENTER.
As next step you have to configure how (for which methods) opsi should use which backend. Therefore please edit the file /etc/opsi/backendManager/dispatch.conf .
A detailed description for this configuration you will find at the getting started manual. The configuration file also contains a lot of examples of typical configurations.
A configuration for the use of the mysql backend (without internal dhcpd) looks like that:
backend_.*         : mysql, opsipxeconfd
host_.*            : mysql, opsipxeconfd
productOnClient_.* : mysql, opsipxeconfd
configState_.*     : mysql, opsipxeconfd
.*                 : mysql
Finally you have to activate the changed configuration with the following commands:
opsi-setup --init-current-config
opsi-setup --set-rights
/etc/init.d/opsiconfd restart
/etc/init.d/opsipxeconfd restart
The HostControl backend does not store any information. It is a special backend to control the opsi clients.
Typical tasks are to send Wake-On-Lan signals and send control signals to the opsi-client-agent.
The HostControl backend is configured by the configuration file /etc/opsi/backends/hostcontrol.conf. Configuration options are here:
-
opsiclientdPort:
Network port to contact the opsi-client-agent. -
hostRpcTimeout:
Timeout (in seconds) connecting a opsi-client-agent. -
resolveHostAddress:
This option controls whether the name resolution of a opsi-client address is primary done by the opsi database or by the name resolution of the operating system of the opsi-server. If this option isTrue, the opsi-server tries at first to get the IP-Address of a opsi-client by the name resolution of the operating system (DNS, /etc/hosts) and if this fails the opsi database is used. To use the opsi database at first, you have to set this option toFalse. -
maxConnections:
Maximal number of concurrent connections to opsi-client-agents. -
broadcastAddresses:
List of broadcast addresses used to send Wake-On-Lan broadcasts.
The default behaviour of opsi4.0 methods called without any parameter is, that it matches all existing objects. For instance the command "host_getObjects" without any parameters results in returning all existing host objects. Dieses This could be dangerous when using the HostControl-Backend. Especially with commands like: "hostControl_shutdown" and "hostControl_reboot". In these casses calling the method without any parameter would shutdown or reboot all the clients.
Therefore with service release opsi 4.0.3 comes with two changes:
- The methods: "hostControl_shutdown" and "hostControl_reboot" don’t have the standard behaviour anymore and result in an error message when they are called without any parameter.
- A new backend is introduced: HostControlSafe Backend, that results in an error message for all of the methods, if they are called without any client parameter. To explicitely address all of the clients by a HostControlSafe-Backend method, the wildcard * can be used:
opsi-admin -d method hostControlSafe_shutdown *
So for the reasons mentioned above, we recommend to use the hostControlSafe methods at the console or especially with little experience in using the service methods.
The command opsi-convert converts the opsi configuration files from one backend to another. The target or the source can be assigned in different ways:
-
backend name:
A backend on the current server can be addressed with just the backend name. The commandopsi-convert file mysqlconverts the data base of the current server from file backend to the mysql backend. -
Service address
Providing a full qualified service address allows access to a remote servers data base (after passing the users password). The service address looks like: https://<username>@<ipadresse>:4447/rpc You will be asked for the passwords.
The conversion command looks like that:
opsi-convert -s -l /tmp/log https://uib@192.168.2.162:4447/rpc https://opsi@192.168.2.42:4447/rpc
-
Configuration directories
With a declaration of a configuration directory for the specified backend manager configuration source or target can be described in detail.
opsi-convert --help

Usage: opsi-convert [options] <from> <to>
Convert an opsi database into an other.
Options:
    -h        show this help text
    -V        show version information
    -q        do not show progress
    -v        increase verbosity (can be used multiple times)
    -c        clean destination database before writing
    -s        use destination host as new server
    -l <file> log to this file

<from> and <to> can be:
     - the name of a backend as defined in /etc/opsi/backends (file, ldap, ...)
     - the url of a opsi configuration service
http(s)://<user>@<host>:<port>/rpc/tftpboot/linux contains the boot files needed for the system start with the PXE boot proms.
The opsi-client-agent accesses the shares provided by the opsi-server to get the software which have to be installed at the client.
The mount of these shares is done by using the user pcpatch. That these shares are not public and have to be mounted using a password is important for: * general system security and data integrity * meet the license agreements of special software packets
To give the client task opsi-client-agent access to authentication data, the server creates a specific key (opsi-host-key) when creating a client. This key is stored (at the file backend) in the file /etc/opsi/pckeys and is passed to the PC with the (re)installation request. The opsi-client-agent will store this key in the local file c:\program files\opsi.org\opsi-client-agent\opsiclientd\opsiclientd.conf
during system installation (access rights limited to the administrators). Also, on the server, the file /etc/pckeys is only accessible by the user root and members of the group opsiadmin. This way every PC has got an unique key only known to the client itself and the opsi-server, not accessible by client standard users. The key is used to encrypt the password of the user pcpatch. The encrypted password will be transferred to the client at boot time via web service. Hence the servers pcpatch password can be changed any time. The new encrypted password will be sent to every client at the next reboot.
The hosts file stores all IP addresses and IP names known to the network. The IP addresses and names of all clients have to be entered here. There might be aliases (additional names) and comments (starting with #).
opsi needs full qualified host name (including the domain name) and this might come from the /etc/hosts as well from the DNS.
Example:
192.168.2.106  dplaptop.uib.local  dplaptop  # this opsi-server
192.168.2.153  schleppi.uib.local
192.168.2.178  test_pc1.uib.local # Test-PC PXE-bootprom
With the following command you may test the name is resolved:
getent hosts $(hostname -f)
The result should be similar to:
192.168.1.1 server.domain.tld server
If the result isn’t like that and contains for example 127.0.0.1 or localhost you should correct your /etc/hosts or your DNS before you continue with the installation.
The required opsi groups are pcpatch and opsiadmin. All users who are administrating opsi packets need to be member of the pcpatch group. Membership of the group opsiadmin allows users to connect to the opsi web service (for instance using the opsi-configed).
-
acl.conf
Configuration of the access control lists to the opsi methods. -
dispatch.conf
Configuration which of the in/etc/opsi/backends/configured backends should be used for which method. -
extend.d/
Directory for backend extensions. For example this is be used to implement the old opsi 3 methods which are mapped to the new opsi 4 methods.
Since opsi V3.2
Here the configuration files for the hardware inventory are to be found. The directory locales holds the language specifications. The file opsihwaudit.conf specifies the mapping of WMI classes to the opsi data management.
Since opsi 3.4
The opsi activation file.
This is by the uib gmbh signed file which is used to activate not free features of opsi. Any change on this file will invalidate the activation. Without this file (or with a invalid file) you may only use the free feature of opsi.
Since opsi V3
Configuration file for the opsiconfd service including configurations like ports, interfaces, logging.
Since opsi version 3.0
Configuration file for the opsiconfd holding the ssl certificate.
Configuration file for the opsipxeconfd in charge for writing the start-up files for the Linux boot image. You can configure directories, defaults and log level here.
Configuration file for the opsi-product-updater.
See also Section 4.5, “Tool: opsi-product-updater”
Since Version 4.0.2-2
General opsi configurations.
Example:
[groups]
fileadmingroup = pcpatch
Background:
The classical installation with the user: pcpatch with the primary group: pcpatch does not function with Samba 4. Samba 4 has fundamental restrictions on Active-Directory, such that groups with the same name as user (as is common in Unix/Linux) are no longer allowed. For this reason, a new configuration file has been introduced: /etc/opsi/opsi.conf, which will control how the groups will access Samba-Access. So for example, UCS 3 will use this file to rename the group pcpatch to opsifileadmins. That means that the user who belonged to the group pcpatch under UCS 3, must now belong to the group opsifileadmins. This special feature is only for UCS 3 and is not the same for other distributions (so long as they are using Samba 4, or have Samba 4 installed).
-
pxelinux.0
Boot file which will be loaded first by the PXE boot-prom. -
installandminiroot.gz
Installation boot-image which will be loaded by the client (per tftp) during a re-installation.
-
01-<mac adresse>or<IP-NUMMER-in-Hex>
Files named by the clients hardware address (prefix 01-) are stored on the opsi-server as client-specific boot files. Usually they are named pipes created by the opsipxeconfd as to initiate the (re)installation of clients. -
default
The filedefaultis loaded if no client-specific file is found. This initiates a local boot. -
install
Information for the boot of the install boot image which will be used by the opsipxeconfd to create the named pipe.
This is the place where opsi-product-packages are saved, which are loaded by the calls of the opsi-product-updater to the server.
This is also the place where opsi-product-packages are saved, which are installed by the calls of the opsi-package-manager if it is called with the option -d.
This directory holds (per default) the partition image files which are produced by the netboot product ntfs-write-image.
In this file the opsi-host-keys, specified for each computer, are stored.
Example:
schleppi.uib.local:fdc2493ace4b372fd39dbba3fcd62182
laptop.uib.local:c397c280fc2d3db81d39b4a4329b5f65
pcbon13.uib.local:61149ef590469f765a1be6cfbacbf491
Here the passwords encrypted with the server key of the server (e.g. for pcpatch) are kept.
The files of the file backend are in /var/lib/opsi, which is the home directory of the opsiconfd daemon. The following schema gives an overview of the directory structure.
/var/lib/opsi-|
              |-depot                           opsi_depot share
              |-repository                      opsi package repository used by opsi-product-updater opsi-package-manager
              |-audit                           inventory - files
              !-config/-|                               config share
                        |-clientgroups.ini      client groups
                        |-config.ini            Host Parameter (Global Defaults)
                        |-clients/              <pcname.ini> files
                        |-products/             product control files
                        !-depots                depot description files

        +audit/
                global.<Type> (generic hard-, and software information)
                <FQDN>.<Type> (host specific hard-, and software information)

        clientgroups.ini (hold the host groups)

        +clients/
                <FQDN>.ini (client configuration information)
        config.ini (store the 'configs' (host parameter))

        +depots/
                <FQDN>.ini (Information according to the depots)

        +products/
                <ID>_<ProdVer>-<PackVer>.<Type> (Information about the products)

        +templates/
                pcproto.ini (template for new clients)
<FQDN>.ini (specific templates (not implemented yet))This file holds information on the client groups.
[<GroupId>]
<HostId> = 1 #aktiv
<HostId> = 0 #inaktiv
This are the global defaults of the host parameter as shown in the server configuration in the opsi-configed.
In these files the client specific configuration is set. This information will be combined with the <depot-id>.ini values whereas the settings from <FQDN>.ini overrides the <depot-id>.ini setting.
These files can have the following structure:
The section info contains all non product client information:
[info]
description = <String>
created = <Date> #format: 'YYYY-MM-DD HH:MM:SS'
lastseen = <Date> #format: 'YYYY-MM-DD HH:MM:SS'
inventorynumber = <String>
notes = <String>
hardwareaddress = <MAC> #format: 'hh:hh:hh:hh:hh:hh'
ipaddress = <IP> #format: 'nnn.nnn.nnn.nnn'
onetimepassword = <String>
The following section stores the installation state and the action request of a product. If there is no information here, the default is not_installed:none.
[<Type>_product_states] #'Local-', bzw. 'NetbootProduct'
<ProductId> = <InstallationStatus>:<ActionRequest>
More information on products you will find at the product sections:
[<ProductId>-state]
producttype = <Type> #'Local-', bzw. 'NetbootProduct'
actionprogress = <String>
productversion = <ProdVer>
packageversion = <PackVer>
modificationtime = <Date> #format: 'YYYY-MM-DD HH:MM:SS'
lastaction = <ActionRequest>
actionresult = <ActionResult>
targetconfiguration = <InstallationStatus>
In this directory are the template files like pcproto.ini, which is the standard template for creating a new <FQDN>.ini file. It has the same internal structure as the <FQDN>.ini file.
Here are the depot specific data storage which are also stored as <depot-id>.ini. Here you find general information about about the the depot.
[depotshare]
remoteurl = smb://<NetBiosName>/<Path>
localurl = file://<Path>

[depotserver]
notes = <String>
network = <IP>
description = <String>
hardwareaddress = <MAC>
ipaddress = <IP>
inventorynumber = <String>

[repository]
remoteurl = webdavs://<FQDN>:<Port>/<Path>
localurl = file://<Path>
maxbandwith = <Integer> #in Bytes
You will find also information which opsi product is installed at the depot in which version and with which property defaults.
This directory contains the product meta data, which is the product name, properties, default values and dependencies.
The control files are the kind of control files, that are generated by creating new opsi-products in the directory <product name>/OPSI/control.
The control files have the following sections:
-
Section [Package]
Description of the package version and whether this is an incremental package. -
Section [Product]
Description of the product -
Section(s) [ProductProperty]
(optional)
Description of variable product properties -
Section(s) [ProductDependency]
(optional)
Description of product dependencies
Example:
[Package]
version: 1
depends:
incremental: False

[Product]
type: localboot
id: thunderbird
name: Mozilla Thunderbird
description: Mail client by Mozilla.org
advice:
version: 2.0.0.4
priority: 0
licenseRequired: False
productClasses: Mailclient
setupScript: thunderbird.ins
uninstallScript:
updateScript:
alwaysScript:
onceScript:

[ProductProperty]
name: enigmail
description: Install encryption plug-in for GnuPG
values: on, off
default: off

[ProductDependency]
action: setup
requiredProduct: mshotfix
requiredStatus: installed
requirementType: before
-
[Package]-Version
is for different package versions from the same product version. This helps to distinguish packages build from the same product version but with different opsi-winst script for instance. -
[Package]-depends
refers to the base package of an incremental package. -
[Package]-Incremental
specifies whether this is an incremental package. -
[Product]-type
marks the product type as localboot or netboot. -
[Product]-Id
is the general name of that product (like firefox), independent from the product version. -
[Product]-name
is the full name of the product. -
[Product]-Description
is an additional description for the product as shown in the opsi-configed as Description. -
[Product]-Advice
is an additional hint for handling the product (caveats etc.) as to be shown in the opsi-configed as Note. -
[Product]-version
is the version of the original software. -
[Product]-Priority
affects (in combination with the product dependencies) the installation sequence. -
[Product]-productClasses
is for future use. -
[ProductProperty]-type
Type of the property: (unicode/boolean) -
[ProductProperty]-name:
Name of the property. -
[ProductProperty]- multivalue
May this property contain a list of values (True/False) -
[ProductProperty]- editable
Is this property free editable or may the user only select on of the values (True/False) -
[ProductProperty]-description:
Description of a property (Tool-tip in the opsi-configed). -
[ProductProperty]-values :
List of allowed values. -
[ProductProperty]-default :
Default value of the property. -
[ProductDependency]-Action :
To which product action this dependency entry belongs (setup, uninstall …). -
[ProductDependency]-Requiredproduct:
Product ID of the product to that a dependency exists. -
[ProductDependency]-Required action:
The required action of the product, which the dependency entry refers to. Actions could be setup, uninstall, update… -
[ProductDependency]-Required installation status:
The required status of the product, which the dependency entry refers to. Typically this is installed, which results in setting this dependency product to setup, if it isn’t installed on the client yet. -
[ProductDependency]-Requirement type:
this is regarding the installation order. If the product, which the dependency entry refers to, has to be installed before the actual product installation starts, the Requirement type must be before. If the dependency product has to be (re-)installed after the actual product, the Requirement type is set to after. If there is no entry, the installation order is of no relevance.
The opsi python modules are located at:
-
Debian Lenny
/usr/share/python-support/python-opsi
/usr/share/python-support/opsiconfd -
Ubuntu Lucid
/usr/share/pyshared/python-opsi
/usr/share/pyshared/opsiconfd
-
opsipxeconfd
opsi daemon to administrate the files required for the PXE boot of the clients. -
opsi-admin
Starts the command line interface for the opsi python library -
opsiconfd
opsi daemon which is the central opsi configuration daemon. -
opsiconfd-guard
opsi daemon which monitors if the opsiconfd is running and restarts the opsiconfd if it isn’t running. -
opsi-configed
Command to start the opsi management interface -
opsi-convert
Script for converting between different backends. -
opsi-makeproductfile
Script for packing the opsi-package (opsi-product) -
opsi-newprod
Script for creating the structure and meta data files of a new opsi product -
opsi-package-manager
Script to unpack, install, remove, list opsi packages on one ore more servers (and a lot more). -
opsi-setup
opsi configuration utility
The opsi log files have the following format:
[Loglevel] Timestamp Message
The log levels are:
0 = nothing      (absolute nothing)
1 = essential    ("we always need to know")
2 = critical     (unexpected errors that my cause a program abort)
3 = error        (Errors that don't will abort the running program)
4 = warning      (you should have a look at this)
5 = notice       (Important statements to the program flow)
6 = info         (Additional Infos)
7 = debug        (important debug messages)
8 = debug2       (a lot more debug information and data)
9 = confidential (passwords and other security relevant data)In this directory are the log-files of the opsi-linux-bootimage. These log files will be named log.<IP-number>.
If the opsi-linux-bootimage couldn’t connect the web-service, you will find the logs in /tmp/log at the bootimage. In such case, there are two possible ways to get the log file:
-
You have a network connection to the client
You may use scp (winscp) to copy the log file from the running boot-image to your computer (login as root with password linux123). You have no network connection to the client
You have to use a USB stick.- Login as root with the password linux123
- Connect USB stick to the client and wait some seconds
-
use the command
sfdisk -lto check on which device you will find your stick - mount
- copy
- umount
A example session:
#sfdisk -l
Disk /dev/sda: 30401 cylinders, 255 heads, 63 sectors/track
Units = cylinders of 8225280 bytes, blocks of 1024 bytes, counting from 0

   Device Boot Start     End   #cyls    #blocks   Id  System
/dev/sda1   *      0+  30401-  30402- 244197528+   7  HPFS/NTFS
/dev/sda2          0       -       0          0    0  Empty
/dev/sda3          0       -       0          0    0  Empty
/dev/sda4          0       -       0          0    0  Empty

Disk /dev/sdb: 1017 cylinders, 33 heads, 61 sectors/track
Units = cylinders of 1030656 bytes, blocks of 1024 bytes, counting from 0

   Device Boot Start     End   #cyls    #blocks   Id  System
/dev/sdb1          0+   1016    1017-   1023580    b  W95 FAT32
/dev/sdb2          0       -       0          0    0  Empty
/dev/sdb3          0       -       0          0    0  Empty
/dev/sdb4          0       -       0          0    0  Empty
# mount /dev/sdb1 /mnt
# cp /tmp/log /mnt
#umount /mnt
In this directory are the log-files of the opsi-client-agent running on the client.
The client log files will be named <client FQDN>.log. On the client you will find this file at c:\tmp\opsiclientd.log.
In this directory are the log-files of the opsi-winst running on the client. The client log files will be named <client FQDN>.log. On the client you will find this file at c:\tmp\instlog.txt
In this directory are the log-files of the opsiconfd and the clients.
The client log files will be named log.<IP-number> and (if available) a symbolic link named <IP-Name>.log to log.<IP-number> is created.
Log file the opsipxeconfd
that administrates the tftp files for the PXE boot of the clients.
The log of the tftpd you will find at /var/log/syslog.
You should increase the log level to see important information.
At the file /etc/inetd.conf in the line starting with tftpd set the parameter verbose to 7 :
tftp dgram udp wait nobody /usr/sbin/tcpd /usr/sbin/in.tftpd --tftpd-timeout 300 --retry-timeout 5 --mcast-port 1758 --mcast-addr 239.239.239.0-255 --mcast-ttl 1 --maxthread 100 --verbose=7 /tftpboot
If this is done execute:
killall tftpd
killall -1 inetd
Log file of the opsiclientd
This file is copied at the end of a event to server at /var/log/opsi/clientconnect/<pc-ipnummer.log>.
-
bootmode= <bkstd | reins>
Stores the information whether the client is new installed or not.
Get your localization code:
http://www.gnu.org/software/gettext/manual/html_node/Usual-Language-Codes.html
Example:
- en
- English
- de
- German
- fr
- French
- it
- Italian
- da
- Danish
opsi has localizations for:
- English
- German
- French
- Italian
- Danish
If it is possible for a localized part of opsi to detect what is your standard language it will switch automatically. If ths is not possible in most cases English is the fallback language and in some cases still German.
Some Parts of opsi have no chance to detect the language to use, so you have to help a little:
-
Bootimage:
Edit on your Server the file
/tftpboot/linux/pxelinux.cfg/install. Append to theappendlinelang=<code>for examplelang=fr.
We are always very happy if you like to make a new localization or correct a existing. Here some hints how to start.
Many localizations are done in the standard GNU *.po files.
You may use the poedit application for editing for editing:
http://download.uib.de/opsi4.0/products/contribute/full-package/poedit_1.4.6-1.opsi
or
http://www.poedit.net/
You will find the po files for the opsi-winst here:
opsi-winst: at svn.opsi.org repo: opsi-winst branches/4.11.3/languages:
A modified new opsi-winst.po you may test by just store it in the opsi-winst\languages directory.
You will find the po files for the opsiclientd here:
You will find the po files for the python-opsi here:
You will find the po files for the opsi-utils here:
You will find the po files for the opsi-configed here:
opsi-configed (stable): at svn.opsi.org repo: opsi-configed/trunk/classes/de/uib/messages
The latest (unstable) version you will find at our experimental repositories. For example: http://download.opensuse.org/repositories/home:/uibmz:/opsi:/opsi40-experimental/Debian_6.0/all/opsi-configed_4.0.2.2-1_all.deb
If you unzip configed.jar you find the translation files in de/uib/messages. There you can replace the file, pack (zip) again the archive and retry the program.
You have to modify the valid_translations.conf and add a new configed_da.properties and a da.png
Since we introduced some signing mechanisms the procedure to get a new working configed.jar has become a little bit more complicated.
One option that your really check out the configed code from svn.opsi.org (where you will find the last stable version), add a configed_da.properties, a da.png and a new valid_localisations.conf (as you provided). Then you may use the bash scripts compile.sh plus sign_jars.sh to produce new signed configed.jar and swingx.jar files. You may put the jars to /usr/lib/configed in order to see it in browser (after reopening the browser).
It is also possible just to put the additional needed files to a unpacked configed.jar, but then you have to rebuild it with the java packager jar. Since it is not signed it cannot be used via the browser.
So you may directly have a look at the result of your work.
One part will be the localization of the message entries of the opsiclientd.conf like for example:
# Message shown in the action notifier window (string)
action_message = Starting to process product actions. You are allowed to
cancel this event a total of %action_user_cancelable% time(s). The event
was already canceled %state.action_processing_cancel_counter% time(s).
# German translation (string)
action_message[de] = Starte die Bearbeitung von Produkt-Aktionen. Sie
können diese Aktion insgesamt %action_user_cancelable% mal abbrechen.
Die Aktion wurde bereits %state.action_processing_cancel_counter% mal
abgebrochen.
You will find the opsiclientd.conf here: